How to Fix: iPhone Not Recognized in iTunes or in Windows 10, 8 or 7 (Solved)
The problem is old: The iPhone is not recognized properly in Windows (Device Manager) or in iTunes application. In fact, when you connect the iPhone on Windows 7, 8 or 10, you receive the following error message: "Windows encountered a problem installing the driver software for your device".
As a result of that problem, the "Apple Mobile Device USB Driver" is displayed with a yellow sign (exclamation point) or with a question mark in Windows Device Manager, your iPhone device is not listed in Windows File Explorer and iTunes application cannot recognize your iPhone device.
In this tutorial you 'll find instructions on how to resolve the following problem: iPhone Not Recognized from Windows or iTunes (Windows 10, 8.1, 8 or 7).
How to Fix: iPhone, iPad, or iPod not recognized by Windows or iTunes.
Method 1. Connect iPhone while UNLOCKED.
Method 2: Install Latest Windows Updates.
Method 3. Uninstall and Reinstall iTunes.
Method 4. Install/Update the iPhone Driver Manually.
Method 5. Disable Driver Signature Enforcement.
Method 1. Connect iPhone while UNLOCKED.
1. Before connecting iPhone to your computer, first UNLOCK IT.
2. Then connect the iPhone to you PC while it is still Unlocked.
– Windows and iTunes should recognize your iPhone Device without problems. If not, then continue to the next method.
Method 2: Install Latest Windows Updates.
Make sure that you have installed all the available Windows Updates. To do that:
Windows 7.
1. Go to Start > Settings > Control Panel.
2. Change the View by setting on the top right corner to Small icons.
3. Open Windows Update.
4. Then Check for updates and install all available updates found.
Windows 10.
1. Click the Start button and select Settings.
2. Select Update & security > Windows Update.
3. Then Check for updates and install all available updates found.
Method 3. Uninstall and Reinstall iTunes.
1. Navigate to Windows Control Panel > Programs and Features.
2. Uninstall the following Apple's applications:
i. iTunes
ii. Bonjour
iii. Apple Application Support.
iv. Apple Mobile Mobile Device Support.
3. After uninstall, restart your computer.
4. Download and install the latest iTunes version.
Method 4. Install/Update iPhone's Driver Manually.
1. Navigate to Windows Device Manager.
2. Expand Universal Serial Bus controllers.
3. Right click at the yellow signed "Apple Mobile Device USB Driver" and select Update Driver Software.
4. Select "Browse my computer for driver software".
5. Then select "Let me pick from a list of device drivers on my computer".
6. At this point try the following:
Option 1. Install the "MTP USB Device"
1. Select the MTP USB Device and then press Next.
– If Windows fails to install the MTP USB Device driver, then try the Option 2.
Option 2. Install the "Apple Mobile Device USB Driver" from a different driver location.
1. Select the Have Disk button.
2. Then, navigate to the following location on your hard disk C:
- C:\Program Files\Common Files\Apple\Mobile Device Support\Drivers
OR
- C:\Program Files (x86)\Common Files\Apple\Mobile Device Support\Drivers (if you 're using 64bit Windows).
3. Select the usbaapl64 (.inf file) and click Open.
4. Press OK to install the "Apple Mobile Device Support Driver".
5. Finally press Next and let Windows install the driver.
6. When the installation is completed, unplug your iPhone. *
7. Then unlock your device and connect it to your computer again.
8. Finally, launch iTunes and see if your iPhone device is recognized.
* Note: If the installation fails again with the error descripted below, then disable Driver Signature Enforcement by following the steps in the next method.
"Windows encountered a problem installing the driver software for your device.
Apple Mobile Device USB Driver
Windows cannot verify the digital signature for the drivers required for this device. A recent hardware or software change might have installed a file that is signed incorrectly or damaged, or that might be malicious software from an unknown source. (Code 5232)".
Method 5. Disable Driver Signature Enforcement and reinstall iPhone drivers.
Step 1. Completely Uninstall Apple's software.
– Follow the instructions in Method 3 above and remove all installed software from Apple (iTunes, bonjour, etc.).
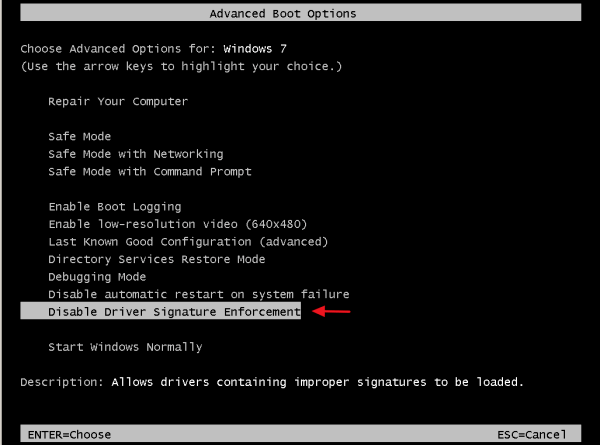
Step 2. Enter in Advanced Options menu / Disable Driver Signature Enforcement.
Windows 7 & Vista.
– To enter in Advanced Options menu in Windows 7 and Vista OS:
1. Close all programs and reboot your computer.
2. Press the "F8" key as your computer is booting up, before the appearance of the Windows logo.
3. When the "Windows Advanced Options Menu" appears on your screen, use your keyboard arrow keys to highlight the “Disable Driver Signature Enforcement” option and then press "ENTER".
Windows 10, 8 & 8.1.
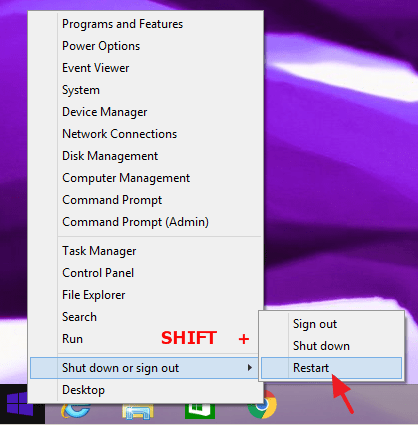
– To enter in Advanced Options menu in Windows 10, 8.1 & 8 OS:
1. Right click at the Windows Start button ![]() and select Shut Down or sign out.
and select Shut Down or sign out.
2. Press and HOLD down the SHIFT key and then click Restart.
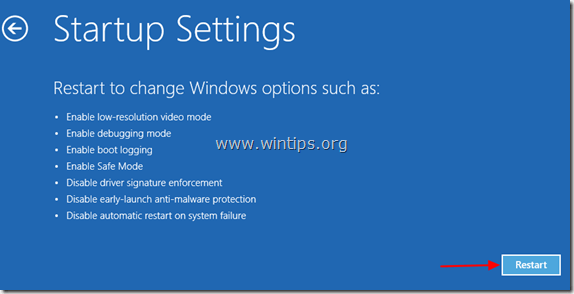
3. When Windows restarts, select Troubleshoot > Advanced Options > Startup Settings.
4. In Startup Settings screen, click Restart.
5. After restart, select the Disable driver signature enforcement option and press Enter. *
* Note: If you see the below screen (Startup Settings), press the “F7” (or the “7”) key on your keyboard to select the“Disable driver signature enforcement” option.
Step 3. install iTunes software & iPhone Drivers.
– When Windows starts:
1. Install the latest iTunes version.
2. Unlock your iPhone device and connect it on the computer.
3. Let Windows to install the needed drivers for your device.
4. Launch iTunes and see if your device is recognized.
That's it! Let me know if this guide has helped you by leaving your comment about your experience. Please like and share this guide to help others.
We're hiring
We're looking for part-time or full-time technical writers to join our team! It's about a remote position that qualified tech writers from anywhere in the world can apply. Click here for more details.
- How to Disable or Remove BitLocker from Windows RE. - April 24, 2024
- FIX: Error 0x8007025d in Windows 10 Update. - April 22, 2024
- How to Disable Device Encryption in Windows 11/10. - April 17, 2024


