
How to fix Windows 10 Update Problems.
This troubleshooting guide contains several methods to help users to fix Windows 10 Update problems such as errors during downloading or installing updates or other issues that may occur while upgrading Windows 10 to a most recent version (build).
Many Windows 10 PC owners face several problems during the installation of a new critical Windows 10 update and in most cases, the update installation error message, such as the "Something Happened – Windows 10 Installation Has Failed" or the "Feature update to Windows 10 Failed to install", does not help solve the problem. (I never understood why updating a system that works normally should be so time-consuming and often unsuccessful).

Unfortunately, there is not only one method to solve all the different problems that may occur during updating or upgrading Windows 10, so I decided to write this guide which includes all the methods that I have used from time to time to solve similar problems.
Windows 10 update or upgrade issues that were fixed with this troubleshooting guide:
Windows 10 Update Installation is stuck/freezes
Windows 10 Upgrade Installation is stuck/freezes
Windows 10 Installation Error: Something Happened – Windows 10 Installation Has Failed.
Feature update to Windows 10 Failed to install.
Windows 10 Update fails to install.
Windows 10 could not complete the installation of an update.
Windows 10 cannot find or download updates.
How to Solve Windows 10 Update or Upgrade Problems
Important: Before applying the methods mentioned below to troubleshoot Windows 10 Update/Upgrade issues, proceed and apply the following steps and then try to update Windows 10 again.
Step 1. Ensure that you have signed in with an account with administrative privileges.
Step 2. Make sure that the Date, Time & Regional settings are correct.
Step 3. If you have enabled the device encryption on your system (BitLocker, VeraCrypt), then proceed and decrypt the drive C: before installing the update.
Step 4. Open Windows Services and set the following services to start Automatically at Windows Startup (Startup type=Automatic).
- App Readiness
- Background Intelligent Transfer Service
- Cryptographic Services
- Windows Modules Installer
- Windows Update
Step 5. Disconnect all the peripheral devices that you don't need (e.g. USB Drives, SD Cards, USB Wireless Mouse or Keyboard Receiver, USB Wireless Network Card, Printer etc.).
Step 6. Turn off the Developer Mode:
- Go to Settings -> Update and Security -> For developers -> Select Sideload apps and then click Yes to confirm.
- Then, navigate to Settings –> Apps -> Manage optional features -> Windows Developer Mode –> click Uninstall.
- Restart your PC and try to update.
Step 7. Make sure that your computer is clean from viruses and malware. To accomplish this task you can use this Malware Scan and Removal Guide to check and remove viruses or/and malicious programs that may be running on your computer.
Step 8. At Power Options (in Control Panel), set Put the computer to Sleep to Never & also disable the Fast Startup.
Step 9. Make sure that you have enough free space on your disk (at least 30GB).
Step 10. Delete the useless files with Disk Cleanup. by using the instructions in this tutorial: How to Free Up Disk Space with Disk Cleanup.
Step 11. Download and install the latest Servicing stack update, for the installed Windows 10 version and architecture (32/64-bit). (To view the installed Windows 10 version/architecture, go to: Start -> Settings –> System –> About.)
Step 12. Update essential device drivers. Navigate to your hardware's vendor support site and download and install the latest drivers for the Chipset and the Graphics adapter (VGA). Additionally, sometimes there is the need to uninstall the VGA driver or to update the system BIOS in order to install an update.
Step 13. Disable -or better- temporarily uninstall all non-Microsoft security software (antivirus, antimalware, firewall, etc.), to avoid compatibility issues with the latest Windows updates.
Step 14. Disable the Secure Boot from BIOS settings.
Method 1. Run the Windows Update Troubleshooter.
Method 2. Force Windows to re-create the Windows Update Store folder.
Method 3. Update Windows 10 Manually with Update Assistant
Method 4. Install the Windows 10 Updates in Clean Boot Mode.
Method 5. FIX Corrupted System Files and Services with DISM & SFC tools.
Method 6. Check Disk for Problems
Method 7. Identify the Cause of the Problem with SetupDiag.
Method 8. Repair Windows with an In-Place Upgrade.
Method 9: Update Windows by using the WSUS Offline Update tool.
Method 10. Perform a Clean Installation of Windows 10.
Method 1. Run the Windows 10 Update Troubleshooter.
The first method to fix Windows 10 update problems is to run the Microsoft's Windows 10 Update Troubleshooter tool in Administrator mode. To do that:
1. Navigate to Control Panel –> Troubleshooting –> Fix problems with Windows Update.

2. When the troubleshooting process is complete, restart your computer.
3. Try to install the update.
Method 2. Force Windows to re-create the Windows Update Store folder
The second method to fix problems with the updates in Windows 10, is to recreate the Windows Update Store folder ("C:\Windows\SoftwareDistribution"), which is the location where Windows stores the downloaded updates. To do that:
1. Simultaneously press the Windows ![]() + R keys to open run command box.
+ R keys to open run command box.
2. In run command box, type: services.msc and press Enter.

3. Right click on Windows Update service and select Stop.

4. Open Windows Explorer and navigate to C:\Windows folder.
5. Select and Delete the “SoftwareDistribution” folder.*
(Click Continue at "Folder Access Denied" window).
* Note: The next time that the Windows Update will run, a new empty SoftwareDistribution folder will be automatically created by Windows to store updates.

6. Restart your computer.
7. Download and run the Windows Update Troubleshooter for Windows 10 from Microsoft's support site.
8. Reboot your computer.
9. Check and install Windows updates.
Method 3. Download and install the Windows 10 Update Manually.
The next method, to resolve the Windows 10 update issues is to download and install the failed update manually. To do that follow the instructions below according your case:
Case A: If you want to upgrade your Windows 10 version (e.g. from 1703 o 1709):
1. Navigate to Windows 10 download site and click the Update now button.

2. When asked, click to Run the downloaded file in order to start the installation immediately, or click the Save button to run the installer later.

3. Finally click the Update Now button and follow the on screen prompts to install the Update.

Case B: If you have problems when installing a standalone update:
1. Go to Settings –> Update & Security and open the Update History
2. Find out the KB number of the failed update. (e.g. "KB4025339")
3. Navigate to Microsoft Update Catalog.
4. Type the KB number of the failed update and click search.

5. Download and then install the update.
Method 4. Install Windows 10 Update in Selective Startup Mode (Clean Boot Mode).
1. Simultaneously press the Windows ![]() + R keys to open the 'Run' command box.
+ R keys to open the 'Run' command box.
2. In run command box, type msconfig press Enter to open the System Configuration utility.

3. At Services tab, check the Hide all Microsoft services checkbox.

4. Then press the Disable all button, to disable all non Windows services that start with Windows.

5. Then select the Startup tab and click Open Task Manager.

6. Select one by one all startup items and click Disable.
7. Finally click OK and restart your computer.
8. Try to install the update. If the update installed without problems, then run "msonfig" again, check the "Normal Startup" at General tab, click OK and restart your computer normally.
Method 5. FIX Windows corruption errors with DISM & SFC tools.
1. Open command prompt as administrator. To do that:
1. In the Search box type: cmd or command prompt
2. Right click on the command prompt (result) and select Run as Administrator.

2. At the command prompt window, type the following command & press Enter:
- Dism.exe /Online /Cleanup-Image /Restorehealth

3. Be patient until DISM repairs component store. When the operation is completed, (you should be informed that the component store corruption was repaired), give this command and press Enter:
- SFC /SCANNOW

4. When SFC scan is completed, restart your computer.
5. Try to update your system again.
Method 6. Check and Repair Hard Disk Errors.
If the hard disk contains errors, Windows 10 update will not be successful. So, proceed to check and repair the hard drive and then try to install the update again. To check and repair errors on your hard drive:
1. Open command prompt as administrator.
2. At command prompt, give the following command and press Enter: *
- chkdsk /R
* Notes:
1. You will be required to reboot the computer if run the CHKDSK command on the system drive.
2. By default the CHKDSK command, will check your main C: drive for errors. If after checking the drive C:, you want to repair errors on another drive (e.g. the drive "E:" ), then switch to that drive (e.g. by typing E: & pressing Enter) and give the same command.
Method 7. Identify the Cause of the Problem with SetupDiag.
The next method to fix problems when upgrading Windows 10, is to diagnose the cause of the problem by using the SetupDiag tool. To do that, follow the instructions in this article: How to Use SetupDiag to Diagnose Windows 10 Upgrade Problems.
Method 8. Repair Windows 10 with an in-place Upgrade.
Another method that usually works, to fix Windows 10 update problems, is to perform a Windows 10 Repair-Upgrade, by using the Media Creation tool to create an ISO or USB Windows 10 install media. For that task follow the detailed instructions on this article: How to repair Windows 10.
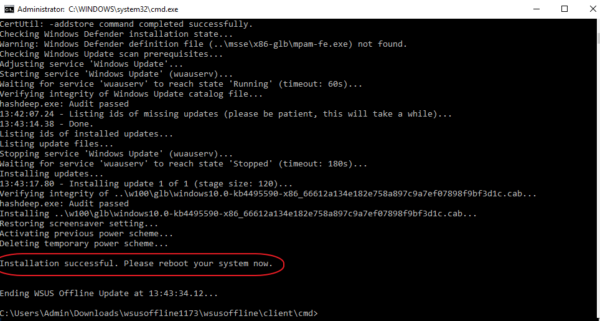
Method 9. Update Windows by using the WSUS Offline Update tool. (Windows 10, 8.1, 8 or 7).
1. Download the latest version of WSUS Offline Update utility.
2. After the download, extract the "wsusoffline.zip" file.
3. From the "wususoffline" folder, double click at UpdateGenerator.exe application.
4. At Windows tab, select the Windows Edition, that you are using.
5. Press the Start button.

6. Be patient until the WSUS Offline Update utility downloads all the available updates.

7. When the download is completed, open the client folder (wsusoffline\client), right click at "UpdateInstaller.exe" application and select Run as Administrator.

8. Finally press the Start button and be patient until the WSUS Offline Update installer, installs the downloaded updates to your system.
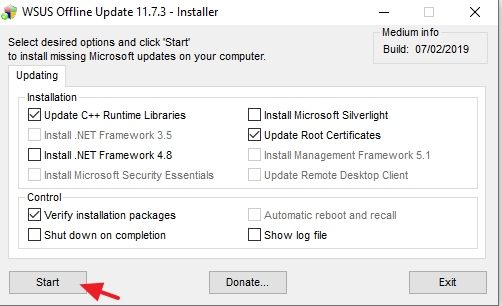
9. When the installation is completed, reboot your PC.
Method 10. Perform a Clean Windows 10 installation.
Many times, especially in computers with oldest Chipset and CPU, it is better and less time consuming to backup your files and to RESET your PC or to perform a clean Windows 10 installation, than to try to resolve update problems in Windows 10.
That's it! Which method worked for you?
Let me know if this guide has helped you by leaving your comment about your experience. Please like and share this guide to help others.

- How to Resolve Hyper Backup Error "Failed to Export System Configuration" on Synology NAS. - June 17, 2026
- How to Require MFA for All Users in Microsoft 365 with a Conditional Access Policy. - June 15, 2026
- How to Resolve Error "Something Went Wrong 657rx" in Outlook or Microsoft 365 Apps. - June 10, 2026


July 2, 2019 @ 1:34 am
Thank you for such a comprehensive guide. However, I am still unable to install Windows 10 1308 or 1903. I have tried all Methods except Method 9. I don't see why I would have to do a fresh install just for an upgrade.
On Method 8 using the WSUS client, Step 8. Place a check at "Automatic reboot and recall" checkbox that option is grayed out and not available. How can I get that enabled?
Also, any advice you may have for me with regards to upgrading Windows 10 pro would be appreciated. When the Windows updater runs it just loops (downloads, restarts, and begins downloading the same 1308 again utilizing RAM) Prior to all the mentioned Methods, I got all kinds of error codes from 0xc800704c7, 0xc1900130 and Windows is no longer crashing. The WSUS client says there are no missing updates found yet I am still running Windows Pro version 1709 and it downloaded and verified 33 updates.
Any advice is appreciated. Thanks in advance!
July 2, 2019 @ 10:04 am
@Genevieve: Have you applied all the recommendations before applying the methods? Also you have tried the repair upgrade of Win10.?
June 12, 2019 @ 6:51 pm
Nicr tut, I think most users could be helped. But…
Today (jun 12 2019) at 13:05 mu pc with windows 10 Pro N asked me to restart to run the updare. It is 18:05 now, screen is still black, occasionally it shows the cursor with the spinning wheel amd that's it.
I run a 'dual boot' (in bootrec). As long as I cannot get into my W10pN, there is nothing I can do.
I do have the option at boot to switch to PE mode, but restore to a previous situation, e.g. Before installing something yesterday, but that does not work.
What options do I have?
June 13, 2019 @ 10:41 am
@Harry Betlem: Have you tried to boot your PC from a Windows installation media and then to restore it?
May 30, 2019 @ 5:16 pm
Very helpful! Thanks!
August 27, 2018 @ 12:39 pm
In windows 10 always updating is very worst because when system connects a internet then automatically update on but here you give the solution this problems so thanks for sharing this information.
April 6, 2018 @ 1:13 am
Eureka! The Reset PC feature in Windows solved the following error I kept getting when trying to update my computer to Windows 10 version 1709: "could not reconfigure one or more windows components" – Thank you.