How to Encrypt Drive C: with VeraCrypt in Windows (All Versions).
This tutorial contains detailed instructions on how to encrypt the operating system drive C: on Windows by using the VeraCrypt free encryption program. VeraCrypt is a free open source disk encryption software which is available for Windows (all versions), Mac OSX and Linux.
As you may know, one of the major ways to protect your personal, is to always have a backup of them, on a separate device, like on an external USB drive, and to keep this device in a safe place and unplugged from your computer, in order to avoid the damage of your data after a malware attack. To accomplish this task, follow the instructions from these articles:
- How to Backup and Restore your Personal Files with Windows Backup.
- How to Backup Personal Files with SyncBack (Free) Backup Utility.
One other significant way to protect your PC and your sensitive data, in order to become inaccessible at the wrong hands (e.g. in case that you lose your device or becomes stolen), is to lock and encrypt your computer with a strong encryption program. For this task, you can use Microsoft's BitLocker program if you own Windows 10, 8/8.1 Professional or Enterprise edition, or you can use the VeraCrypt free encryption program which can work in -almost- all Windows versions and editions (Home, Pro, Enterprise, etc.).*
* Note: VeraCrypt can encrypt the following operating systems:
-
- Windows 10
- Windows 8 and 8.1
- Windows 7
- Windows Vista (SP1 or later)
- Windows XP
- Windows Server 2012
- Windows Server 2008 and Windows Server 2008 R2 (64-bit)
- Windows Server 2003
- Related article: How to Encrypt your PC with BitLocker in Windows 10 Pro & Enterprise.
How to Encrypt your Windows PC with VeraCrypt.
To protect your Windows PC (System Drive & Contents) with VeraCrypt:
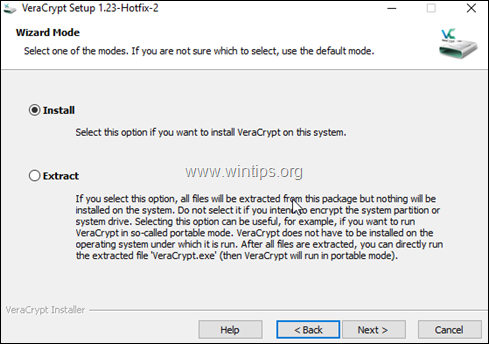
1. Download and Install VeraCrypt on your PC. *
* Note: Always install VeraCrypt with local administrative privileges.
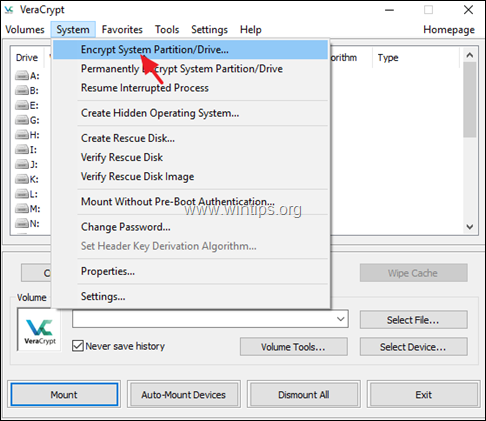
2. When the installation is completed, launch VeraCrypt and from the System menu, select Encrypt System Partition/Drive.
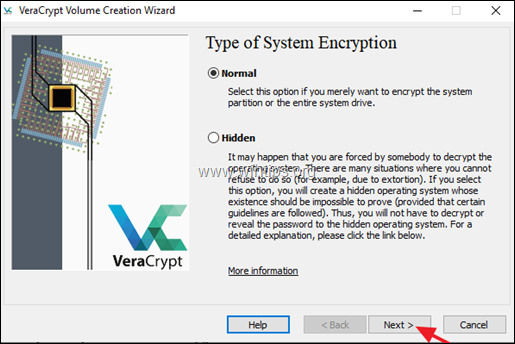
3. At type of System Encryption options, leave Normal and click Next.
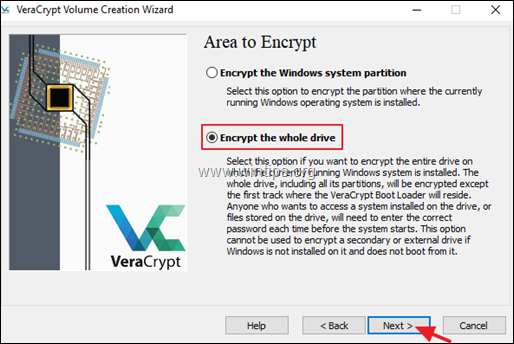
4. At the Area to Encrypt window, select to Encrypt the whole drive. *
* Notes:
1. Encrypting the whole drive is the best option, because it protects your PC with a password before it starts (pre-boot authentication).
2. If the "Encrypt the whole drive' option is not available (greyed out), then you have to disable the "Secure Boot" in BIOS before running the VeraCrypt.
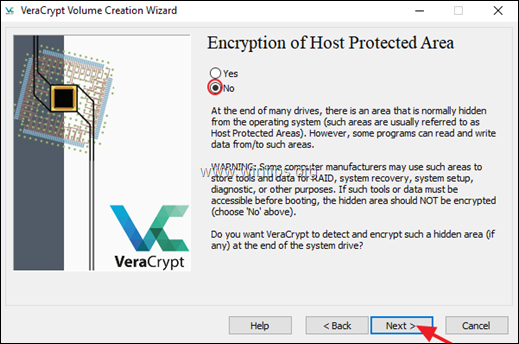
5. Select No at Encryption of Host Protected Area options and click Next to continue.
6. At Number of Operating Systems options, select Single-boot, unless you have installed multiple operating systems (Multi-boot) and click Next to continue.
7. Leave the default Encryption Options (AES / SHA-256) and click Next.
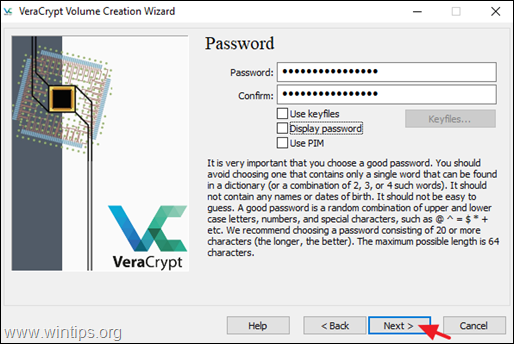
8. Now type a strong password* and click Next to continue.
* Note: A very strong password must consisting of 20 or more characters and it must contain upper and lower case letters, numbers, special symbols, etc..
TIP: Check the "Display Password" checkbox to verify what you typing.
9. At Collecting Random Data window, move your mouse as randomly as possible within the window to increase the cryptographic strength. When the 'Randomness' bar becomes green press Next to continue.
10. At Keys Generated window, click Next.
11. At Rescue Disk window, note the path for the VeraCrypt Rescue Disk ISO image and click Next if you wish to create the Rescue Disk immediately, or select the Skip Rescue Disk verification checkbox to create the Rescue disk later.
* Notes:
1. For prevention purposes, its better to create immediately the Rescue disk and also to have a copy of the VeraCrypt Rescue Disk ISO image file to another computer.
2. If you want to create a VeraCrypt USB rescue disk, then you can use the Rufus utility to burn the VeraCrypt Rescue Disk ISO image to USB.
3. It's very important to create the VeraCrypt Rescue Disk, because will help you to recover your system at the following situations:
1. If the VeraCrypt Boot Loader, master key or other critical data gets damaged.
2. If Windows gets damaged and you cannot start the system.
12. At next, VeraCrypt will prompt you to create immediately a VeraCrypt Rescue CD or DVD. Click OK to continue.
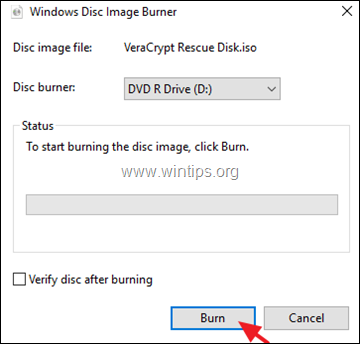
13. Now, place an empty CD or DVD on the disc burner and click the Burn button to create the Vera Crypt Rescue disk or click Cancel if you want to create the rescue disk later or if don't own a disc burner.
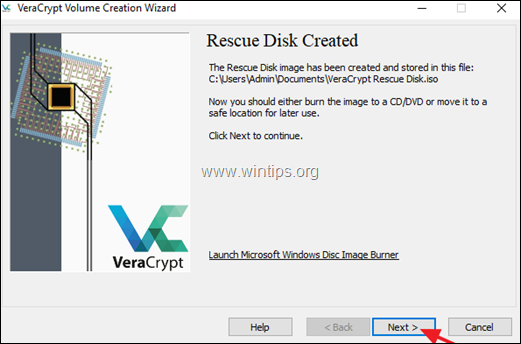
14. When the Recue Disk is created click Next.
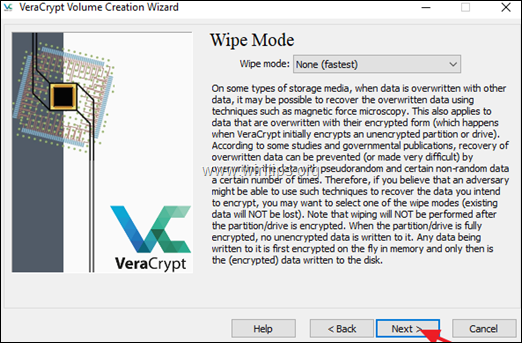
15. At the Wipe Mode screen click Next.
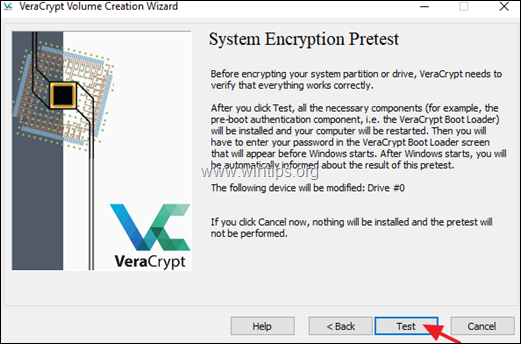
16. At System Encryption Pretest screen, click the Test button in order to verify that everything works correctly.
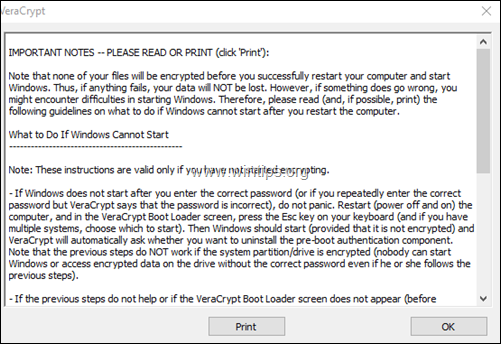
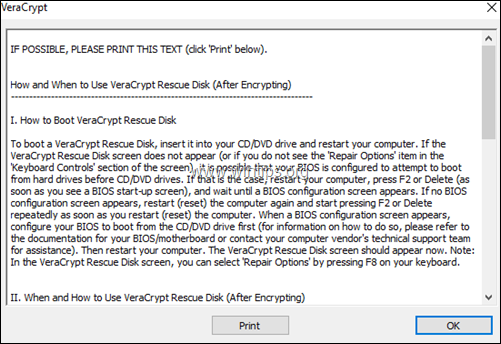
17. Now carefully read the 'Important Notes' (or better print them) to be ready if something goes wrong and click OK.
18. Then click Yes to restart your computer, in order to start the System Encryption Pretest.
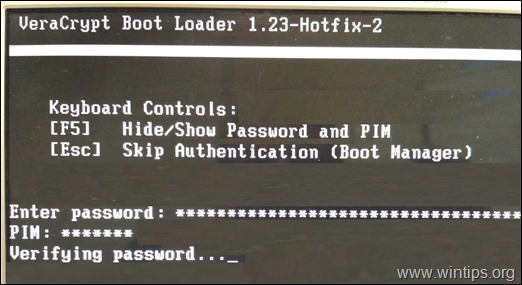
19. At system restart you 'll be prompted to enter your VeraCrypt password and the PIM. So type your password and hit Enter and then hit Enter again at the PIM prompt. *
* Note: If you repeatedly enter the correct password but VeraCrypt says that the password is incorrect), do not panic (the drive is not encrypted yet). Just restart (power off and on) the computer and in the VeraCrypt Boot Loader screen, press the Esc key on your keyboard and Windows will start. Then when asked by VeraCrypt, uninstall the pre-boot authentication component.
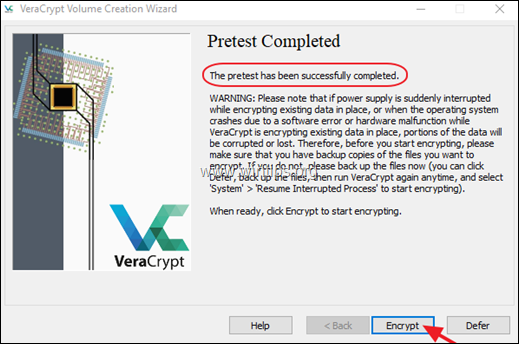
20. After booting to Windows, VeraCrypt should inform you that the pretest has been successfully completed. Read carefully the warning on the screen and when done press Encrypt to start the encryption process.
21. Now carefully read (or better print) the instructions on the screen and click OK
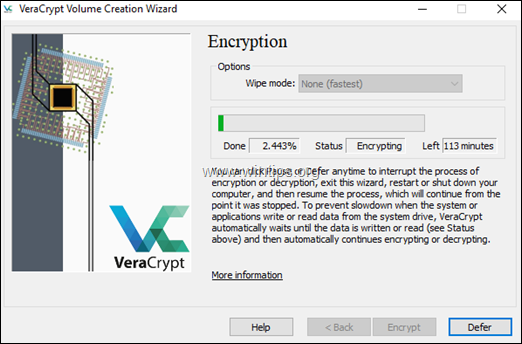
22. Finally wait until the encryption is completed. The encryption time varies, according the size of the hard drive but you can work at your computer during the process. *
* Note: If you want to cancel or to postpone the encryption process, click the Defer button, and then from VeraCrypt program go to:
- System -> Resume Interrupted process: if you want to resume the encryption process.
- System -> Permanently Decrypt System Partition/Drive if you want to terminate the encryption process.
23. When the encryption process is completed then your system is protected and nobody can start Windows or access the encrypted data on the drive without having the correct password. *
* Suggestion: Do not forget to always have a recent backup of your data on a separate device (e.g. on an external USB drive), stored in a safe place.
How to use the VeraCrypt Rescue disk if you face problems:
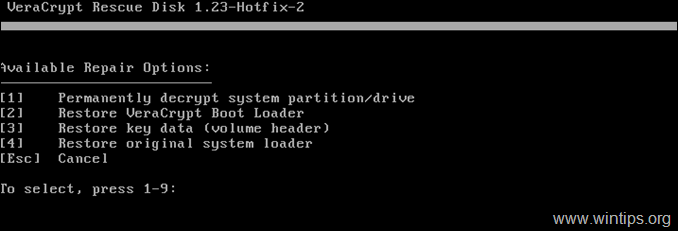
If your VeraCrypt protected computer cannot start normally, then boot your computer from the VeraCrypt rescue disk (CD/DVD or USB), and then press the F8 key to access the repair options. Then press the corresponding number key to start the repair action you want, according of the problem.
- [1] Permanently decrypt system partition/drive: Use this option if Windows cannot start (after entering your password), in order to permanently decrypt the partition/drive.
- [2] Restore Vera Crypt Boot loader: Use this option if the VeraCrypt Boot Loader screen does not appear on the screen after you start your computer (or if Windows does not boot), to restore the boot loader and to regain access to your encrypted system and data.
- [3] Restore key data (volume header): Use this option to restore the master key or other critical data, if you repeatedly enter the correct password but VeraCrypt says that the password is incorrect.
- [4] Restore Original System Loader: Use this option after decrypting the system partition/drive in order to restore the original system loader (Windows)
That’s it! Let me know if this guide has helped you by leaving your comment about your experience. Please like and share this guide to help others.
We're hiring
We're looking for part-time or full-time technical writers to join our team! It's about a remote position that qualified tech writers from anywhere in the world can apply. Click here for more details.
- FIX: Numeric keypad Not Working on Windows 10/11 - July 24, 2024
- How to Share Files or Printers in Hyper-V? - July 22, 2024
- How to invoke Hyper-V Screen resolution prompt? - July 17, 2024

