How to Backup Personal Files with SyncBack (Free) Backup Utility.
One of the worst nightmares in the computer world is to lose our personal data due to a disk crash or due to an accidental data deletion. It is, therefore, of high importance to keep an up-to-date back up copy of all our important data (documents, emails, favorites, etc.) to another storage device. For that reason, I have prepared this article to guide you through the back up process of each separate type of files that you need to back up. (e.g. Documents, Emails, Bookmarks, etc.).
To make the backup job easier, I use the Free version of "SyncBack" backup utility offered by 2brightsparks. "SyncBackFree" is a lightweight free fast backup and synchronization software that can help users to make backup copies of their files easily. The program also includes many other useful features, like backup scheduling, file compressing, network backups, etc.
The tutorial contains detailed instructions on how to easy backup all your important data (Documents, Pictures, Music, e-Mail, Favorites) in Windows 10, 7, 8 or Vista, with the free SyncBack backup program. If you follow the below back up procedures regularly, you will not lose any precious data in case of data deletion or disk corruption.
- Related Article: How to Backup and Restore your Personal Files with Windows Backup
How to Backup your Personal Data using SyncBack (Free)
Step 1: Download & Install SyncBackFree
Step 2: Create a backup profile in SyncbackFree
Step 3: Backup Important Files (Documents. Pictures, Music, etc.)
Step 4: Backup Outlook, Outlook Express & Thunderbird Data
Step 5: Backup Favorites (Bookmarks) from IE, Firefox, Chrome
Step 1: Download & install SyncBackFree.
1. Download SyncBackFree from here.
2. Choose “Run” if you want to immediately install the SyncBackFree backup application or “Save” the “SyncBack_Setup.exe” on your disk for a later installation.
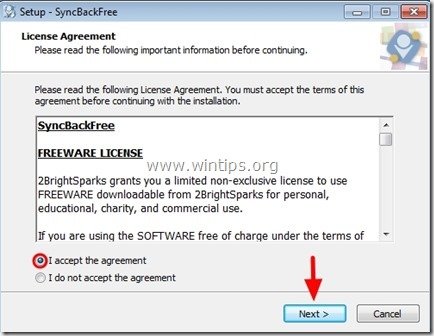
3. “Accept the License Agreement” and press “Next”.
4. Press “Next” at the rest installation steps.
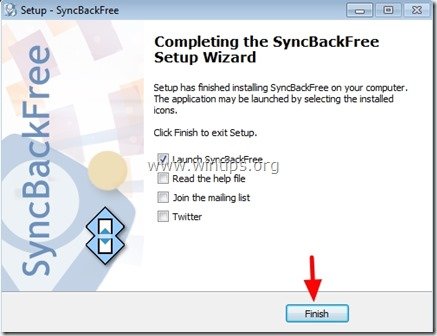
5. At the last installation screen, uncheck the “Join the mailing list” checkbox (if you want) and press the “Finish” button to run the SyncBackFree backup application. *
* Notice: If you would like, you can visit the official web page of SyncBack Free for information and to find manuals on how to use SyncBackFree program or you can press “No” to do that on a later time.
Step 2: Create a backup profile in SyncbackFree.
After SyncbackFree installation, we have to create a new profile for the backup. To do that:
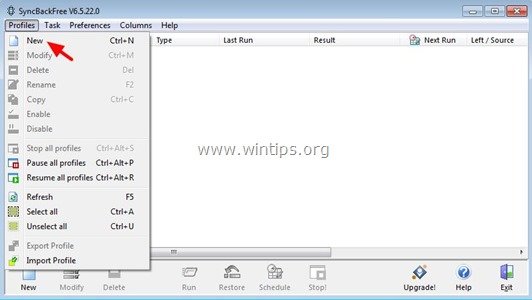
1. From the SyncBackFree main menu, navigate to “Profiles” and choose “New”.
2. Type a profile name (e.g. “MyFiles Backup”) and press “Next”.
3. Now you have to decide what type of backup (profile) you want to perform (e.g. “Backup”) and press “Next”:
- Backup: By choosing this profile, the program will copy all new and modified files from your backup source (e.g. your local disk) to your backup location (e.g. your external USB disk).
- Synchronize: By choosing this profile, the program will synchronize between two sources, the backed up source (e.g. your local disk) with your backup location (e.g. your external USB disk) to contain the same files.
- Mirror: If you choose the “Mirror” profile, then the program will create an identical backup of your backup source to your backup location. (The program deletes all the files from your backup location if they don’t exist in the backup source).
– At this point I prefer to choose to create a “Backup” profile because, in my opinion, it is the safest choice (e.g. in the case that you have accidentally deleted a file in your source, the file will not be deleted from the back up destination) *
* Note. Keep in mind that when you use a “Backup” profile, you may have unwanted/useless files in your backup location {e.g in the case that you have deleted a useless file from your backup source (e.g. your local disk), the file will remain in your backup location (e.g. the external USB Disk) and you have to delete it manually or to perform a Mirror backup}.
4. Press “Done” in the next screen.
5. Check the “Do not prompt me again” option and press “OK”.
6. Continue to the next step, to customize the “Backup” profile settings. (Choose Backup Source & Backup Destination and select which files you want to backup).

Step 3: Backup your important files with SyncBackFree.
In this step I'll show you, how to customize the backup profile in order to take a basic backup of our important files. The basic backup will be contain all the files that are created by you or that are important to you. (Documents, Photos, Music, Videos, etc.). So, let's start:
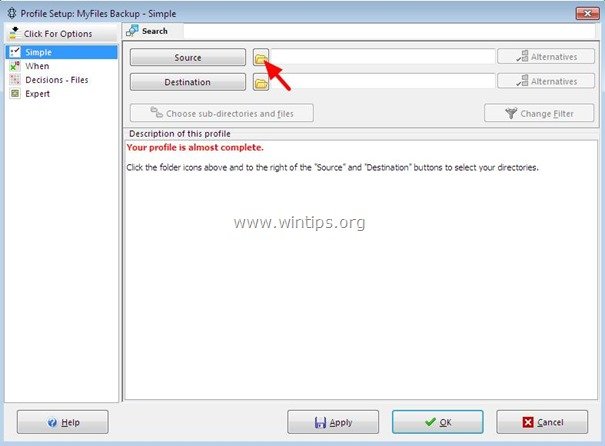
1. Click the folder icon next to Source in order to select the files and folders that you want to backup (backup source). *
* Note: If you don't see the below screen, then double click at the new created profile (e.g. "MyFiles Backup") at the main SyncBack screen.
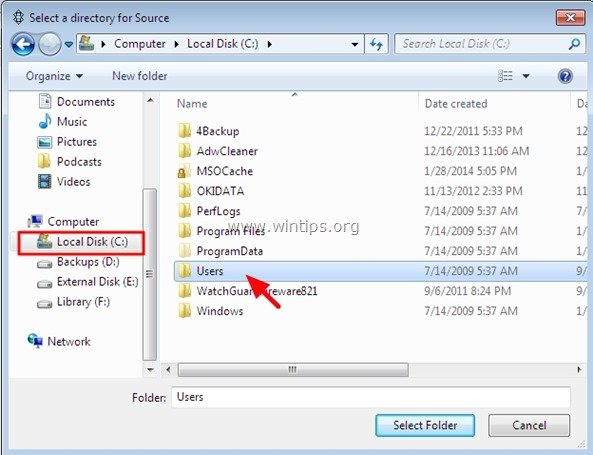
2. From the left pane select Local Disk (C:) & double-click to open “Users” folder*.
* If you have Windows XP double-click to open the “Documents and Settings” folder.
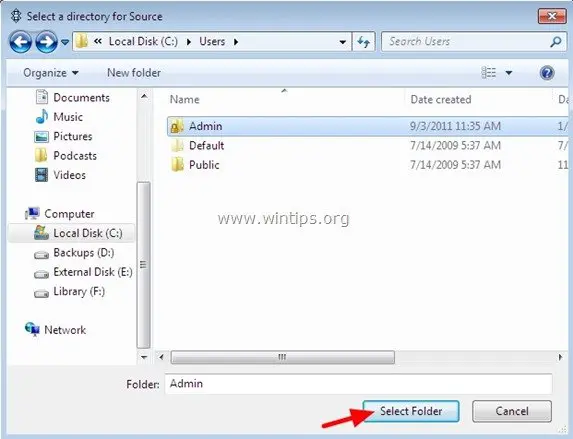
3. Click to select your username folder (e.g. “Admin”) and then press the “Select Folder” button.
4. Click the folder icon next to “Destination” in order to specify the backup location:.
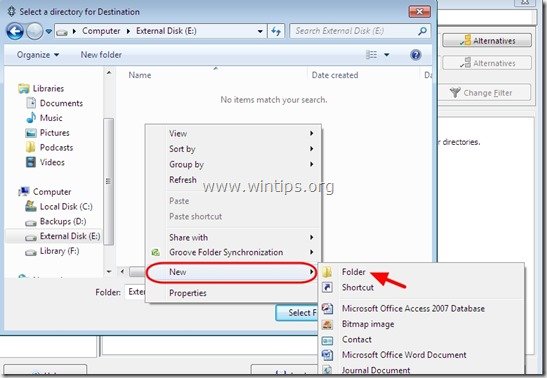
5. Select where your files will be saved (your backup location e.g. your external USB disk).
6. Create a recognizable folder for your backup: Right-click (at the right pane) and go to “New” > “Folder”.
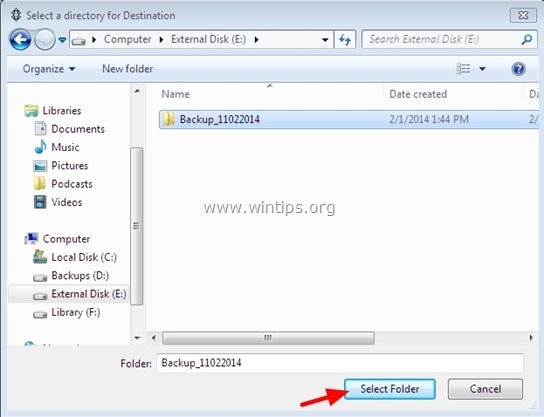
7. Give a name for the new backup folder (e.g. “Backup_11022014” and press the “Select Folder” button.
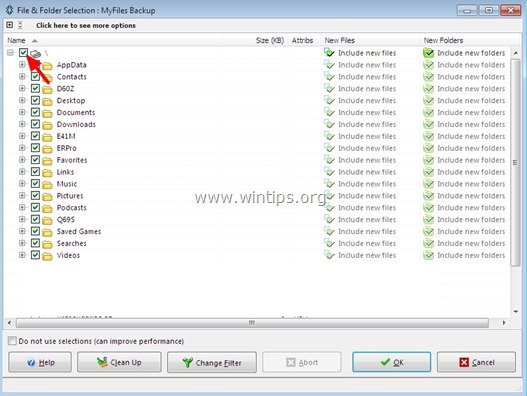
8. Now click Choose sub-directories and files button and select which files and folders you want to backup.
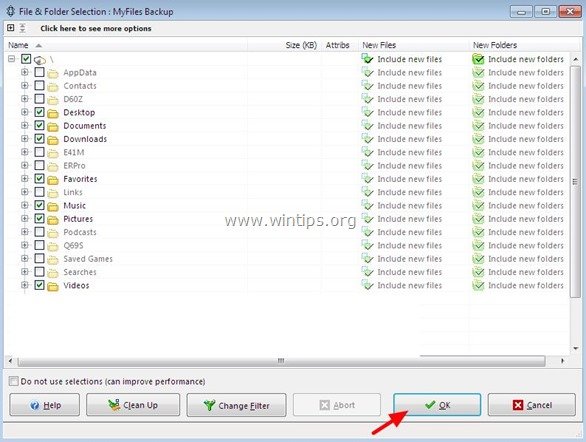
9. For your convenience deselect the first check box.
10. Finally – according your OS – select the following folders and press OK when done:
- If you have Windows 10, 8,7 or Vista select the following folders:
- Desktop
- Documents
- Downloads
- Favorites (contains our bookmarks from Internet Explorer)
- Music
- Pictures
- Videos
- If you have Windows XP select the foloowing folders:
- My Documents
- Desktop
- Favorites (contains our bookmarks from Internet Explorer)
* Note: The above list(s) contains all the basic important folders to backup. You have to select yourselves any other folder that you want to backup.
11. After making your choices, press OK at SyncBackFree options screen.
12. At this point, press "Yes" if you want to perform a simulated run for your new profile or, you can press the “No” button, in order to continue without simulation.
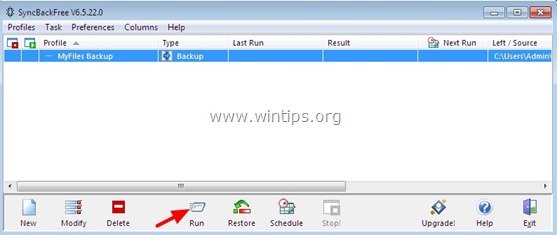
13. Now, we're ready to take our first backup with the SyncBack Free. To proceed, select the new created profile and then press the Run button (at the bottom of SyncBackFree program) to start backing-up the selected files and folders to the specified backup destination.
14. After a while the program informs you about the actions that will be made during the backup operation. You can review the actions (if you want) or just press the Continue Run button to immediately start the backup job.
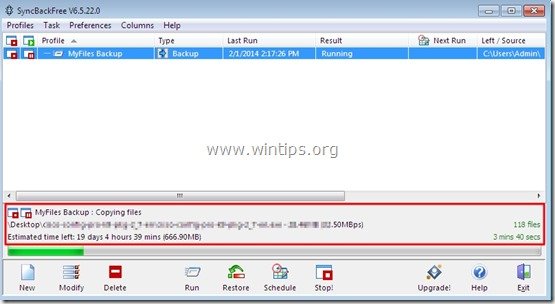
15. As the backup operation is executed, the SyncBackFree informs you of the files copied and the estimated time needed for the backup.
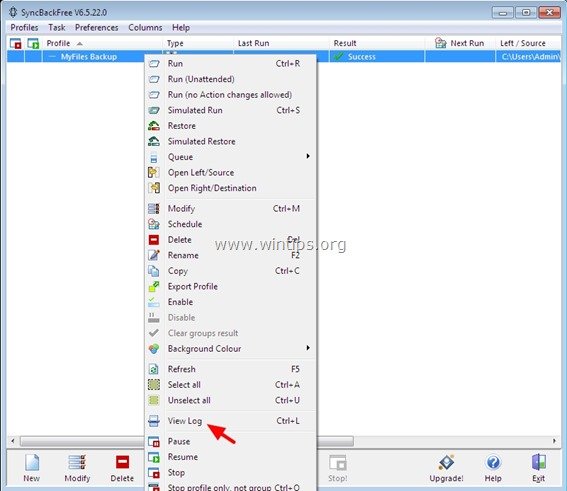
16. If the backup operation was successful, the SyncBackFree will display a “Success” message at the result column, otherwise it displays a warning message. If a warning message is displayed, then you can right-click on the profile and click on “View log” to see what causes the error.
17. That’s it. From now on, run the profile at any time you want, to take an up-to-date backup of your important files, or just modify the Schedule options, in order to automatically backup your files in predefined days or hours.
18. Continue to the next steps to learn which folders, needed to be included in the backup profile, in order to backup your e-mail data (e-Mails, contacts, calendar) and your bookmarks.
Step 4: How to Backup Outlook, Outlook Express or Thunderbird Data.
If you want to backup your emails and the address book from Outlook, Outlook Express or Thunderbird, then include the mentioned folders below, in the backup.
Outlook
– If you are using the Microsoft Outlook as your main e-mail program, then include – in the backup source – the "Outlook" folder, which is stored at the following default location on your disk: *
- Windows XP:
C:\Documents and Settings\<your username>\Local Settings\Application Data\Microsoft\Outlook
- Windows 10, 8, 7 or Vista:
C:\Users\<your username>\AppData\Local\Microsoft\Outlook
- Office 2016, 2013, 2010: If you 're using Outlook 2016, Outlook 2013 or Outlook 2010, include the Outlook Files folder, from this location:
C:\Users\<your username>\Documents\Outlook Files\
* Notes:
1. The "Outlook" folder contains a PST data file (commonly named "Outlook.PST") which contains all the e-mail messages, contacts, tacks & calendar that stored in MS Outlook.
2. If you want to confirm the “Outlook” store folder location on your computer, then read the following article which contains full -STEP BY STEP- instructions on How to Backup Outlook 2003, 2007 or 2010 data.
3. If you want to backup Outlook Email Account settings, then you can read the instructions in this article: How to Backup & Restore Outlook Account Settings
Outlook Express
If you are using the Outlook Express as your main Email program, then include – in the backup source – the Outlook Express & Address Book folders which are stored at following (default) locations on the disk: *
- C:\Documents and Settings\<YOUR_USERNAME>\Local Settings\Application Data\Identities\{<Outlook_Express_Identity_Name>}\Microsoft\Outlook Express
- C:\Documents and Settings\<YOUR_USERNAME>\Application Data\Microsoft\Address Book
* Notes:
1. The Outlook Express folder, contains all your Email Folders and your Email messages.
2. The Address Book folder, contains your e-mail contacts.
3. If you want to confirm "Outlook Express" folder's location then read the following article which contains detailed instructions on How to Backup & Restore Outlook Express Messages, Address Book & Accounts.
Thunderbird
To backup Thunderbird data include this folder in the backup job:
- C:\Users\<username>\AppData\Roaming\Thunderbird\Profiles\<Profile name>
Step 5: How to Backup Favorites (Bookmarks) from Internet Explorer, Chrome & Firefox.
To backup your Favorites, with SyncBackFree, then include the following folders (or files) in the backup source:
Internet Explorer
To backup your Internet Explorer bookmarks, include – on the backup -the "Favorites" folder from the following location on your disk:
- Windows 10, 8, 7 & Vista:
C:\Users\<YOUR_USERNAME>\Favorites - Windows XP:
C:\Documents and Settings\<YOUR_USERNAME>\Favorites
Mozilla Firefox
To backup your Firefox bookmarks, include the "bookmarkbackups" folder from the following location on your disk:
- Windows 10, 8, 7 & Vista:
C:\Users\<YOUR_USERNAME>\AppData\Roaming\Mozilla\Firefox\Profiles\<Profile_Name_Folder>.default\default\bookmarkbackups - Windows XP:
C:\Documents and Settings\<YOUR_USERNAME>\Application Data\Mozilla\Firefox\Profiles\<Profile_Name_Folder>.default\bookmarkbackups
Google Chrome
To backup your Chrome bookmarks, include the "bookmarks" file from the following location on your disk:
- Windows 10, 8, 7 & Vista:
C:\Users\<YOUR_USERNAME>\AppData\Local\Google\Chrome\User Data\Default\bookmarks - Windows XP:
C:\Documents and Settings\<YOUR_USERNAME>\Local Settings\Application Data\Google\Chrome\User Data\Default\bookmarks
That it! Let me know if this guide has helped you by leaving your comment about your experience. Please like and share this guide to help others.
We're hiring
We're looking for part-time or full-time technical writers to join our team! It's about a remote position that qualified tech writers from anywhere in the world can apply. Click here for more details.
- How to Disable or Remove BitLocker from Windows RE. - April 24, 2024
- FIX: Error 0x8007025d in Windows 10 Update. - April 22, 2024
- How to Disable Device Encryption in Windows 11/10. - April 17, 2024

