
How to clean install Windows 10 on your Desktop or Laptop PC.
Microsoft, when Windows 10 came out on the market, started prompting Windows 8.1, 8, & 7 users to upgrade their systems and install the new OS for free. But – as always – the upgrade process to the latest Windows OS, is not the best practice to have a workable computer without problems, especially on computers with a lot of programs installed prior to the upgrade. On the other hand, in the past, if you want to perform a clean install of Windows 10, you have to first upgrade to Windows 10 from your Windows 7 or Windows 8 installation and then to perform a clean install.
Today – finally – Microsoft started allowing the use of a valid Windows 7, 8, or 8.1 product key to perform a fresh install and activate Windows 10 with it. Of course if you have bought a Windows 10 key you can use it to do a clean install of Windows 10.
This tutorial contains detailed instructions on how to perform a clean install of Windows 10 on your computer.
How to perform a Windows 10 clean installation.
Before you continue, make sure that:
1. You have backed up all your files first to another media (e.g. external USB disk)
2. You have in hand a valid Windows 10, 7, 8, or 8.1 product key. If you have previously updated and activated Windows 10 to the same computer you don't need a key. Windows 10 will be activated automatically.
3. Optionally and if you have more than one physical disk on your system: Disconnect any other hard disk from your system (and keep only the hard disk that you will install Windows on it), to avoid deletion by mistake.
Step 1. Create a Windows 10 installation Media.
In order to do a fresh install of Windows 10 on your computer you need a valid Windows 10, 8.1, 8 or 7 product key and a Windows 10 DVD or USB installation media.
If you don't have a Windows 10 USB installation media, you can create one by following the instructions given on this article:
Step 2. Modify Boot Order in BIOS settings.
1. Power On your computer and press “DEL” or “F1” or “F2” or “F10” key to enter BIOS (CMOS) setup utility. *
* Note: The way to enter into BIOS Settings depends on the computer manufacturer. If your computer supports UEFI, press the the corresponding button according to your computer’s manufacturer instructions. (e.g. In Sony Vaio laptops that support UEFI, you have to press the “ASSIST” key on your laptop, while your laptop is Powered-OFF).
2. In BIOS menu, find the “Boot Order” setting. This setting is commonly found in the”Advanced BIOS Features” menu.
3. At “Boot Order” setting, set the USB disk (e.g. USB-HDD) as the first boot device if you have created a Windows 10 USB installation media or set your DVD drive as the first boot device if you have created a Windows 10 DVD installation media.
4. Save and exit from BIOS settings.
Step 3. Install Windows 10.
1. Place the Windows 10 installation media on your computer.
2. When prompted press Enter to boot from CD or DVD.

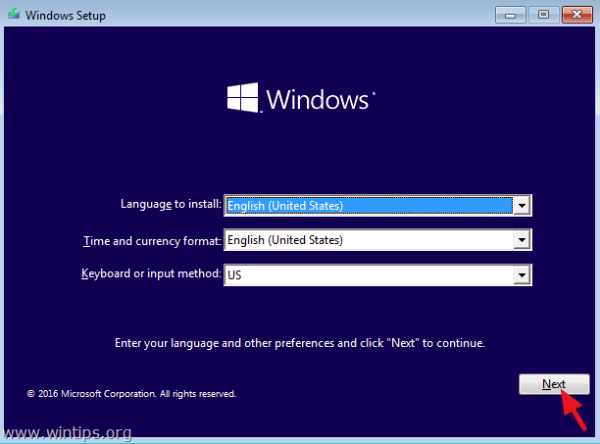
3. At the first setup screen, choose your Language, Time – Currency and your keyboard input method and click Next.

4. At the next screen choose Install now.

5. Then type your Windows 10, 8.1, 8 or 7 product key. *
* Note: If you have previously installed and activated Windows 10 on the same computer, there is no need to type the product key again. Click "I don’t have a product key" and Windows 10 should be activated automatically once installed and connected to the Internet (Microsoft Servers).

6. Accept the license agreement and press Next.

7. Choose Custom: Install Windows only (advanced).

8a. If you have previously installed Windows on the same disk that you are going to install Windows 10, then Delete to remove all listed partitions. Otherwise…

8b. …select the Unallocated Space and click Next.

9. The setup process of Windows 10 is starting. Wait until it is completed.

10. After the setup process is completed, Windows restart, and prompts you to personalize your PC. If you want to make your own customizations, choose Customize settings, otherwise choose Use express settings to continue. *
* Note: In my opinion, I think that you must give some extra time here and make your customizations to critical – for me – decisions, such as which type of data and information can be served to Microsoft.

8. Then define who owns this PC.*
- If the PC is personal (local computer) select "I own it" and press Next. If your PC belongs to a domain** select "My organization" option and press Next.
Notes:
*. You will not see these choices if you setup the Windows 10 Home version.
** You can join a domain after setup is finished (Windows 10 Pro).

9. At the next screen:
a. If you have chosen the "My organization" option at previous screen, select either the "Join Azure ID" if you use Office 365 business services, or select the "Join a Domain" option if your PC belongs to a domain. Then follow the on-screen prompts to setup (first) a local account on your computer and after setup is completed join your domain.

b. If you have chosen the "I own it" option, then you can setup your computer either by using a Microsoft or a local account at "Make it yours screen".
– If you want to use a MS account, type your MS account credentials (username & password) and press Next.
– If you want to setup a new local account, then click the "Skip this step" option and follow the prompts to create a new local account for your computer.

11. Wait until Windows personalization is completed.

12. When Windows 10 OS is installed, decide if you want your PC to be discovered by other PC's on your network or not.

13. After installation, navigate to the device manager and see if all your devices are recognized properly, otherwise install any other driver needed.
That's it! Let me know if this guide has helped you by leaving your comment about your experience. Please like and share this guide to help others.

")
.")
