How to Disable the Windows Store in Windows 8 & 8.1
Windows Store app (Service Name="WSService") is an essential service for all applications downloaded and managed from Windows Store. So proceed to disable it only if you never use apps from Windows Store.
This tutorial is written for users that want to block Windows Store application in their Windows 8 (8.1) system, due to problems caused by it, or because they want to be unavailable to Windows 8 PC users.
Notes:
1. If you own a Windows 8 or 8.1 Home based system the only way to disable (deny the access) to Windows Store is by using the registry method (method-2).
2. If you own a Windows 8 or 8.1 Pro based system you can disable the Windows Store or by using the Group Policy Editor method (method-1) or by using the registry method (method-2).
This tutorial contains detailed instructions, on how you can block the Windows 8 Store App in your system.
How to disable Windows Store in Windows 8 & Windows 8.1.
Method 1. Disable Windows Store through Local Group Policy Editor (Windows 8 Pro).
Method 2. Disable Windows Store through Registry (Windows 8 Home).
Method 1. How to disable Windows Store in Windows 8, 8.1 Pro in Local Group Policy Editor.
– To deny the access to Windows Store app in Windows 8 or Windows 8.1 Pro editions, using Group Policy Editor:
1. Simultaneously press the Windows key + R keys to open the 'Run' command box.
2. In run command box, type: gpedit.msc and press Enter to open the local Group Policy Editor.

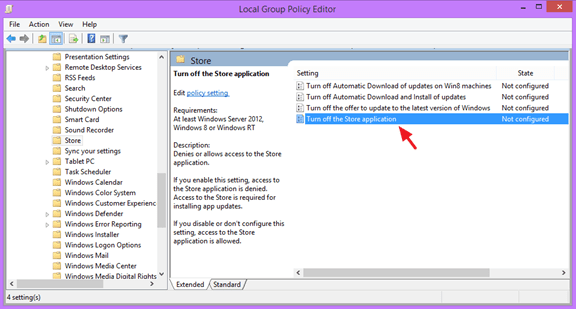
3. Inside Group Policy Editor navigate to the following setting: Computer Configuration > Administrative Templates > Windows Components > Store.
4. At the right pane double click to open the "Turn Off the Store Application" settings.

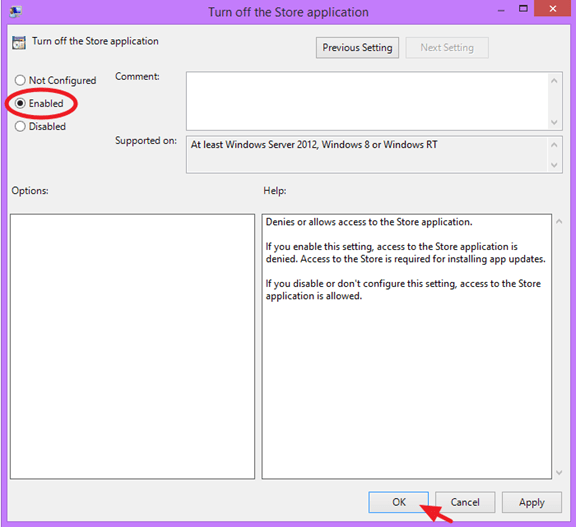
5. Check the Enabled radio button and click OK.

6. Close Group Policy Editor.
7. Restart your computer.
Method 2. How to turn off Windows Store in Windows 8, 8.1 Home using Registry:
– To deny the access the Windows Store app in Windows 8 or Windows 8.1 Home edition using registry:
1. Simultaneously press the Windows key + R keys to open the 'Run' command box.
2. In run command box, type: regedit and press Enter.
3. IMPORTANT: Before you continue, first take a backup of your registry. To do that:
1. From the main menu, go to File & select Export.
2. Specify a destination location (e.g. your Desktop), give a filename to the exported registry file (e.g. "RegistryUntouched"), select at Export range: All and press Save.
4. After you have backed up your registry, navigate to the following location at the left pane:
- HKEY_LOCAL_MACHINE\SOFTWARE\Policies\Microsoft\WindowsStore
Note: If the 'WindowsStore' key doesn't exist, then right-click at Microsoft key and select New > Key and name it "WindowsStore" (without quotes).
5. Right-click on an empty space at the right pane and select New > DWORD Value.
6. Give at the new value the name RemoveWindowsStore
7. Double click at the new created RemoveWindowsStore value and at the value data box type "1" (without quotes).
8. Close Registry Editor and restart your computer.
– From now on, whenever you try to launch the Windows Store, the following message will be displayed on your screen: "Windows Store isn't available on this PC. Contact your system administrator for more information".
That's it! Let me know if this guide has helped you by leaving your comment about your experience. Please like and share this guide to help others.
We're hiring
We're looking for part-time or full-time technical writers to join our team! It's about a remote position that qualified tech writers from anywhere in the world can apply. Click here for more details.
- FIX: Numeric keypad Not Working on Windows 10/11 - July 24, 2024
- How to Share Files or Printers in Hyper-V? - July 22, 2024
- How to invoke Hyper-V Screen resolution prompt? - July 17, 2024


May 12, 2022 @ 6:51 pm
As of May of 2022, " Method 2. How to turn off Windows Store in Windows 8, 8.1 Home using Registry " still works!
After failing to disable Windows Store via Administrator Power Shell commands, this work around was greatly appreciated!
Thanks 😊