Full Malware Scan & Removal Guide to Clean Heavy Infected Computers
Nowadays, new viruses, adwares and malwares appear and disappear within days or weeks. When a new virus/adware/malware is released and users’ computers are infected, it takes several days for experts to identify them and then to specify the appropriate treatment/removal procedure.
During those days, users don’t have a way to try and remove them, but, instead, they have to wait for the solution to become public or they have to take their computer to an expert so that it can be cleaned. To avoid this, I decided to write down a generic article that presents you the most common steps and the most useful anti-virus/adware/malware tools used to clean your computers. So, in case your computer is infected by a virus you can’t identify, you can use these steps and tools to try and clean it. As you can all understand, it may not always work, but I am sure that it will help you in most cases.
How to Clean Windows from Malware, Adware, Spyware, Rootkits, Viruses, Trojans, etc.
Important: Before you continue with the removal procedure, make sure that you have an updated backup of all your important files.
Suggestions:
1. If you cannot download any of the bellow suggested programs on the infected computer, then you can download them on another clean computer and transfer them (e.g. by using a USB flash disk) on the infected computer.
2. If you like, add this page to your favorites (Ctrl + D) to easily find and follow the given instructions.
ATTENTION: All the Anti-Malware programs and removal tools that suggested in this guide are totally FREE.
Malware Removal Guide Steps:
Step 1: Start your computer in “Safe Mode with Networking”.
Step 2: Terminate known running Malicious processes with RKill
Step 3: Scan and remove hidden malicious Rootkits with TDSSKiller.
Step 4: Remove Malicious Rootkits with Malwarebytes Anti-Rootkit.
Step 5: Remove Malware programs from Windows Startup.
Step 6: Remove Malicious programs from Task Scheduler.
Step 7: Delete Temporary files and folders from all users with TFC.
Step 8: Uninstall Malicious Applications.
Step 9: Clean Adware & Unwanted Browser Toolbars with AdwCleaner.
Step 10: Clean Malware with Malwarebytes Anti-Malware.
Step 11. Scan and Remove Viruses with your Antivirus Program.
Step 12: Delete infected Windows Restore Points.
Step 1. Start your computer in “Safe Mode with Networking”.
Start your computer in Safe mode with network support to avoid malicious programs and unnecessary services to run.
To start Windows in Safe mode with Networking:
1. Simultaneously press the Win ![]() + R keys to open the run command box.
+ R keys to open the run command box.
2. Type msconfig and press Enter.
3. Click the Boot tab and then check the Safe Boot & Network options.
4. Click OK and restart your computer. *
* Note: When you done with the malware cleaning, then open the System Configuration (msconfig) utility again and at General tab, select Normal Startup and then click OK, to start Windows normally.
Step 2: Terminate Running Malicious processes with RKill.
RKill is a program that was developed at BleepingComputer.com that attempts to terminate known malware processes so that your normal security software can then run and clean your computer of infections.
1. Download and save RKill to you desktop. *
* Note: RKill is offered under under different filenames because some malware will not allow processes to run unless they have a certain filename. Therefore when attempting to run RKill, if a malware terminates it please try a different filename.
2. Run RKill and let the program to terminate any malicious processes that may running.
3. When RKill is finished press OK and continue to the next step.
Step 3: Scan and remove hidden malicious Rootkits with TDSSKiller.
1. Download and save TDSSKiller Anti-rootkit utility by Kaspersky Labs on your computer (e.g. your desktop).
2. When the download is complete, go to your download location (e.g. your desktop) and double click on “tdsskiller.exe” to run it.
3. At Kaspersky’s Anti-rootkit utility program click on “Change parameters” option.
4. At TDSSKiller settings, check to enable the “Detect TDLFS file system” option and press “OK”.
5. Press "Start scan" to start scanning for malicious programs.
When the scan process is complete, a new window opens with the scanning results.
6. Choose the "Cure" option and let the program finish the cure operation of the infected files.
7. When the "curing" operation is complete, reboot your computer.
8. After rebooting, run TDSSKiller again to scan one more time for Rootkits. If the previous curing job was completed successfully, the program now will inform you that "No Threats found".
Step 4: Remove Malicious Rootkits with Malwarebytes Anti-Rootkit.
Malwarebytes Anti-Rootkit is a free, cutting edge rootkit scanner & remover that detects and eliminates even the nastiest malicious rootkits.
1. Download and save Malwarebytes Anti-Rootkit on your desktop.
2. Run Malwarebytes Anti-Rootkit and click OK to extract the files on your desktop (the files extract under "mbar" folder).
3. Click Next at the first screen and then click the Update button.
4. When the update is completed click Next again.
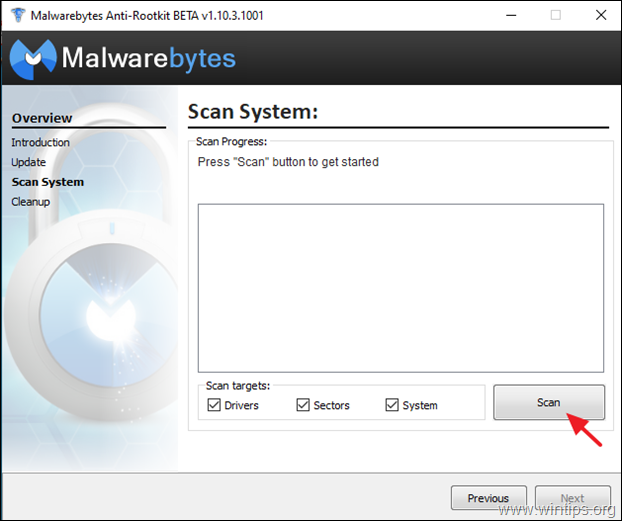
5. Finally click Scan to scan your system for malicious rootkits.
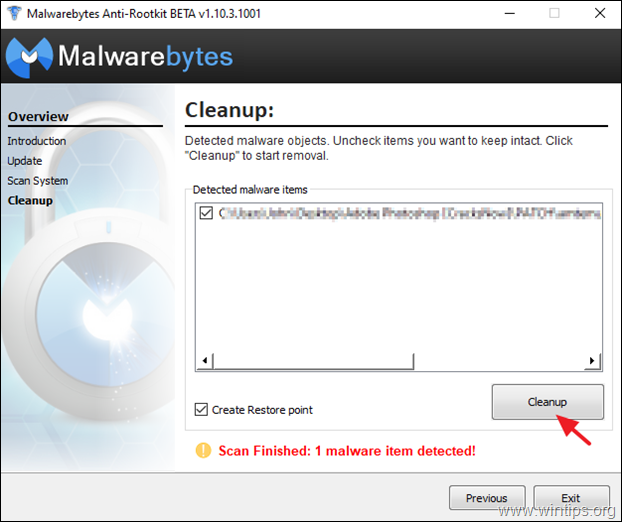
6. When the scan is finished click Cleanup to clean your computer.
Step 5: Remove Malware & Unknown programs from Windows Startup.
1. Press Ctrl + Shift + Esc to open Task Manager and select the Startup tab.
2. Select and disable any unknown program that is run at Windows start up.
Step 6. Remove Malware Programs in Task Scheduler.
1. At the search box, type: task scheduler
2. Open Task scheduler
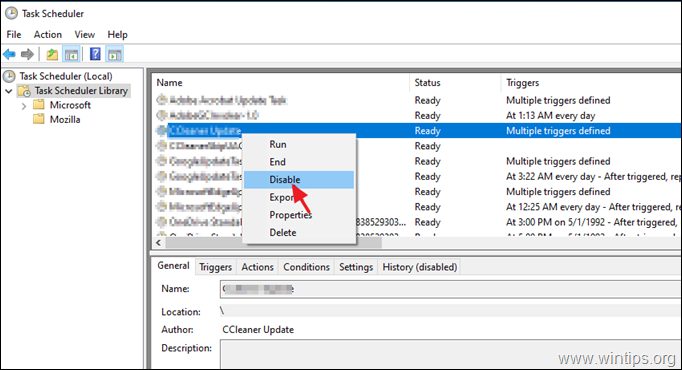
3. Expand Task Scheduler (Local) and select Task Scheduler Library on the left.
4. Right-click and Disable any suspicious task.
Step 7: Delete Temporary files from all users with TFC.
1. Download and save TFC by OldTimer to your computer.
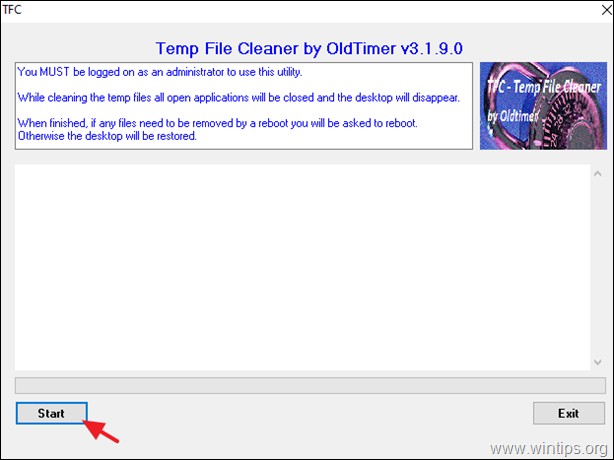
2. When downloading is completed, run TFC and press the start button to clean all temporary files and folders from your computer. *
* Note: The detailed instructions on how to download and use TFC can be found here: How to delete temporary files using TFC.
Step 8. Remove ALL Unknown & Unwanted programs.
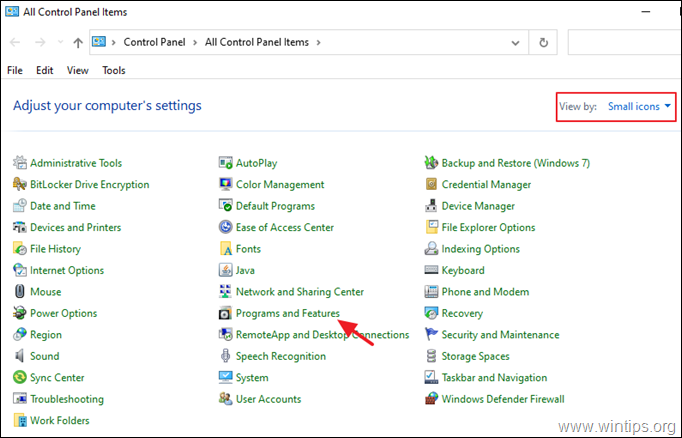
1. Open Windows Control Panel. To do that, open the search box and type Control Panel. *
* Note: In Windows 7 & Vista: Go to Start > Control Panel.
2. Set the View By to Small icons and open Programs and Features *
3. When the program list is displayed on your screen:
a. Sort the programs to be displayed by their Installation date (Installed On).
b. Select and Uninstall any unknown program installed on your system. *
* Notice: If you receive the “You do not have sufficient access to uninstall” error message or you face problems during program uninstall, then follow this guide to uninstall the program.
4. When you remove all the unknown or unwanted programs, continue to the next step.
Step 9: Clean Adware, Unwanted Browser Addons & Toolbars with AdwCleaner.
AdwCleaner is a powerful utility to clean all the Adware, Toolbars, PUP & Hijacker programs from your computer.
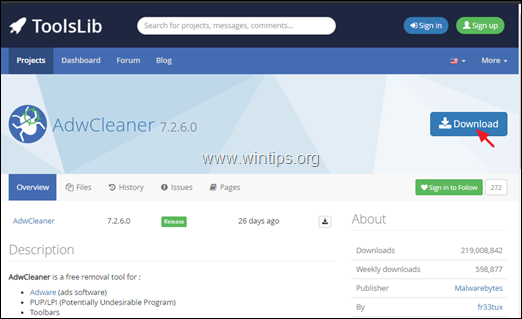
1. Download and save AdwCleaner utility to your desktop.
2. Close all open programs and Double Click to open AdwCleaner from your desktop.
3. After accepting the “License Agreement”, press the Scan Now button.
4. When the scan is completed, press Clean & Repair to remove all the unwanted malicious entries.
4. When asked, click Clean and Restart Now.
5. After restart, close AdwCleaner's information (log) window and continue to the next step.
Step 10: Clean Malicious Programs, Files and Registry Entries with Malwarebytes Anti-Malware.
* Note: Malwarebytes is one of the most reliable FREE anti malware programs today in order to clean your computer from remaining malicious threats. If you want to stay constantly protected from viruses and malware threats, existing and future ones, we recommend to buy the Malwarebytes.
How to Download & Install Malwarebytes:
1. Click the Free Download button at Malwarbytes Download page to download the Malwarebytes Premium TRIAL version. *
* Note: After the 14-day trial period, Malwarebytes reverts to a free version but without real-time protection for ransomware, viruses or malware programs.
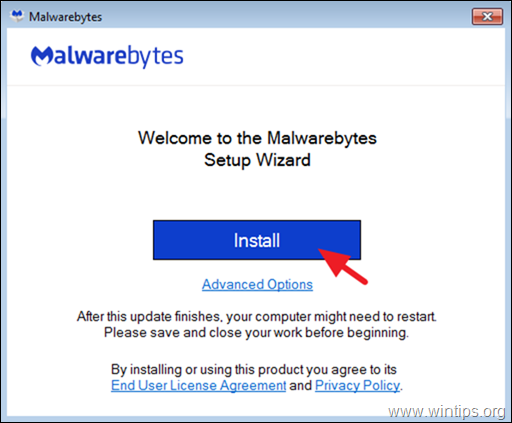
2.When the download is completed, double click at the downloaded file, and install Malwarebytes.
3. When prompted to install Malwarebytes Browser Guard, click Skip this.
4. When the installation is completed, proceed reading below to scan your computer with Malwarebytes for first time.
How to Scan & Clean your computer with Malwarebytes.
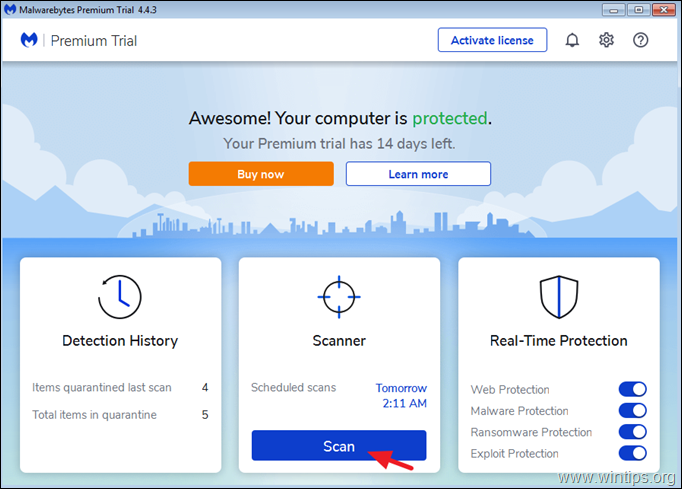
1. Launch Malwarebytes Premium Trial and wait until the program updates its antivirus database.
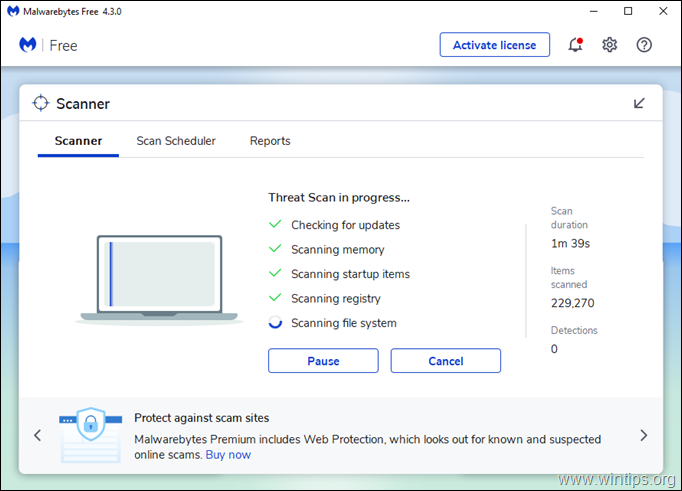
2. When the update process is completed, press the Scan Now button to start scanning your system for malware and unwanted programs.
3. Now wait until Malwarebytes finishes scanning your computer for malware.
4. When the scan has completed, select all detected threats (if found) and then press the Quarantine button to remove all of them from your computer.
5. Wait until Malwarebytes removes all infections from your system and then restart your computer (if required from the program) to completely remove all active threats.
Step 11. Scan and Remove Viruses with your Antivirus Program.
After restart, open your Antivirus program and perform a full scan for viruses on your computer.
- Related article: Best Free Antivirus Programs for Home use.
Suggestion: Before or after scanning your system with your antivirus program, I suggest to scan your system for viruses with ESET Online Scanner which is a power Standalone Virus Removal tool, to clean your computer from threats.
1. Download and run ESET Online Scanner.
2. Choose your language and Accept the Terms of Use.
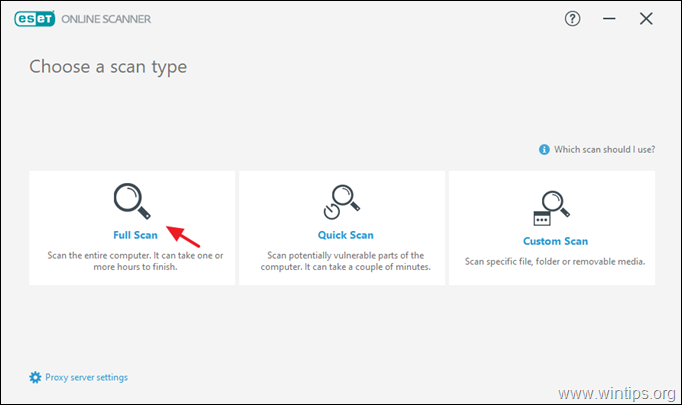
3. Select Computer Scan and then click Full Scan.
4. Select Enable ESET to detect and quarantine unwanted applications and click Start scan.
Step 12: Delete infected Windows Restore Points.
After performing the above instructions, check if your computer is working smoothly and then proceed and remove all the previous system restore points from your computer, because they still contain malware that can harm your computer in the future. So proceed and…
1. Disable the 'System Restore' feature on the disk C:\ in order to remove the infected System Restore points.
2. Then proceed and re-enable the 'System Restore' feature for safety and security reasons.
- Related article for detailed instructions: How to Enable or Disable System Restore in Windows.
Conclusion: Hope that you find this article useful and effective and that your computer is now clean from all harmful programs running on it. I will try to keep this article updated. From your side if you want to learn how to stay protected on the future from malware programs read this article: Ten+ tips to keep your computer fast and healthy.
We're hiring
We're looking for part-time or full-time technical writers to join our team! It's about a remote position that qualified tech writers from anywhere in the world can apply. Click here for more details.
- FIX: Numeric keypad Not Working on Windows 10/11 - July 24, 2024
- How to Share Files or Printers in Hyper-V? - July 22, 2024
- How to invoke Hyper-V Screen resolution prompt? - July 17, 2024


![tdsskiller-no-threats-found1[2] tdsskiller-no-threats-found1[2]](https://www.wintips.org/wp-content/uploads/2013/09/tdsskiller-no-threats-found12.jpg)




![image_thumb[2] image_thumb[2]](https://www.wintips.org/wp-content/uploads/2019/01/image_thumb2_thumb.png)
![image_thumb[3] image_thumb[3]](https://www.wintips.org/wp-content/uploads/2019/01/image_thumb3_thumb.png)
![image_thumb[4] image_thumb[4]](https://www.wintips.org/wp-content/uploads/2019/01/image_thumb4_thumb.png)




April 2, 2020 @ 4:53 am
For any user. Computer restoration Excellence discovered!
I've used a bunch since the 8086 days.
Wonderfully presented
I have been an avid follower of MalwareBytes when it started offering free service in discussion groups on their web site. They are genius. Ppl MB were possibly the first to instruct how to cure the incurably rootkits that the greatest creep hackers on earth loved to provide. There wasn't much Protection in those days.
Malwarebytes and Wintips. The teams to provide protection and service instruction for the impossible hacks.
Fixed income but I will one-time support your Great experience.
Btw, I am not affiliated with Malwarebytes. "Except for my service plan."
Thank you Wintips!
Fine work from a fellow computer (geek).
Dwyt-Eise
February 27, 2019 @ 5:42 pm
Great Work guys. the passion is eminent. you love what your do. thrilled
February 20, 2019 @ 9:53 am
Great.Lithuania!
September 24, 2017 @ 11:13 am
you are a gem. very helpful.tnx
January 19, 2017 @ 9:25 am
hello sir,
when i finished all your steps 1-13, and restarted my computer, then turned it on, its stuck on a BLUE SCREEN (LIKE A CLEAR SKY), after entering my pc password on the logon ,… i tried to run it @ safe mode and its all good but then i tried it @ normal start up, it goes BLUE SCREEN again…
plz help me sir
January 19, 2017 @ 10:49 am
@olsen: 1. Boot in Safe Mode and by using "msconfig", disable all non Microsoft services. (How to Clean Boot Windows 10, 8, 7 or Vista..
2. Restart your computer and boot normally to Windows.
3. If Windows is starting without problems, then by using "msconfig" again enable one by one the disabled services and restart your computer, until you find out which service or program causes the problem.
December 16, 2016 @ 11:40 am
Are all of these steps to be done in safe mode w/networking? Or just up to step 8?
December 17, 2016 @ 1:08 pm
@Dean76leap: For sure, YES.
October 28, 2016 @ 8:28 pm
Donation Sent! Thanks a bunch!
September 28, 2016 @ 5:25 pm
thanks peeps.i,m a complete beginer at this..its cleared up a lot of problems..
September 5, 2016 @ 4:39 pm
I wholeheartedly agree, excellent article. Very clearly written. even the novice could follow this guide. I received the link to this guide from a technician at a company that I work with. I will share at every opportunity as well. Thank you so much for sharing your knowledge. Job well done.
August 13, 2016 @ 5:31 pm
Wohoo! Amen! =)
August 13, 2016 @ 7:48 am
Thank you so much for compiling this marvelous syllabus!
July 23, 2016 @ 1:34 am
Steps 3 (RogueKiller), 4 (CCleaner), 6 (TFC) and 8 (AdwCleaner) didn't work for me – 3, 4 & 8 the downloaded executable files would run when double-clicked and TFC hung after a few minutes of operation.
@Jangrik – you can't see the System Protection tab because your PC is in Safe Mode. Restart your PC normally and it will appear again!
July 23, 2016 @ 9:53 am
@GaryB: Are you running these programs in safe mode? If yes, then continue to rest steps.
June 19, 2016 @ 9:05 pm
Dude great article helped a lot, I'm a newbie to PC but helped alot
June 4, 2016 @ 10:53 am
Hey, it's very useful for me. My computer has many malware. Anyway, I have some problems with step 3 and step 13. For step 3, my roguekiller can't work properly. It's stuck in some point and I can't do anything even move my pointer :(( And for step 13, I cant see my system protection tab. I think it is missing because f**** malware. Do you have any suggest for me? Thanks before
June 5, 2016 @ 9:58 am
@Jangkrik: 1. Download and run Eset Online Scanner to clean your computer for viruses. 2. a) Open registry Editor and navigate to this key: "HKEY_LOCAL_MACHINE\Software\Policies\Microsoft\Windows NT\SystemRestore"
b). Delete the "DisableSR" value if exists. c) restart your computer.
If "System Protection" is missing again then launch it from "C:\Windows\System32\SystemPropertiesProtection.exe" or "C:\Windows\System32\SystemPropertiesRemote.exe" or type in search box "System Restore".
May 16, 2016 @ 5:56 am
Awesome work, thanks for the note it was really helpful.
I brought my machine back to life!
April 30, 2016 @ 9:51 am
Merci de France =D
February 17, 2016 @ 6:59 pm
very handy article thank you
January 31, 2016 @ 7:56 am
Excellent article for both amateur and veteran PC users to rid their PCs of junk.
January 21, 2016 @ 7:32 am
I downloaded and ran the RogueKiller and started the scan, but every time it stops at 58% and gives me "RogueKiller.exe has stopped working." I've tried running it a few times, but no luck. Any suggestions?
January 21, 2016 @ 10:46 am
@Gabriel: I think that Roguekiller's latest version has problems. Do not run it and continue at the next step.
December 23, 2015 @ 5:03 pm
Very nice ! Thanks for this great article. Usefull to fight against all these virus craps.
November 11, 2015 @ 1:25 pm
Thanks a lot, appreciate on your hard work and effort.
October 23, 2015 @ 10:09 pm
Marvelous ! Neatly written & explained, and the tools are awesome to kick out residing viruses & infections. Well Done & excellent job !
September 13, 2015 @ 12:54 pm
Great article! Clear and well written. This process has improved the performance of my machine a lot. Thanks.
August 13, 2015 @ 10:01 am
The convenience of having all these tools in one place is great, and the article is well written for those who are new to the art of Virus-Fu.
Thanks
November 11, 2013 @ 11:31 pm
Holy Smokes! That's what I call a useful guide. Very nice collection of tools that pros actually use! Thanks.