How to Enable System Restore Protection in Windows 10/8/7/XP.
This tutorial contains instructions on how to turn on the System Restore Protection on a Windows 10, 8, 7 based computer. As you may know, the System Restore feature allows you to restore your Windows computer to a previous working state if something goes wrong and Windows does not work correctly, e.g. after installing a Windows Update or another Software.
The System Restore feature is available in all Windows versions (Windows 10, 8, 7 or Vista), but it can work only if you have previously enabled the System Protection on the System Drive C:\.
At my opinion, the System Restore feature is one of the most useful Windows features and for that reason the System Protection must be enabled on any Windows computer, because it can help you resolve Windows problems without having to reinstall Windows or to restore the previous version of any file or folder after an unwanted modification or after a virus attack.
How to Turn On the System Restore Protection in Windows 10/8/7 OS.
To turn on the system restore protection on your system, follow the instructions below according your operating system:
How to Enable System Restore protection in Windows 10/8.
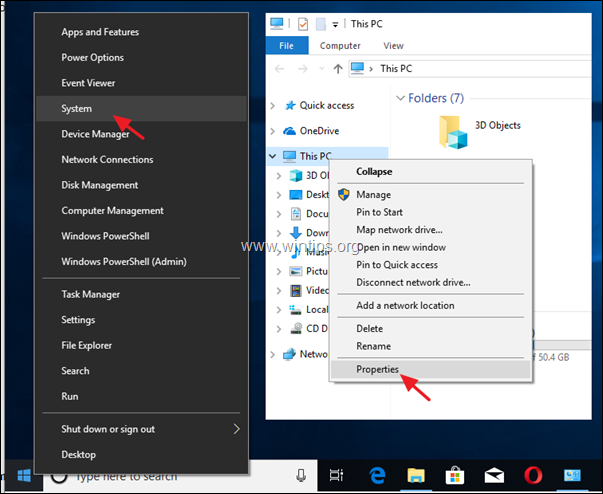
1. Open the System Protection settings, by using one of the following ways:
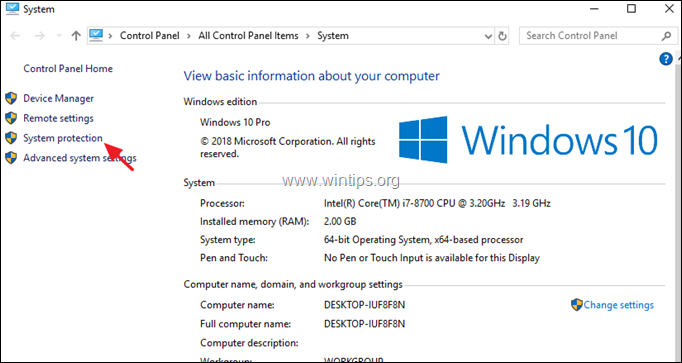
2. Click System protection at the left pane.
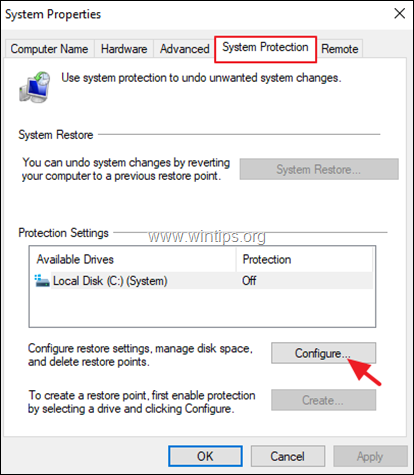
3. At System Protection tab, click Configure.
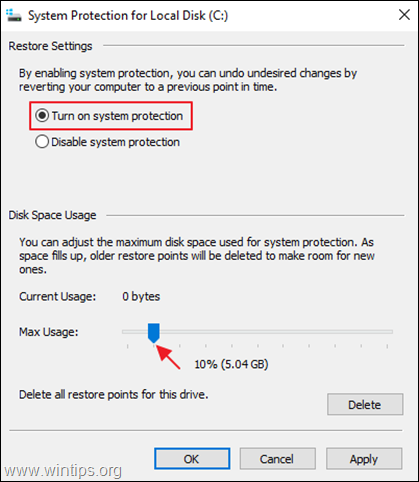
4. To enable the System Restore Protection: *
a. Check the Turn on system protection.
b. Adjust the maximum disk space used for system protection, to (about) 10-15% of the maximum disk space.
c. Click OK and close the System Properties.
* Note: If you want to disable System Restore for any reason, then check the Disable system protection and press OK.
How to Enable System Restore protection in Windows 7.
To turn on the System Restore Protection in Windows 7:
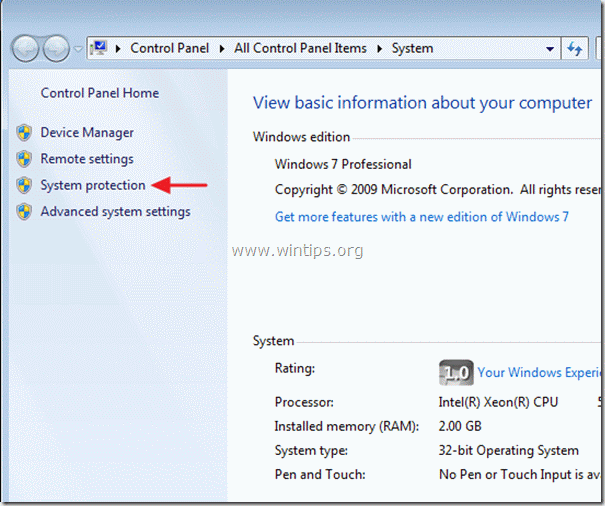
1. Open the Start menu and then right click on the Computer Item and select Properties.
2. Open System protection on the left pane.
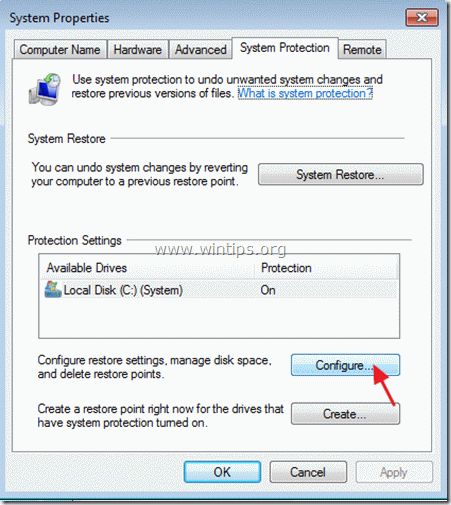
3. In System Protection tab, click Configure.
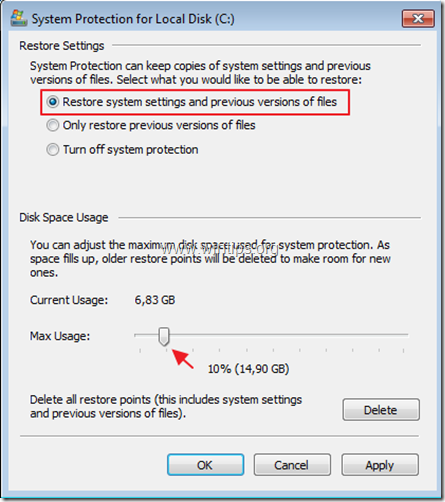
4. To enable the System Restore protection: *
a. Check the Restore system settings and previous versions of files option.
b. Adjust the maximum disk space used for system protection, to (about) 10-15% of the maximum disk space.
c. Click OK and close the System Properties.
* Note: If you want to disable System Restore for any reason, then check the Turn off system protection option and press OK.
How to Enable System Restore protection in Windows Vista.
To turn on the System Restore Protection in Windows Vista:
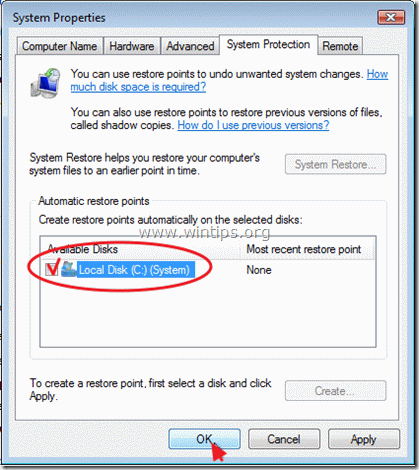
1. Click on Start menu, right-click on Computer Item and select Properties.
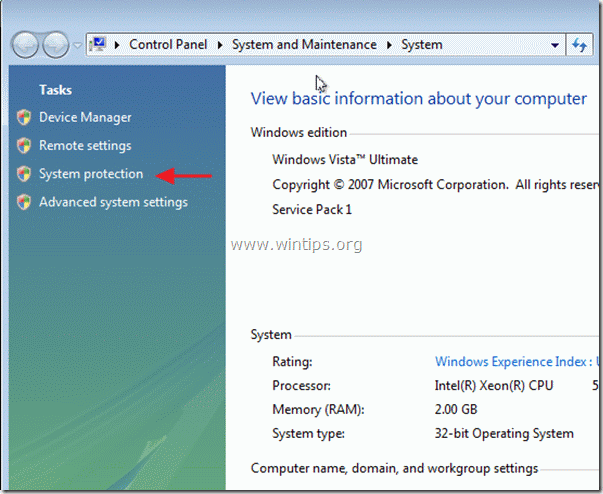
2. Open System protection on the left pane.
3. In System Protection tab, check the checkbox on Local Disk (C:) (System) drive to turn on the protection. *
* Note: If you want to turn off the System Restore Protection for any reason, then uncheck the checkbox on Local Disk (C:) (System) drive and click OK.
How to Enable System Restore protection in Windows XP.
To turn on the System Restore Protection in Windows XP:
1. Click Start, right-click at My Computer Item and select Properties.
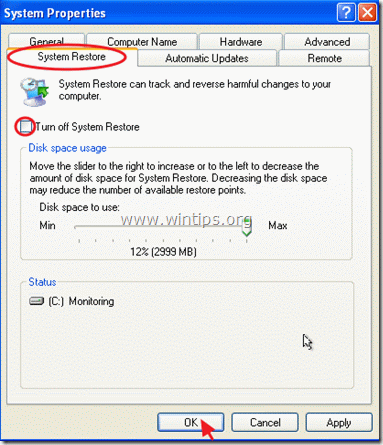
2. To enable the System Restore protection, select the System Restore tab and uncheck the Turn off System Restore checkbox and then click OK.
That's it! Let me know if this guide has helped you by leaving your comment about your experience. Please like and share this guide to help others.
We're hiring
We're looking for part-time or full-time technical writers to join our team! It's about a remote position that qualified tech writers from anywhere in the world can apply. Click here for more details.
- FIX: Numeric keypad Not Working on Windows 10/11 - July 24, 2024
- How to Share Files or Printers in Hyper-V? - July 22, 2024
- How to invoke Hyper-V Screen resolution prompt? - July 17, 2024






How to remove Adware InstallCore.gen
February 25, 2013 @ 11:53 am
[…] Windows 8 […]