How to Encrypt Drive C: with BitLocker in Windows 10/11 Pro & Enterprise.
This tutorial contains detailed instructions on how to lock your entire computer contents on Windows 10 Pro or Enterprise Editions, by using the BitLocker encryption program. By enabling the BitLocker encryption on your computer, you will protect your sensitive data from unauthorized access, in case your computer becomes stolen or lost.
If you lock (encrypt) your Windows PC (operating system drive and it's contents) with the BitLocker program, will be impossible to others to unlock your computer, because there is no way to bypass the BitLocker protection (Pre-boot authentication) and to access the contents on your computer. *
* Note: The most important preventive measure to protect your personal data, is to always have a backup of them, on a separate device (like on an external USB drive), and to keep this device in a safe place and unplugged from your computer, in order to avoid the damage of your data after a malware attack. To accomplish this task, you can follow the instructions from these articles:
- How to Backup and Restore your Personal Files with Windows Backup.
- How to Backup Personal Files with SyncBack (Free) Backup Utility.
How to Encrypt your Windows PC with BitLocker (Windows 10/11 Pro & Enterprise).
BitLocker System Requirements:
1. Windows 11, 10, 8, 8.1 Pro or Windows 10 Enterprise & Windows 7 Ultimate. *
2. To enhance the BitLocker protection your device must own a Trusted Platform Module (TPM)** 1.2 or higher and Trusted Computing Group (TCG)-compliant BIOS or UEFI. If your device doesn't have a TPM module then you can buy one (if your motherboard supports it) or you can use BitLocker without TPM by disabling the TPM requirement in Group Policy (see Step-2 for instructions).
Notes:
1. If you don't own Windows 10 Pro or Enterprise edition, then read the following article to encrypt your Windows computer: How to Encrypt your PC with VeraCrypt in Windows (All Versions)
2. The TPM is a hardware component, commonly installed on modern devices (computers, laptops, etc.) and provides hardware based security through integrated cryptographic keys. In fact, a TPM chip is a crypto-processor which is designed to carry out cryptographic operations and includes multiple physical security mechanisms in order to make it tamper resistant and even a malicious software is unable to tamper with the security functions of the TPM.
How to Enable BitLocker Encryption on Windows 10.
Step 1. Check if your computer has a TPM chip.
First of all, check if you computer contains a TPM module. To do that:
1. Simultaneously press the Windows ![]() + R keys to open run command box.
+ R keys to open run command box.
2. Type devmgmt.msc and press Enter.
3. If your computer has a TPM chip, then you should see under Security Devices, a Trusted Platform Module device with it's version number.
4. If you computer contains a TPM chip, then continue to step-3, otherwise continue to step-2 below.
Step 2. Disable the TPM requirement through Group Policy Editor.
If you computer doesn't contain a TMP chip, then disable the TPM authentication for BitLocker.
1. Simultaneously press the Windows ![]() + R keys to open the run command box.
+ R keys to open the run command box.
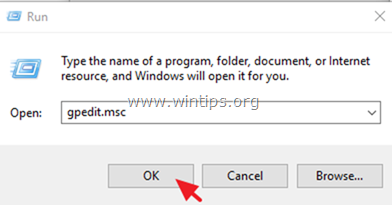
2. Type gpedit.msc & Press Enter.
3. In Group Policy Editor navigate to the following path:
- Computer Configuration -> Administrative Templates -> Windows Components -> BitLocker Drive Encryption -> Operating System Drives
4. At the right pane, double click at Require additional authentication at startup.
5. Choose Enabled, then check the Allow BitLocker without a compatible TPM (requires a password or a startup key on a USB flash drive) option and then click OK.
6. Close Group Policy Editor and continue to the next step.
Step 3. Turn On BitLocker Encryption on Drive C:
To enable the BitLocker protection on your Windows 10/11 PC (on System Drive C: & its contents):
1. Navigate to Windows Control Panel (small icons) and open BitLocker Drive Encryption.
2. Then, click Turn on BitLocker to enable the encryption on the drive C:
3. Press Next at the first three (3) screens.
4. At the next screen select how you want to unlock your drive at startup:
- Insert a USB drive: If you want to unlock your computer by using a USB flash drive then plug an empty USB drive on your PC and select this option to continue.
- Enter a password: Click this option if you want to unlock your PC, by typing a password (like in this example).
5. Now type a strong password and click Next.
6. At the next screen select where do you want to save the recovery key, in case you have problems unblocking your PC, and then click Next. At this step, you have the following options:
- Save to your Microsoft account: By selecting this option you 'll able to get your recovery key after signing with your Microsoft Account at https://onedrive.live.com/recoverykey
- Save to a USB flash drive. If you select this option plug an empty USB drive on the PC and follow the instructions to create the BitLocker recovery drive. If you having problems unlocking the computer (in the future), then plug the USB flash drive in to your locked PC and follow the instructions to unlock it.
- Save to a file: If you want to save the recovery key to a file, then plug a USB drive on the PC and then save the recovery key on the USB. If you can't unlock your PC in the future, then read the saved text file from another computer in order to find out the recovery key to unlock your computer.
- Print the recovery key and save the printed document to a safe place.
7. Now, according your case, select one of the following encryption options and click Next.
- Encrypt used disk space only (faster and best for new PCs and drives)
- Encrypt entire drive (slower but best for PCs and drives already in use)
8. Then select the encryption mode according your needs and click Next.
- New encryption mode (best for fixed drives on this device)
- Compatible mode (best for drives that can be moved from this device)
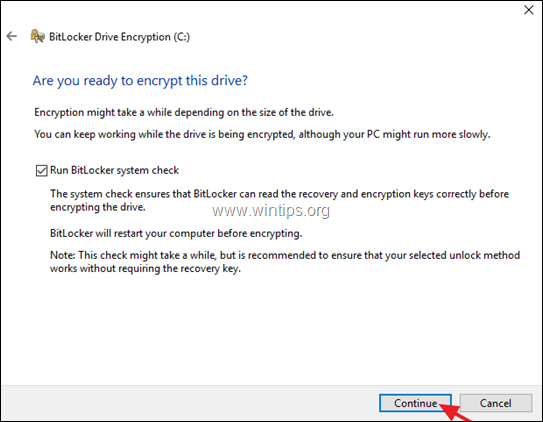
9. Leave the Run BitLocker system check option checked and click Continue.
10. Finally restart your PC to run the BitLocker system check.
11. At restart, type the BitLocker password to unlock the drive and press Enter to continue. *
* Note: If you forget the password then press ESC to access the BitLocker recovery options.
12. After restart double click at the BitLocker Drive Encryption icon ![]() in the taskbar or go to Control Panel > BitLocker Drive Encryption, to see the encryption status. *
in the taskbar or go to Control Panel > BitLocker Drive Encryption, to see the encryption status. *
* Notes:
1. The encryption time varies according the encryption method you selected before and the size of the hard drive.
2. You can work at your computer during the encryption process.
Available Options in BitLocker Drive Encryption program.
After enabling the BitLocker Drive Encryption on your PC, you can:
- Suspend Protection: Use this option if you want to pause the protection on your system in cases that you want to upgrade Windows 10 or to change the hardware on your PC.
- Change Password: Use this option if you want to change the password to Unlock your PC. (BitLocker password)
- Remove Password: Use this option if you want to use another method to unlock your PC. (e.g. instead of using a password, you want to use a flash drive).
- Turn Off Blocker Protection: By selecting this option, you will remove the BitLocker protection (encryption).
Additionally from BitLocker's menu, you can turn on the encryption for any other fixed drive on your PC or you can use the BitLocker to Go option to encrypt any Removable Drive (e.g. you USB flash Disk).
That’s it! Let me know if this guide has helped you by leaving your comment about your experience. Please like and share this guide to help others.
We're hiring
We're looking for part-time or full-time technical writers to join our team! It's about a remote position that qualified tech writers from anywhere in the world can apply. Click here for more details.
- FIX: Numeric keypad Not Working on Windows 10/11 - July 24, 2024
- How to Share Files or Printers in Hyper-V? - July 22, 2024
- How to invoke Hyper-V Screen resolution prompt? - July 17, 2024


![image_thumb[3] code 31 WAN miniport fix](https://www.wintips.org/wp-content/uploads/2015/03/image_thumb3_thumb.png)


