FIX: Dell Laptop Needs the Bitlocker Recovery key (Solved).
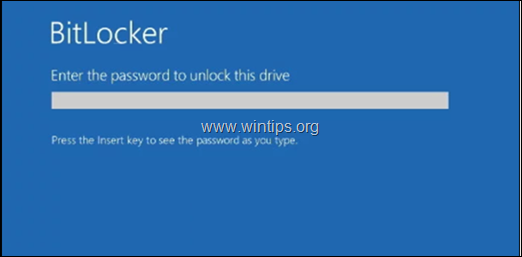
Recently, one of my customers, brought his Windows 10 Dell laptop to our service, with the following problem: When the laptop starts, it prompts to enter the BitLocker recovery key, but, as my customer says, it has never enabled the BitLocker encryption on the system.
After some research on the Internet, I found that on some Dell devices the bitlocker is starting automatically to encrypt the drive if a Microsoft Account (MSA) is used on the system. In other cases, some users complained that the Bitlocker encryption was enabled automatically, after updating the BIOS on their Dell laptop.
In this tutorial, you 'll find all the available methods to remove the Bitlocker Drive Encryption in Windows 10.
How to Remove Bitlocker Encryption in Windows 10.
Case 1. How to Disable Bitlocker Encryption If you can login to Windows 10.
The normal way to disable the bitlocker encryption in Windows 10 is the following:
1. Navigate to Windows Control Panel and open System and Security.
2. At 'Manage Bitlocker' section, click Bitlocker Drive Encryption.
3. Click Turn off Bitlocker on the encrypted drive.
Case 2. How to Disable Bitlocker if you Cannot login to Windows.
Step 1. Find the Bitlocker Recovery key.
1. First of all, you should know that there is no way to bypass the Bitlocker encryption, if you don't have the Bitlocker password or the bitlocker recovery key. So, If you have enabled the Bitlocker Drive encryption on your system, then look at the following locations to find the bitlocker recovery key:
- On a printout you saved. (Type the 48-digit number recovery key from the printout)
- On a USB flash drive. (Plug the USB drive on the locked PC and follow the instructions)
- On your Microsoft Account.
- On your Azure Account if you sign in with an Azure Active Directory account.
Note for DELL devices: If you own a Dell PC or laptop and you have added a Microsoft account (MSA) on you device, for any reason (e.g. if you use an MSA account to logon to Windows 10, or to download Apps from the Microsoft Store, or to get your emails, or to activate Microsoft Office), then from another device with Internet access, sign in with that Microsoft Account at Microsoft's Bitlocker Recover Key webpage to get the Recovery key for your device. **
2. If you find the recovery key, proceed to step-2 below, otherwise proceed to step-3.
Step 2. Unlock the drive by Entering the Recovery key.
Type the bitlocker recovery key (48-digit number) at system startup. If the Bitlocker recovery key, is not accepted at system startup, then you have the following options:
Option 1. Attach the encrypted drive on another Windows 10 PC and then double click on the drive and type the recovery key to unlock it. After unlocking the drive, follow the instructions at case-1 to turn off the bitlocker encryption.
Option 2. Unlock the Drive in WinRE Environment. To do that:
1. Boot your system from a Windows 10 Installation Media (USB or DVD).
2. At the first screen click Next and then Repair you computer.
2. In the screen you asked for the recovery key, click Skip this drive.
3. Then go to Troubleshoot -> Advanced options -> Command prompt
4. In command prompt, give the following command to view the BitLocker status of all drives:
- manage-bde -status
5. Once you find the drive letter of the encrypted drive, give the following command to unlock the encrypted drive by using the recovery key.
- manage-bde –unlock drive-letter: -rp 48-digit-numerical-recovery-key
e.g. To unlock the drive "D:", by using the recovery key "123456-789012-345678-901234-567890-123456", type:
manage-bde –unlock D: -rp 123456-789012-345678-901234-567890-123456
6. When the decryption process is completed, give the "manage-bde -status" command, to ensure that the Encrypted Percentage is 0%
7. Then proceed to disable the Bitlocker protection on the drive, with this command:
- e.g. Disable-BitLocker -MountPoint "drive-letter:"
e.g. To disable the bitlocker protection on drive "D:", type:
Disable-BitLocker -MountPoint "D:"
8. Then decrypt the drive by giving this command (Keep in mind, that you have to wait some time until the background decryption process is completed):
- manage-bde -off drive letter:
e.g. To remove the encryption on drive "D:" type:
manage-bde -off D:
9. Finally, give again the "manage-bde -status" command and verify that the Conversion status is Fully Decrypted.
10. When done, remove the Recovery Media and reboot the computer. Windows should start normally.
3. After login to Windows, proceed to deactivate the Bitlocker encryption, by following the steps Ii n Case-1 above.
Step 3. Modify BIOS Settings on your Dell Laptop. *
* Attention: The below procedure applies only on Dell laptops. If you don't have a Dell laptop, then skip to Step-4.
If you cannot find the bitlocker recovery key, from your MS account, and the Bitlocker recovery key prompt, appeared after a BIOS update, then:
1. Power on your laptop.
2. When you see the Dell logo, press continuously the F2 key to enter BIOS Setup.
3. At Boot Sequence options, select UEFI and click Apply.
4. At Security options, select the TPM 2.0 Security and set it to Enable. Then click Apply again.
5. At Secure Boot options, set the Secure Boot to Enable and click Apply.
6. Click Exit to restart the system and see if you can boot to Windows.
Step 4. Completely Erase the Bitlocker Encrypted Drive and Reinstall Windows 10.
If you cannot unlock the drive, by using the instructions above, then the only remaining way to use again your computer, is to remove the Bitlocker encryption by completely erasing the encrypted drive and then to reinstall Windows 10. That means that you will lose all of your stored data. So, continue below, only if you can live with that decision.
*** Caution: Continue below only if it is your last choice. The following procedure WILL DELETE ALL YOUR PERSONAL FILES & DATA on the encrypted disk.***
1. Boot your system from a Windows 10 Installation Media (USB or DVD).
2. At the first screen click Next and then Repair you computer.
3. In the screen you asked for the recovery key, click Skip this drive.
4. Then go to Troubleshoot -> Advanced options -> Command prompt
5. In command prompt, give the following command:
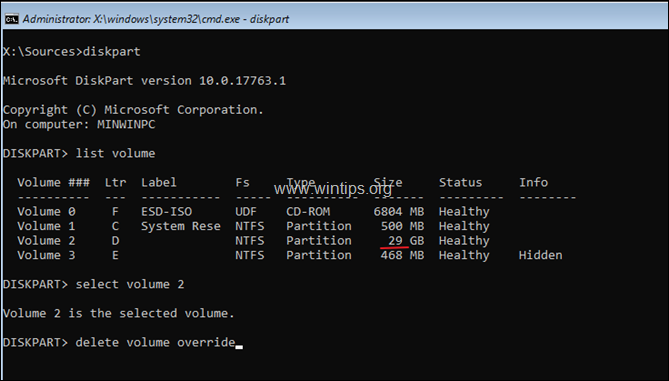
- diskpart
6. At DISKPART command type type the following command to list all the volumes on the system.
- list volume
7. Then proceed and select the largest in size volume, with this command:*
- select volume number
e.g. As you can see at the screenshot below, the largest in size volume, is the volume "2". So, at this case the command will be:
select volume 2
8. Finally proceed to delete the selected volume, by giving this command:
- delete volume override
9. When the process is completed, type exit to close the DISKPART utility.
10. Restart your computer and boot again from the Windows installation media.
11. Proceed to perform a clean Windows 10 installation, by following the steps in this article: How to clean install Windows 10 on your Desktop or Laptop PC.
That's it!
Let me know if this guide has helped you by leaving your comment about your experience. Please like and share this guide to help others.
We're hiring
We're looking for part-time or full-time technical writers to join our team! It's about a remote position that qualified tech writers from anywhere in the world can apply. Click here for more details.
- FIX: Numeric keypad Not Working on Windows 10/11 - July 24, 2024
- How to Share Files or Printers in Hyper-V? - July 22, 2024
- How to invoke Hyper-V Screen resolution prompt? - July 17, 2024


January 25, 2024 @ 10:49 am
Thank you soooo much!!!! Finally a write up with very clear information. You saved me night man! I ended up needing to diskpart, but that is okay, it's exactly what I was looking to do.
Reinstalled win 10, grab ing the stupid bitlocker key, and then proceeding to entirely wipe windows for Linux V●ᴥ●V
Thanks again!
September 6, 2023 @ 3:30 pm
Thanks for this info. I have a work computer that I just brought home so that I could work from home the following day. I turned on the power and I got that Bitlocker screen, which I had never, ever seen before, so I was dumbfounded. Our IT department support team is pretty non-existent, so Google away. I'm a relatively computer savvy guy, so fooling around in the bios isn't scary for me. Anyway, long story, long, I used your STEP 3 and we're all good now. Thank you so much.
May 16, 2023 @ 12:38 am
If you have a Microsoft Account, log into that and you can access your bitlocker Recorery Keys. I ran into this problem on a week old Alienware with an AMD R7. Just google "windows BitLocker recovery keys"
September 28, 2021 @ 10:53 pm
Great article
We have developed a tool in the hope of educating those with there finger print scanning laptops that they are bitlocker encrypted.
Most have no clue of the importance of there recovery key
Harddrive engine will check smart attributes and display the age of a hard drive while checking for a mounted bitlocker drive and automatically save the recovery key in a printable report
August 2, 2021 @ 6:13 pm
Step 3 allowed me to login without having the bitlocker key. Thank you so much for your post
November 22, 2019 @ 7:46 pm
Removing bitlocker is not fixing it.
August 20, 2019 @ 9:20 pm
Great Post. I was able to solve my laptop lenovo problem.
Thanks my dear friend.
August 15, 2019 @ 10:06 am
Case 2: Note for Dell Users —- I am a dell user and have logged into a microsoft account to use Office365 and One Note. The same account is -not- associated with any BitLocker key, so it is not an automatic thing.
August 31, 2021 @ 11:46 am
Yes, I spent hours on the phone with Dell and Microsoft since I too only got a Microsoft account because I bought Office 365. No Bitlocker recovery key in here. I understood that they would only be uploaded to your Microsoft account if you registered the device when you first set up your computer and Windows, unless there is an option to do it later which of course would imply that you know of Bitlocker and therefore take care of it. I didn't and spent already days to find a solution. This post here is promising….still going through some of the steps.
Thank you, Constantinos, for putting this up here. I have sifted through tons of posts on Dell's website about this issue. Yours is the most comprehensive one I came across so far!
August 4, 2019 @ 12:24 pm
Hey,
I'm at step 4, just to let you know you need to know the admin's password if you want to boot the installation from an USB. I'm stuck at this part. I can erase the ssd but I'm not sure if I'm able to boot from the usb after I cleaned the ssd.