FIX: Printer Not Working on Windows 10/11.
When your printer is not working is an annoying problem especially if you have an important document to print. But don't worry! If you're experiencing printer issues in Windows 10/11 you're not alone and in this guide you'll find step by step instructions to fix it.
Why a Printer May Not Working in Windows 10/11?
The primary reason why a printer may not work is because it may not be receiving power or may not be connected to the computer properly. For example: if the printer's power cord is not properly connected to both the printer and the power outlet, or if the cable connecting the printer to the computer is damaged, this can cause the printer to not work or not communicate with the computer.
The second reason for a printer not working in Windows 10/11 is printer's driver. Printer drivers are the programs that communicate with the computer, allowing it to recognize and use the printer correctly. When these drivers become out of date or damaged, the system may not be able to communicate properly with the printer, resulting in a wide range of printing issues.
How to FIX: Printing Not Working issue on Windows 10/11.
Before you you continue to the below methods to fix your printing problem, perform first these simple steps:
1. Check first to see if the printer is ON and doesn't display any error. (e.g. Paper Jam, Out of Paper, etc.).
2. Turn Off the Printer and disconnect the power cord and the cable that connects it to your PC or to the network (e.g. the USB or the LAN cable).
3. Restart your computer.
4. Then, reconnect the printer's power cable and the cable that connects the printer with your PC (USB or LAN).
5. Turn On the printer and try to print a test page.
6a. If the printer is not printing again right-click on your printer and select See what's printing.
6b. Select the pending document to print and from the Document menu choose Cancel.
7. Then go, to Start ![]() > Settings > Update & Security.
> Settings > Update & Security.
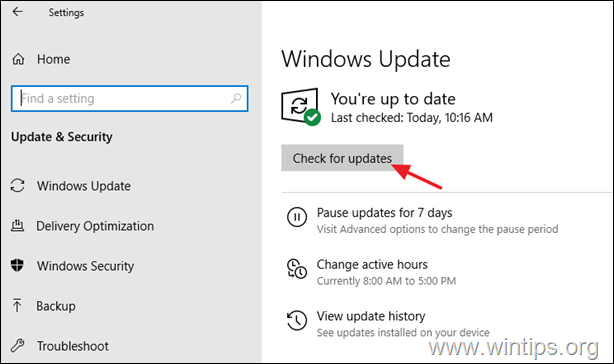
8. Click Check for updates and then if any updates found proceed to install them, restart your PC and try to print again. If your system is fully updated or you cannot print again, proceed to the methods below.
Method 1. Fix Printer Not Working with Printer Troubleshooter.
To help users with printer problems, Microsoft has integrated the "printer troubleshooter" tool into the Windows system. To try to solve the "Printer is not working" problem using the printer troubleshooter, follow these steps:
1. Press the Windows ![]() + I to launch Settings and then select Update & Security.
+ I to launch Settings and then select Update & Security.
2. Select Troubleshoot from the left pane and at the right select Additional troubleshooters.
3. Click on the Printer and hit the Run the troubleshooter button.
4. Allow the tool to detect the printer problem and if a fix found, click Apply this fix.
5. Once completed, check if the printer now works.
Method 2: Reset Print Spooler (Clear Printer Queue).
If you have a lot of print jobs waiting in the queue, it may be causing the "printing not working" problem. In this case, proceed to remove the print jobs in the queue and restart the "Printer Spooler" service.
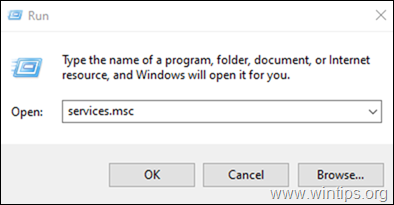
1a. Press Windows + R keys to open the Run widget.
1b. Type: services.msc and press Enter.
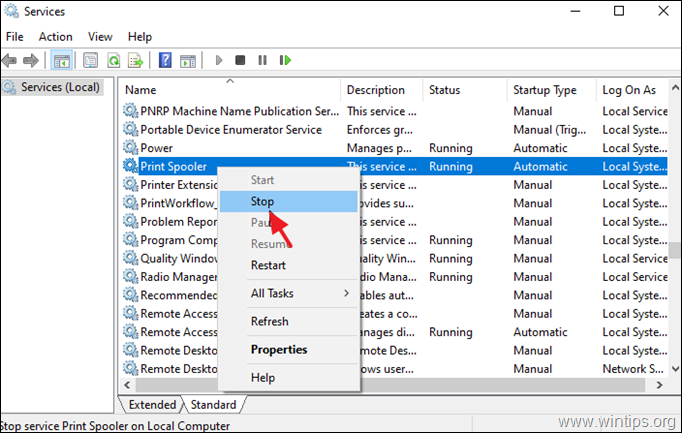
2. At the right pane, right click on Print Spooler service and click Stop. Then, without closing the 'Services' window and continue to next step.
3a. Simultaneously press the Windows ![]() + R keys to open run command box.
+ R keys to open run command box.
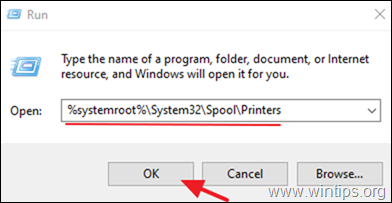
3b. In Run command box, type the following command and click OK:
- %systemroot%\System32\Spool\Printers
4. Press CTRL + A to select all the files inside the "Printers" folder and press the Delete button to delete all of them.
5. Now go back to Services window, right-click at Print Spooler service and click Start.
2. Finally close all windows and try to print.
Method 3: FIX Printing Problems by Reinstalling the Printer.
One of the most effective ways to resolve printing issues, is to uninstall the printer driver and other printer's related software and to reinstall them. This method often solves printing problems, especially if the printer's driver is damaged.
1a. Press Windows ![]() + R keys to load the Run dialog box.
+ R keys to load the Run dialog box.
1b. Type devmgmt.msc and press Enter to open the device manager.
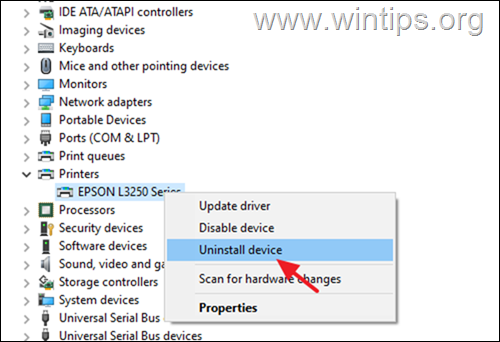
2a. in the Device Manager window, expand Printers.
2b. Right-click on the Printer and select select Uninstall device. (At warning prompt, select Uninstall to proceed.)
2c. When done, close Device Manager.
3a. Press Windows ![]() + R keys to load the Run dialog box.
+ R keys to load the Run dialog box.
3b. Type appwiz.cpl in the search box and press Enter.
4. Check if there is any printer software installed and if so Uninstall it.
3. Once completed, turn off the printer and reboot the PC.
4. After restarting, go to Control Panel > Devices and Printers.
5. Select the Microsoft Print to PDF (or any other installed printer), and open Print server properties.
6. Under Installed printer drivers, ensure that your printer's driver is not listed. If listed, select it and click the Remove button to remove it. Then reboot your PC again.
7. When finished, turn on the printer and wait 4-5 minutes for Windows to install the printer drivers.
8. Then, go to Control Panel > Devices and Printers and see if the printer is listed as a device. Then according the result, proceed as follows:
-
If the printer is listed, right-click on it, open the Printer Properties and Print a Test Page, to see if the problem is solved.
-
If you don't see the printer, navigate to printer's manufacturer support site and download and install the latest driver and software for the printer.
If none of the above methods resolve the printing issue, it could be a hardware problem with the printer. In this case, you may need to contact the printer's manufacturer for further support, or to replace your printer.
That's it! Which method worked for you?
Let me know if this guide has helped you by leaving your comment about your experience. Please like and share this guide to help others.
We're hiring
We're looking for part-time or full-time technical writers to join our team! It's about a remote position that qualified tech writers from anywhere in the world can apply. Click here for more details.
- FIX: Numeric keypad Not Working on Windows 10/11 - July 24, 2024
- How to Share Files or Printers in Hyper-V? - July 22, 2024
- How to invoke Hyper-V Screen resolution prompt? - July 17, 2024






![clip_image011[1] clip_image011[1]](https://www.wintips.org/wp-content/uploads/2021/11/clip_image0111_thumb-1.png)


