FIX: VirtualBox Error in supR3HardenedWiReSpawn – Error relaunching VirtualBox VM process 5 (Solved)
Many VirtualBox users (including me), have encountered the following issue, when starting a virtual machine after restarting the computer: "VirtualBox – Error in supR3HardenedWiReSpawn" and after clicking OK, it appears another error says "Failed to open a session for the virtual machine exit code 1 (0x1) – E_FAIL (0x80004005)", which refers to the 'VBoxHardening.log' for details about the error. But, in 'VBoxHardening.log' file, there is not a clear explanation about the problem, except that many DLL files "lacks WinVerifyTrust".
Problem description: On a Windows 10 PC, after installing the latest version of VirtualBox and after restarting the computer, the following errors appears when starting a VM machine:
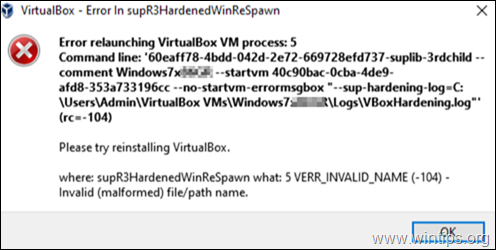
"VirtualBox – Error in supR3HardenedWiReSpawn
Error relaunching VirtualBox VM process: 5
supR3HardenedWinReSpawn what: 5 VERR_INVALID_NAME (-104) -Invalid (malformed) file/path name."
…and after hitting OK (on the above message), you receive the following error:
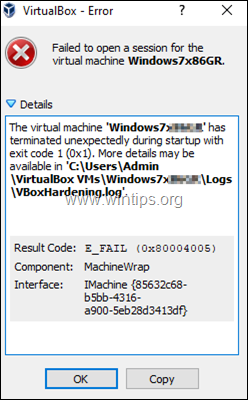
"Failed to open a session for the virtual machine %VM_Machine_Name%.
The virtual machine '%VM_Machine_Name%' has terminated unexpectedly during startup with exit code 1 (0x1). More details may be available in 'C:\Users\Admin\VirtualBox VMs\%VM_Machine_Name%\Logs\VBoxHardening.log'.
Result Code: E_FAIL (0x80004005)
Component: MachineWrap
Interface: IMachine {85632c68-b5bb-4316-a900-5eb28d3413df}"
This tutorial contains instructions to solve the following VirtualBox errors:
- VirtualBox Error in supR3HardenedWiReSpawn. Error relaunching VirtualBox VM process: 5…supR3HardenedWinReSpawn what: 5 VERR_INVALID_NAME
- Failed to open a session for the virtual machine…Virtual Machine terminated with exit code 1 (0x1)"
- The 'VBoxHardening.log' file reports that several .dll files [lacks WinVerifyTrust].
How to FIX: Error relaunching VirtualBox VM process 5 [lacks WinVerifyTrust]
Important: Before proceeding to the steps below, apply the following actions and see if you can start the VM (after applying each of them):
1. Disable the AV Real Time Protection, or uninstall your Antivirus program and then try to start the VM. *
* Note: If you own an HP Pro or an HP Elite PC, with preinstalled software from HP, proceed and uninstall the following programs:
- HP Client Security
- HP Sure Click
- HP Sure Sense
2. Make sure that Hyper-V is Disabled. To do that, navigate to Control Panel > Programs and Features > Turn Windows features on or off and Uncheck the Hyper-V feature.
3. Navigate to "C:\Program Files\Oracle\VirtualBox\drivers\vboxdrv", right click at VBoxDrv.inf and click Install.
4. Uninstall and Re-Install the VirtuaBox, by following the procedure below:
a. Navigate to Control Panel > Programs and Features and Uninstall VirtualBox
b. Reboot your computer.
c. Download the latest version of VirtualBox.
d. Right click on the downloaded file and click Run As Administrator.
e. Reboot your computer.
f. Try to start the VM and if you receive the same error, follow the steps below:
Step 1. Change the Start type of VBoxDrv Service (VBoxDrv.inf) to 2 (Auto Load)*
* Note: The idea to change the 'Start' value of VBoxDrv service to 2, came after reading the Hardening Fix (workaround) For Error After Install and Restart in VirtualBox forums, where it is suggested to change the 'Start' value to 3. But that change didn't work and things got worse.
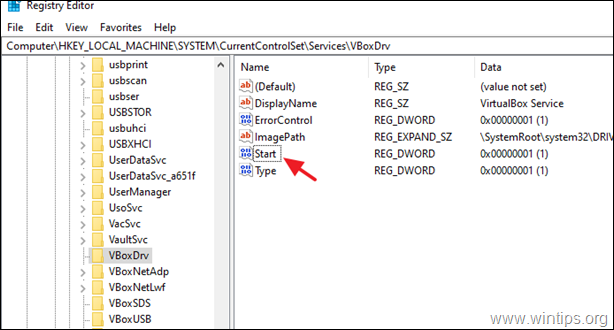
1. Open Registry Editor.
2. Navigate to this key at left pane:
-
HKEY_LOCAL_MACHINE\SYSTEM\CurrentControlSet\Services\VBoxDrv.
3. At the right pane, double click at Start REG_DWORD value.
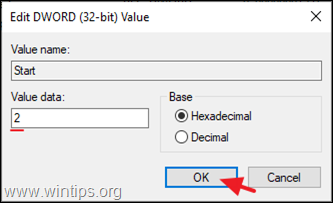
4. Change the Value data from 1 to 2 and click OK. *
* Possible Values for the Startup type of 'VBoxDrv' service (Stored in 'Start' REG_DWORD value).
Value Startup type Explanation
0 Boot Service is Loaded at Boot.
1 System: Service is loaded during the KERNEL initialization (on Boot).
2 Automatic: Service is loaded Automatic by the Service Control Manager.
3 Manual: Service is loaded Manually (on Demand).
4 Disabled: Service is Disabled.
5. Close the Registry Editor and restart the PC.
6. Try to start the VM. If the VM, couldn't start again, with error "Call to WHvSetupPartition failed: ERROR_SUCCESS (Last=0xc000000d/87", continue to step 2.
Step 2. Disable Hyper-V at Boot.
In Windows 10 PRO or Enterprise, the HYPER-V is started by default at bootup, so proceed and disable it.
1. Open Command Prompt as Administrator.
2. Type the following command and press Enter:
- bcdedit /set hypervisorlaunchtype off
3. Reboot your PC.
4. After reboot, start the VM.
That's it! Let me know if this guide has helped you by leaving your comment about your experience. Please like and share this guide to help others.
We're hiring
We're looking for part-time or full-time technical writers to join our team! It's about a remote position that qualified tech writers from anywhere in the world can apply. Click here for more details.
- FIX: Numeric keypad Not Working on Windows 10/11 - July 24, 2024
- How to Share Files or Printers in Hyper-V? - July 22, 2024
- How to invoke Hyper-V Screen resolution prompt? - July 17, 2024


