How to Change DNS Settings in Windows 10/11.
Sometimes it is useful to change the DNS settings on your Windows 10/11 computer, especially if the assigned DNS addresses provided by your network provider (ISP) do not allow you to visit a website, or slow down your web browsing.
The DNS ("Domain Name System"), is a service that translates (map), computer names or domain names to IP addresses and vice-versa. For example, it translates the domain name "www.wintips.org" to the IP Address "193.116.221.7".
By changing the default DNS Server settings assigned by your ISP, you can get faster-browsing speed, better security and improved online privacy. Also, by using other DNS Servers, you can block any inappropriate content in your home or workplace, or gain access to restricted content for your country.
This guide contains three (3) different ways to modify your DNS server settings so that you can use other DNS servers to resolve your Internet queries.
How to Modify the DNS Server Settings on Windows 10/11.
Method 1. Change DNS Servers in Windows 10/11 Settings.
1. Go to Start > Settings > Network and Internet, or right-click on the Network icon on the taskbar and choose Network and Internet Settings.
2. In Network and Internet Settings, click on the active network connection (e.g. "Ethernet", if you're connected to the network through an Ethernet cable, or "Wi-Fi" for Wireless).
3. Scroll down and click Edit next to DNS server assignment to modify the DNS settings.
4. At the Edit DNS settings window, do the following:
-
- Change from Automatic (DHCP) to Manual
- Put the IPv4 switch to On
- Type your preferred DNS IP address (e.g. "8.8.8.8" to use Google's DNS Servers).
- When done, click Save.
Method 2. Modify DNS settings from Control Panel.
To change the DNS Server address(es) from Windows Control Panel:
1 Type control panel in the Search box and click on Control Panel app shown under Best match results.
2. Select Network and Internet.
3 Open Network and Sharing Center.
4. Now click Change adapter settings on the left pane.
5. Right-click on the active network connection (e.g. "Ethernet", if you're connected to the network through an Ethernet cable, or "Wi-Fi" for Wireless) and choose Properties.
6. Now select the Internet Protocol Version 4 (TCP/IPv4) and click Properties.
7. At Internet Protocol Version 4 (TCP/IPv4) Properties window:
-
- Select Use the following DNS server addresses
- Type below the Preferred DNS Server IP address (e.g. "8.8.8.8" to use Google's DNS Servers)
- Click OK twice to apply the change and to close the 'Properties' window.
Method 3. Set a Different DNS Server from Command Prompt.
If you want to change the DNS settings using Command Prompt, proceed as follows:
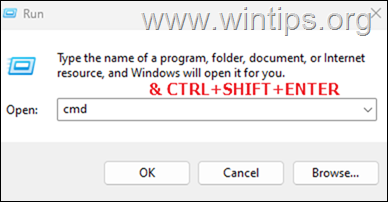
1. Simultaneously press the Windows ![]() + R keys to open run command box.
+ R keys to open run command box.
2. In run command box, type: cmd and press CTRL + SHIFT + Enter to open Command Prompt as administrator
3. In command prompt, type netsh and hit Enter to view and modify the network configuration.
4. Now give the below command to view the name of the connected network interface (e.g. the "Wi-Fi" in this example.)
-
interface show interface
5. Finally, give the following command to change the IP Address of the DNS Server on the connected network interface. *
- interface ip set dns name="Interface Name" source="static" address="IP- Address"]
* Note: In the above command, replace the Interface Name with the name of the connected interface (e.g. "Wi-Fi" in this example), and in IP Address type the IP address of the DNS Server that you want to use (e.g. "8.8.8.8" in this example). e.g.:
- interface ip set dns name="Wi-Fi" source="static" address="8.8.8.8"
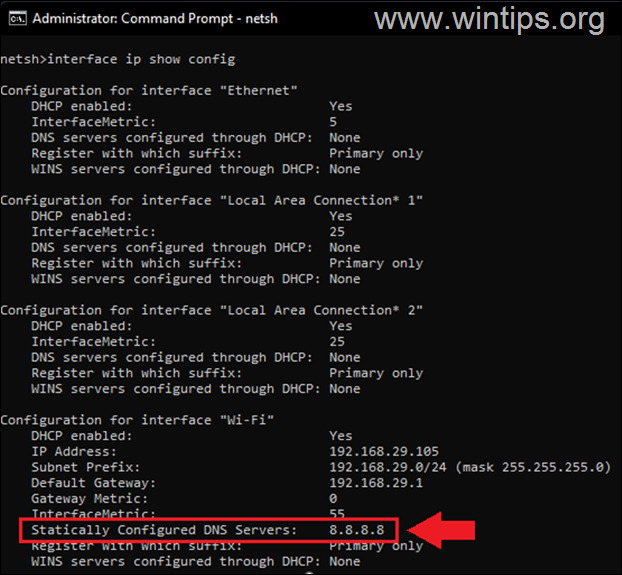
6. Finally, give the below command to confirm the DNS change and you're done!
- interface ip show config
That's it! Which method worked for you?
Let me know if this guide has helped you by leaving your comment about your experience. Please like and share this guide to help others.
We're hiring
We're looking for part-time or full-time technical writers to join our team! It's about a remote position that qualified tech writers from anywhere in the world can apply. Click here for more details.
- FIX: Numeric keypad Not Working on Windows 10/11 - July 24, 2024
- How to Share Files or Printers in Hyper-V? - July 22, 2024
- How to invoke Hyper-V Screen resolution prompt? - July 17, 2024


