How to Find What Causes Blue Screen of Death from BSOD Minidump information.
When Windows crashes, it displays a blue screen of death (aka "BSOD"), only for a few seconds and then restarts immediately. The BSOD screen contains a brief description of the STOP error and some very general instructions for solving the crash problem.
The error details displayed on the blue screen are minimal and for most users – even advanced users – seem unintelligible and don't really help solve the problem.
However, at the same time as the BSOD occurs, Windows creates a small memory dump file (also known as a "minidump") in the "C:\Windows\Minidump\" directory, which contains some additional details about the BSOD error and may help you to more easily resolve the problem.
In this tutorial you will find detailed instructions on how to find out what causes Windows to crash to a blue screen, by reading the blue screen error message or by viewing the BSOD MiniDump file(s).
- Related Article: How to FIX Blue Screen Of Death BSOD Problems (Common Solutions)
How to Read BSOD Minidump Files in order to Find Out What Causes the BSOD problem in Windows 11, 10, 8, 7 & Vista OS.
In order to find the cause for the BSOD problem, you can examine the details of the crash error from the Blue Screen Of Death or by analyzing the BSOD Minidump file. (Personally I prefer the second method, because is more helpful.)
Method 1. Find the Cause of the Blue Screen from BSOD screen details.
Method 2. Find the Cause of Blue Screen from BSOD Minidump file.
Method 1. Resolve Blue Screen problems from Blue Screen Of Death.
Step 1. Prevent Windows from Automatically Restarting after a BSOD Crash.
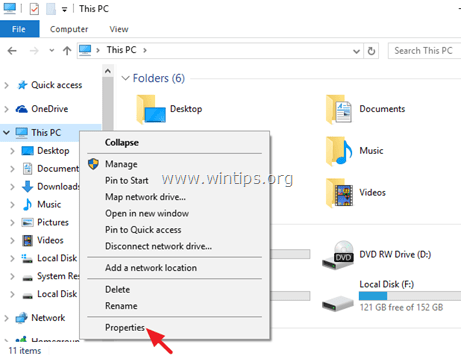
First of all, prevent Windows from restarting automatically when a system crash occurs in order to have enough time to read the complete BSOD error message that is displayed on the screen. To disable the Automatic Restart:
1. Open Windows Explorer and at the left side right-click at the Computer (or This PC) icon and select Properties.
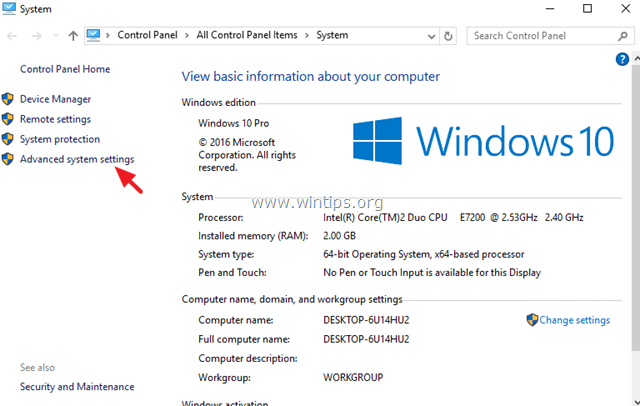
2. Choose Advanced system settings.
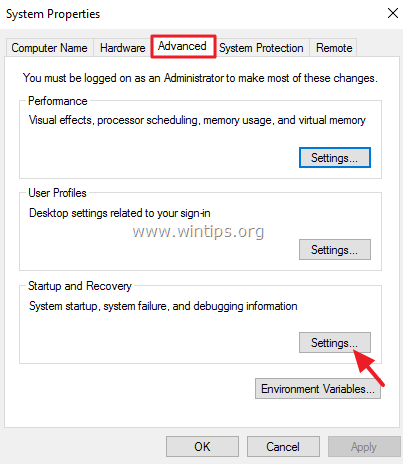
3. Open the Startup and Recovery settings.
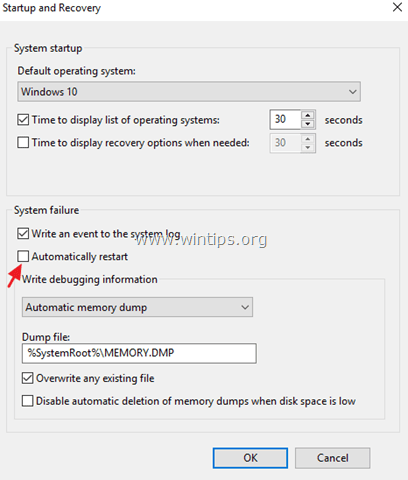
4. Uncheck the Automatically restart* option and press OK.
Step 2. Examine the details of the blue death screen.
After disabling the "Automatically Restart" feature, you should have enough time to read the blue screen of death details the next time your system crashes.
How to find what caused the System Crash from Blue Screen information (details).
In Windows 7 or Vista:
– The most important information of a BSOD screen is located at the near top and contains the actual crash error along with the filename of the application or driver that caused the BSOD problem (if any).*
* e.g. At the screenshot below, the file that has caused the BSOD Crash problem is the "ntoskrnl.exe" and the error message is "IRQL_NOT_LESS_OR_EQUAL"
– The other information that may be useful is located near the bottom of a BSOD screen (right after the troubleshooting advices) and it contains the STOP error number (aka "Bug Check Code") on this form "0x<eight (8) alphanumeric characters>" and followed in parenthesis with the parameters of the error. *
* e.g. The Stop Code in the below bsod screenshot is: "0x0000000a"
{Blue Screen Of Death (sample) in Windows 7 or Windows Vista}
After reading and finding out the error from the BSOD screen, then perform a web search (Google is your friend) to find for a solution for the bsod problem. *
* e.g. Search Web for: "ntoskrnl.exe IRQL_NOT_LESS_OR_EQUAL" or "IRQL_NOT_LESS_OR_EQUAL 0x0000000a", etc.
In Windows 10, 8.1 & 8
The blue screen of death on Windows 10 and Windows 8, has a new look (at last), but it is as unhelpful as in the previous versions of Windows. Now the BSOD screen contains only the crash error (marked with red in the screenshot below) and only an advice to search for the error online.
{Blue Screen Of Death (sample) in Windows 10 & Windows 8}.
Method 2. Find the Root Cause of the BSOD from the BSOD's Memory Dump file (Minidump).
The second method to find out the BSOD Crash reason is to read the details that were stored in the BSOD Minidump file(s).
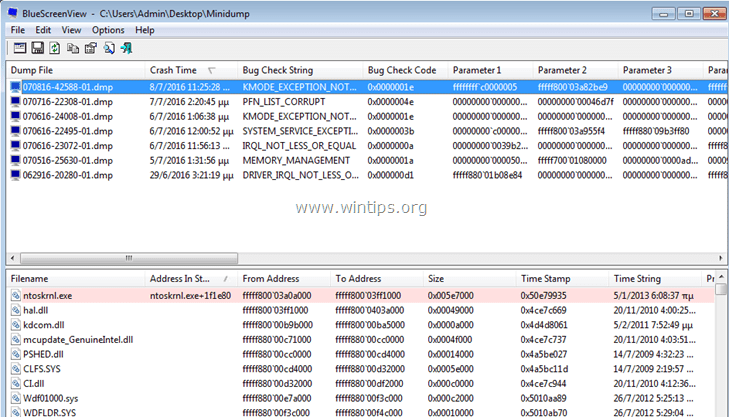
To view the minidump file information, you can use the free NirSoft’s BlueScreenView (Blue Screen Viewer) utility that can scan all minidump files created during the “blue screen of death” system crash and then displays the details about all crashes in one table.
How to find what caused the System Crash from the BSOD Minidump file.
1. Download NirSoft’s free BlueScreenView utility according your OS version (32 or 64 bit). *
* Note: You can download even the full Installer or the Portable version of the program.
2. Launch BlueScreenView and the program will automatically find and analyze the minidump files that were created during the BSOD crash.
– At the top pane of the BlueScreenView utility, you will see a list of all the minidump files that were created when your system crashed, shorted by the date/time, plus the Stop Error displayed in the blue screen (the Bug Check Code and its parameters), and the details of the driver or module that possibly caused the crash (filename, product name, file description, and file version).
– At the bottom pane the BlueScreenView utility displays highlighted the application or the driver or the module that is possibly responsible for the crash and you should pay attention to it.
3. Right click at any line line and select "Google Search – Bug Check + Driver" or "Google Search – Bug Check" or "Google Search – Bug Check + Parameter 1" to search for the additional solutions for the BSOD problem online.
Additional BlueScreenView Useful Features.
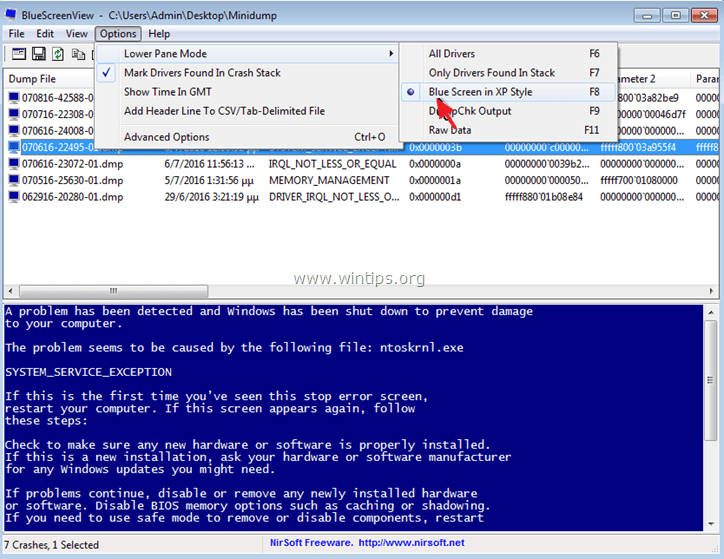
1. BlueScreenView gives you the ability to view the same blue screen that was displayed by Windows during the BSOD crash. To do that, from the main menu go to Options and choose Lower Pane Mode > Blue Screen in XP Style.
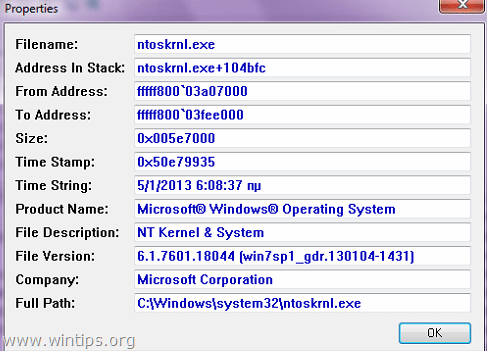
2. Double click at any line (on the upper or the lower pane) in order to see more details about the BSOD problem.
3. If the crashed system cannot load Windows, then you can transfer the Minidump (C:\Windows\Minidump\) folder to another working computer and examine the minidump files from there. To do that:
1. Select the Advanced Options icon which is located under the File menu or go to Options > Advanced options.
2. Then press Browse and then point BlueScreenView to search for the minidump files to the transferred Minidump folder.
That's it! Let me know if this guide has helped you by leaving your comment about your experience. Please like and share this guide to help others.
We're hiring
We're looking for part-time or full-time technical writers to join our team! It's about a remote position that qualified tech writers from anywhere in the world can apply. Click here for more details.
- How to Disable Device Encryption in Windows 11. - April 17, 2024
- How to View Permissions on Shared Folders on Windows 10/11. - April 15, 2024
- FIX 0x80070643 error in KB5034441 update (Solved) - April 10, 2024


