How to remove Win32.Expiro virus (Removal Guide)
Virus:Win32/Expiro.gen is a very nasty virus because it infects all executable (.exe) files and for that reason it is difficult to be removed from your system. Win32:Expiro virus can collect data from your pc and give access to your computer to unwanted users.
Expiro is a family of polymorphic viruses that can infect critical files on your computer by adding malicious code in their original code in order to perform malicious functionality to your computer. W32/Expiro family viruses can steal credit card information, modify Internet settings and also infect files protected by the system file checker (SFC).
Aliases:
Win32/Expiro
W32/Expiro-H
Virus:Win32/Expiro.S (Microsoft)
Virus.Win32.Expiro.w (Kaspersky)
W32.Xpiro.D (Symantec)
W32/Expiro.gen.h (NAI)
W32/Expiro-H (Sophos)
Win32.Expiro.W (FSecure)
Virus.Win32.Expiro.i (v) (Sunbelt)
W32/Expiro.E (Antivir)
W32/Expiro.O (Authentium)
Win32.Expiro.W (Bitdefender)
W32.Expiro-15 (Clamav)
W32/Expiro.W (Fortinet)
W32/Expiro.O (Fprot)
Virus.Win32.Expiro (Ikarus)
Variant of Win32/Expiro.T virus (NOD32)
W32/Expiro.gen (Panda)
Virus.Win32.Expiro.SEP.4 (VBA32)
Virus Expiro.A
Virus.Win32.Expiro.w
Win64/Expiro.AG
Win32/Expiro.AG
Win64/Expiro.gen!AH
Win64/Expiro.gen!AH
To detect and remove Win32:Expiro family infection (all its variants) follow the detailed instructions given below:
How to clean your computer from W32.Expiro virus infection.
Step 1. Download Dr.Web® Antivirus LiveCD.
1. Download Dr.Web® LiveCD on your computer. *
* Read the License Agreement and then press “Agree”.
2. When the download operation is completed, right-click on “drweb-livecd-xxxx.iso” file and select “Burn disc image”. *
* You can also use the “ ImgBurn” free application to burn disc images to an optical disc.
For detailed instructions on how to do that see this article: How to create or burn ISO images and write your files into a CD / DVD / HD DVD / Blu-ray disc’s.
Step 2. Disinfect your computer from W32.Expiro virus using Dr.Web® LiveCD
To disinfect your computer from Expiro virus, boot the infected computer with Dr.Web® LiveCD. To do that:
1. First, make sure that your DVD/CDROM Drive is selected as first boot device in BIOS (CMOS) Setup. To do that:
- Power On your computer and press "DEL" or "F1" or "F2" or "F10" to enter BIOS (CMOS) setup utility.
(The way to enter into BIOS Settings depends on the computer manufacturer). - Inside BIOS menu, find the "Boot Order" setting.
(This setting is commonly found inside "Advanced BIOS Features" menu). - At “Boot Order” setting, set the CD-ROM drive as first boot device.
- Save and exit from BIOS settings.
2. Put Dr.Web® LiveCD on the infected computer's CD/DVD drive in order to boot from it.
3. At the Welcome screen, choose your language (with the arrow keys) and press “Enter”.
4. When Dr.Web for Linux starts, press the “Switch to” button next to Scanner .
5. Under Scan Modes, press “Full Scan”
6. At the next window, press the “Begin the scan" button to start scanning your system for viruses.
7. Wait until “Dr. Web” antivirus finishes scanning your system for viruses.
8. When the scan is completed, select all infected executable (*.exe) files and click at “Cure” option. *
* To select multiple files, hold down the “CTRL” key on your keyboard while selecting the infected files.
9, When you “cure” all files, close Dr.Web scanner window and “Shut Down” your computer.
10. Continue to the next step.
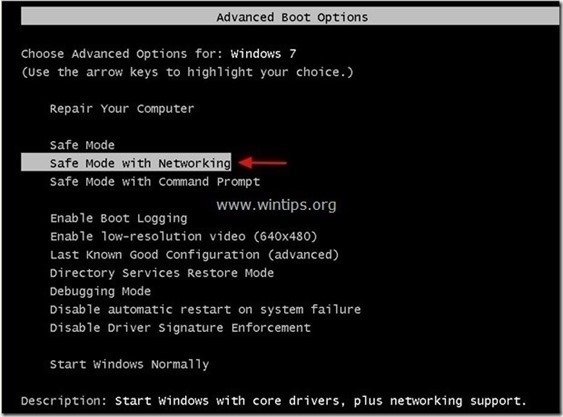
Step 3: Start your computer in “Safe Mode with Networking”
1. Power on your computer and remove “Dr. Web’s LiveCD” disk from your CD/DVD drive.
2. Then, as your computer is booting up, press the "F8" key before the appearance of the Windows logo.
3. When the "Windows Advanced Boot Options Menu" appears on your screen, use your keyboard arrows keys to highlight the “Safe Mode with Networking” option and then press "ENTER".
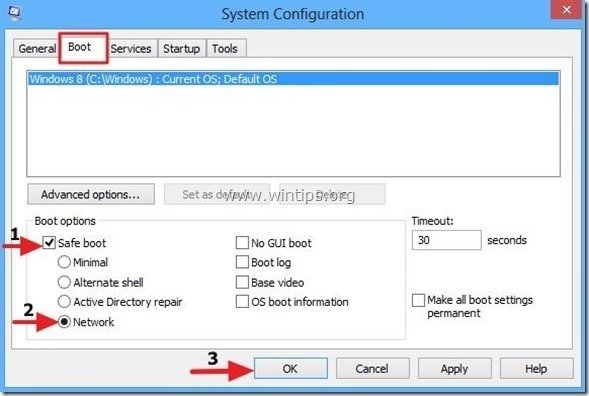
Windows 8 & 8.1 users:
- Leave your computer to boot in Windows normally.
- When Windows are loaded, press “Windows”
 + “R” keys to load the Run dialog box.
 - Type “msconfig” and press Enter.
- Click the Boot tab and check “Safe Boot” & “Network”.
- Click “OK” and restart your computer.
Note: In order to boot Windows in “Normal Mode” again, you have to uncheck the “Safe Boot” setting by using the same procedure.
Step 4. Stop and delete malicious running processes with RogueKiller.
RogueKiller is an anti-malware program designed to detect, stop & remove generic malwares and some advanced threats such as rootkits, rogues, worms, etc.
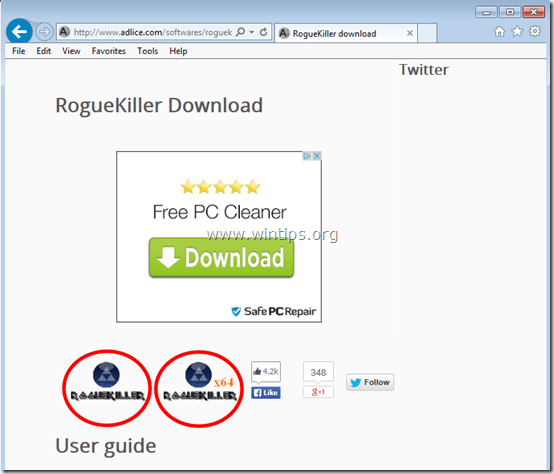
1. Download and save "RogueKiller" utility on your computer'* (e.g. your Desktop)
Notice*: Download version x86 or X64 according to your operating system's version. To find your operating system's version, "Right Click" on your computer icon, choose "Properties" and look at "System Type" section.
2. Double Click to run RogueKiller.
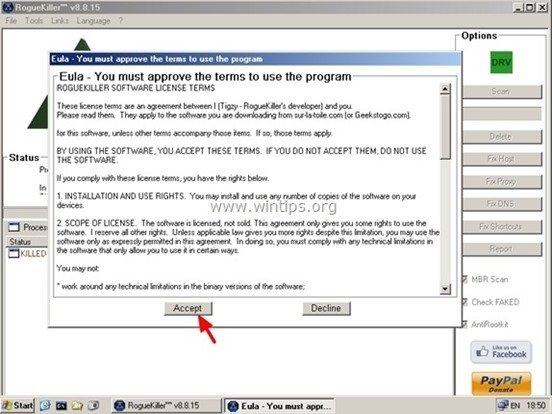
3. Wait until the pre-scan is completed and then read and “Accept” the license terms.
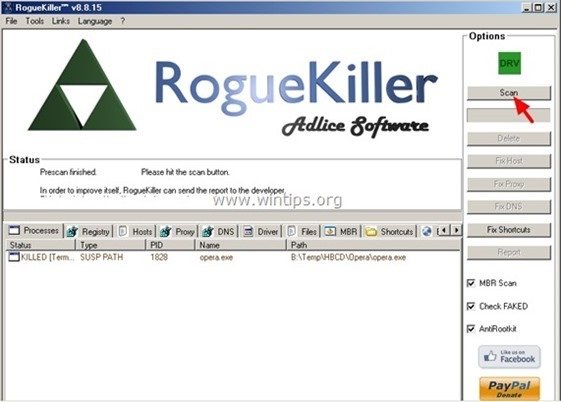
4. Press the “Scan” button to scan your computer for malicious threats and malicious startup entries.
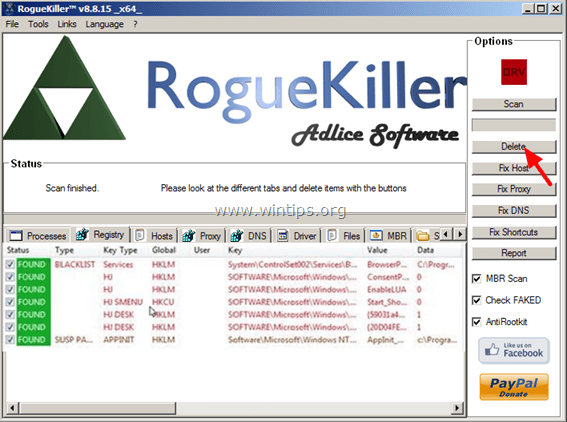
5. Finally, when the full scan is completed, navigate to "Registry" tab, select all malicious items found & press the "Delete" button to remove them.
6. Close “RogueKiller” and continue to the next step.
Step 5: Remove all adware infections with “AdwCleaner”.
1. Download and save “AdwCleaner” utility to your desktop.
2. Close all open programs and Double Click to open ”AdwCleaner” from your desktop.
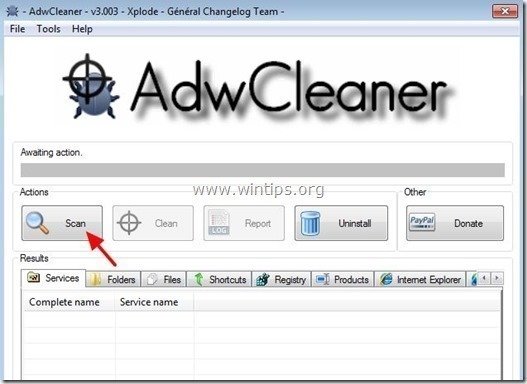
3. After accepting the “License Agreement”, press the “Scan” button.
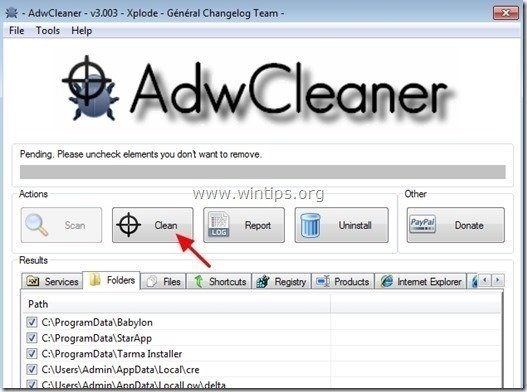
4. When the scan is completed, press “Clean” to remove all the unwanted malicious entries.
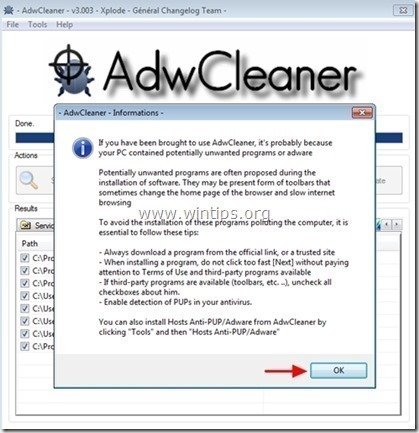
4. Press “OK” at “AdwCleaner – Information” and press “OK” again to restart your computer.
5. When your computer restarts, close "AdwCleaner" information (readme) window and continue to the next step.
Step 6. Remove Cryptowall infection with Malwarebytes Anti-Malware Free.
Download and install one of the most reliable FREE anti malware programs today to clean your computer from remaining malicious threats. If you want to stay constantly protected from malware threats, existing and future ones, we recommend that you install Malwarebytes Anti-Malware Premium:
Malwarebytes™ Protection
Removes Spyware, Adware & Malware.
Start Your Free Download Now!
Quick download & Installation instructions:
- After you click the above link, press at the “Start My Free 14-Trial” option to start your download.
- To install the FREE version of this amazing product, uncheck the “Enable free Trial of Malwarebytes Anti-Malware Premium” option at the last installation screen.
Scan & Clean your computer with Malwarebytes Anti-Malware.
1. Run "Malwarebytes Anti-Malware" and allow the program to update to its latest version and malicious database if needed.
2. When the update process is completed, press the “Scan Now” button to start scanning your system for malware and unwanted programs.
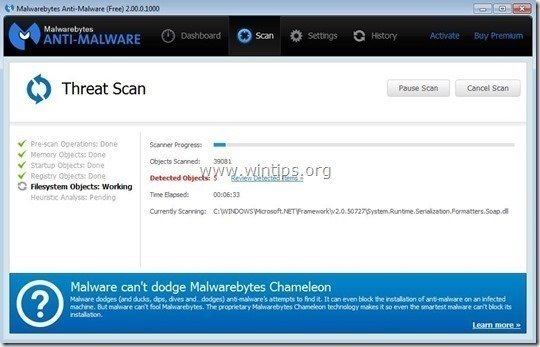
3. Now wait until Malwarebytes Anti-Malware finishes scanning your computer for malware.
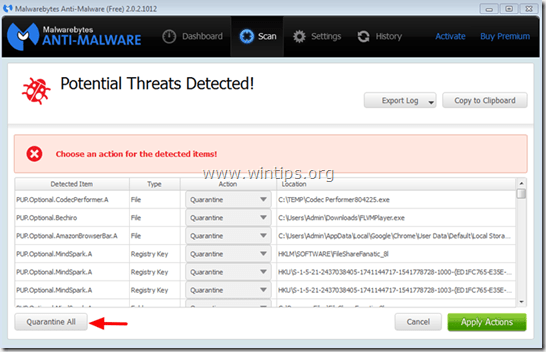
4. When the scan has completed, first press the “Quarantine All” button to remove all threats found.
5. Wait until Malwarebytes Anti-Malware removes all infections from your system and then restart your computer (if required from the program) to completely remove all active threats.
6. After the system restarts, run Malwarebytes' Anti-Malware again to verify that no other threats remain in your system.
Step 7. Perform a full scan with your antivirus program.
We're hiring
We're looking for part-time or full-time technical writers to join our team! It's about a remote position that qualified tech writers from anywhere in the world can apply. Click here for more details.
- FIX: Numeric keypad Not Working on Windows 10/11 - July 24, 2024
- How to Share Files or Printers in Hyper-V? - July 22, 2024
- How to invoke Hyper-V Screen resolution prompt? - July 17, 2024



![malwarebytes-downlaod_thumb1_thumb2_[1] malwarebytes-downlaod_thumb1_thumb2_[1]](https://www.wintips.org/wp-content/uploads/2014/05/malwarebytes-downlaod_thumb1_thumb2_1_thumb4.jpg)
![malwarebytes-anti-malware-free-insta[2] malwarebytes-anti-malware-free-insta[2]](https://www.wintips.org/wp-content/uploads/2014/05/malwarebytes-anti-malware-free-insta2_thumb3.jpg)
![update-malwarebytes-anti-malware_thu[1] update-malwarebytes-anti-malware_thu[1]](https://www.wintips.org/wp-content/uploads/2014/05/update-malwarebytes-anti-malware_thu1_thumb2.jpg)
![start-scan-malwarebytes-anti-malware[2] start-scan-malwarebytes-anti-malware[2]](https://www.wintips.org/wp-content/uploads/2014/05/start-scan-malwarebytes-anti-malware2_thumb2.jpg)
![wwrq1ctw_thumb1_thumb_thumb_thumb_th[2] wwrq1ctw_thumb1_thumb_thumb_thumb_th[2]](https://www.wintips.org/wp-content/uploads/2014/05/wwrq1ctw_thumb1_thumb_thumb_thumb_th2_thumb1.jpg)


