Use Rufus to Create a Windows 11 Install disk that bypasses TPM, Secure Boot requirements (How-to).
This guide shows how to use RUFUS to create a Windows 11 install disk on a USB, to bypass the TPM, Secure Boot and Microsoft Account requirements to setup Windows 11.
Microsoft doesn't allow the installation of Windows 11 on PC's that doesn't meet the following minimum hardware requirements:
- Processor: 1 gigahertz (GHz) or faster with 2 or more cores on a compatible 64-bit processor or System on a Chip (SoC)
[Windows 11 supported processors] - Memory: 4 GB RAM
- Storage: 64 GB or larger storage device
- System firmware: UEFI, Secure Boot capable
- TPM: Trusted Platform Module (TPM) version 2.0
- Internet Connectivity.
Additionally, starting with Windows 11 version 22H2 and later, Microsoft does not allow setting up Windows 11 without an Internet connection or without using a Microsoft account.
To bypass all the above restrictions, and to setup Windows 11 on an older PC using a Local Account, follow the instructions below.
How to Setup Windows 11 on an Unsupported PC and/or Without a Microsoft Account using RUFUS.
The easiest way to install Windows 11 on unsupported PC's, and without using a Microsoft Account, is to create a Windows 11 USB installation media with the RUFUS USB Creator Utility. To do that:
1. Go to Windows 11 Download page.
2. Select Windows 11 (multi-edition ISO) and click Download.
3. Choose the product language and click Confirm.
4. Finally click 64-bit Download to download Windows 11 in a ISO file.
5. When the download is complete, plug an EMPTY USB disk on your PC (at least 8GB)
6. Download and run the RUFUS USB Creator Utility.
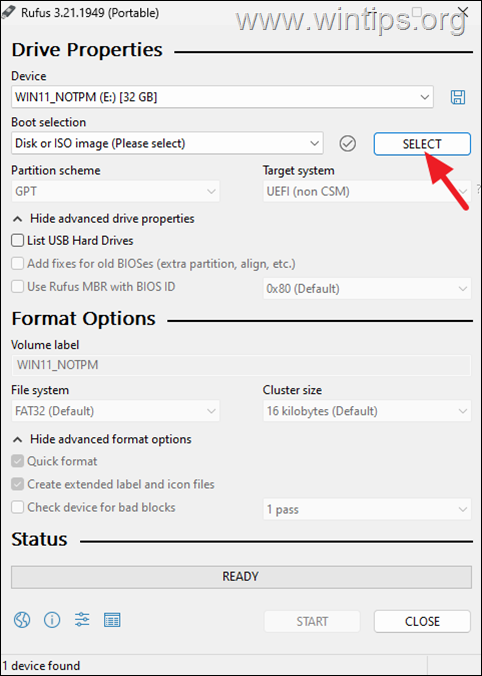
7. At Rufus utility, click SELECT.
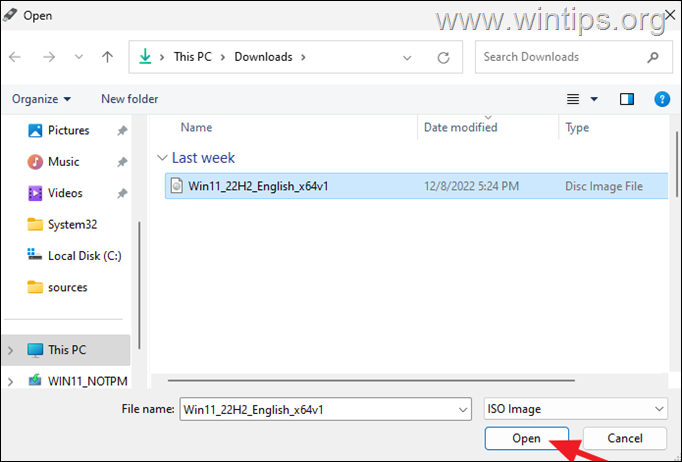
8. Choose the Windows 11 ISO file and click Open.
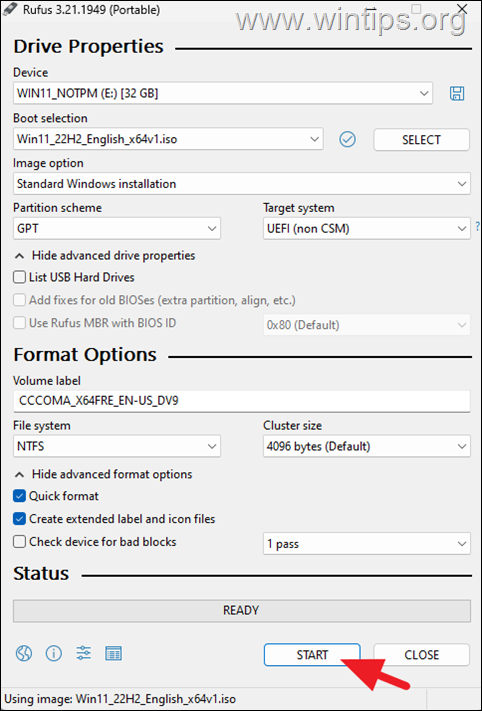
9. Then click the Start button. *
* Note: If you own a very old PC that does not support UEFI, change the Partition Scheme to MBR, before pressing the 'Start' button..
10. Now at Windows User Experience options, select the following and click OK:
- Remove requirement for 4GB+ RAM, Secure Boot and TPM 2.0, if you want to setup Windows 11 on a computer that does not meet the Windows 11 hardware requirements.
- Remove requirement for an online Microsoft Account, if you want to setup Windows 11 with a local account (and not with a Microsoft Account.)
- Create a local account with username…: If you have selected the above option, then select also this one and type a username for the local account.
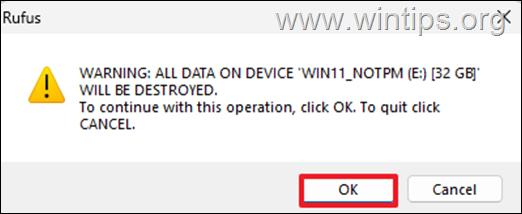
11. Finally click OK on the warning message. *
* Important: Any files on the USB disk will be deleted during the operation!
12. When the operation is completed, click CLOSE and you done! From now on, you can use the created USB disk to install Windows 11 on any machine that doesn't meet the hardware requirements for Windows 11 and without using a Microsoft account.
That's it! .Let me know if this guide has helped you by leaving your comment about your experience. Please like and share this guide to help others.
We're hiring
We're looking for part-time or full-time technical writers to join our team! It's about a remote position that qualified tech writers from anywhere in the world can apply. Click here for more details.
- FIX: Numeric keypad Not Working on Windows 10/11 - July 24, 2024
- How to Share Files or Printers in Hyper-V? - July 22, 2024
- How to invoke Hyper-V Screen resolution prompt? - July 17, 2024


November 30, 2023 @ 1:29 am
Absolutely Brilliant !! – instructions are so easy to follow and the method makes sense
Definitely 5 stars for this one !!
Thank You.
July 15, 2023 @ 2:43 am
Very helpful steps.
July 12, 2023 @ 6:17 am
I tried few other methods of upgrading win 10 to win 11 on my Dell E6540 with no luck. Your method and how you have described the steps makes a lot of sense. I finally was able to do it with your approach. Thanks very much.