FIX: Cannot Add or Modify PIN in Windows 10 (Solved)
If you cannot add or modify the Windows Hello PIN in Windows 10, continue reading below to resolve the problem. Windows 10 gives you the opportunity to sign-in to your PC with a PIN (Personal Identification Number), as an alternative sign-in option other than your password. Using a PIN makes it easier to login to your Windows 10 device without having to type your complicated password.
The normal way to Add or to Change PIN on Windows 10, is the following:
1. Go to Start > Settings > Accounts > Sign-in options.
2. Select Windows Hello PIN on the left.
3. Click the Add button to create a new PIN for your account, or the Change button to modify you PIN.
However, sometimes the following problems may occur when you try to set or change the PIN in Window 10:
- PIN incorrect error when trying to Modify PIN, even when the correct PIN was entered.
- Something went wrong. Try again later when trying to Add / modify PIN.
- Something went wrong (code: 0x8009002d). Restart your device to see if that fixes the problem.
- After clicking the Add PIN button nothing happens.
- PIN option is unavailable (Windows Hello PIN option missing).*
* Note: This issue usually occurs on domain computers. To resolve this issue, go straight to Method-3 below.
If you are experiencing one of the above issues, follow the instructions below to fix the problem.
How to FIX: Unable to configure Windows Hello PIN in Windows 10.
* Suggestion: If you cannot modify your PIN and you are logged in to Windows using your existing PIN, try the following:
1. Sign-Out of Windows.
2. On the login screen, select Sign-in Options and then click the key icon
3. Enter your account password to log in to Windows.
4. After login, try to change your PIN. If you still cannot modify your PIN, click REMOVE to delete the current PIN and then click Add to add a new PIN..
- Method 1. Reset Windows 10 PIN.
- Method 2. FIX Windows corruption errors with DISM & SFC tools.
- Method 3. Turn ON the PIN Option through Registry.
Method 1. Reset PIN.
Step 1. Activate Administrator Account
For precautions reasons, proceed and enable the Administrator account:
1. Open Command Prompt as Administrator.
2. At command prompt, type the following command and press Enter:
- net user administrator /active:yes
Step 2. Install Unlocker utility
1. Download and Install* the latest Unlocker version from here.
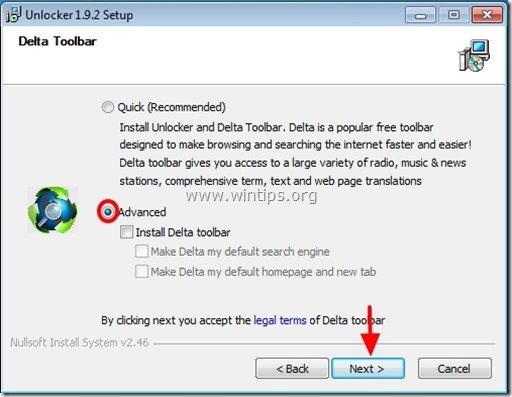
* Note: At 'Unlocker Setup' options, click Advanced and uncheck the "Install Delta Toolbar".
2. When the installation is completed, continue to step-2.
Step 3. Delete the NGC folder.
1. Open Windows Explorer and Navigate to the following folder.
- C:\Windows\ServiceProfiles\LocalService\AppData\Local\Microsoft
2. Right-click at the NGC folder and select Unlocker.
3. At Unlocker window choose Delete and click OK. *
4. When the deletion is completed, restart your PC and login to Windows with your account password. *
* Note: If you cannot login using your account password, login in to Windows using the Administrator account and then reset the user's password.
5. Proceed to Add a PIN.
Method 2. FIX Windows corruption errors with DISM & SFC tools.
If you unable to add/modify PIN, follow the instructions below to repair the Windows 10 system files and then proceed to set the PIN again.
1. Open command prompt as administrator. To do that:
1. In the Search box type: cmd or command prompt
2. Right click on the command prompt (result) and select Run as Administrator.
2. At the command prompt window, type the following command & press Enter:
- Dism.exe /Online /Cleanup-Image /Restorehealth
3. Be patient until DISM repairs component store. When the operation is completed, (you should be informed that the component store corruption was repaired), give this command and press Enter:
- SFC /SCANNOW
4. When SFC scan is completed, restart your computer.
5. Proceed to ADD or to Change your PIN
Method 3. Turn ON the PIN Option through Registry.*
* Note: This method commonly applies to computers who are joined to an Active Directory domain and the PIN function is not available.
1. Open Registry Editor. To do that:
1. Simultaneously press the Win
+ R keys to open the run command box.
2. Type regedit and press Enter to open Registry Editor.
2. Navigate to this key at left pane:
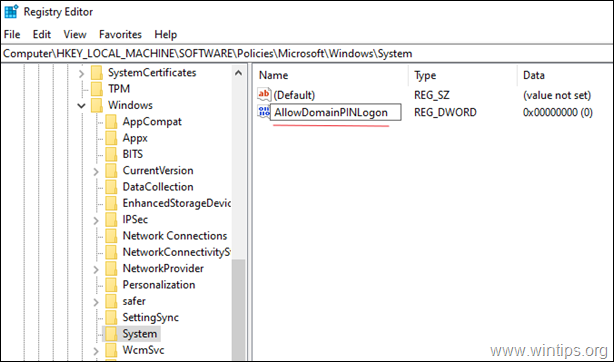
- HKEY_LOCAL_MACHINE\SOFTWARE\Policies\Microsoft\Windows\System
3. Right-click at an empty space at right pane and select New > DWORD (32-bit value).
4. Name the new value: AllowDomainPINLogon
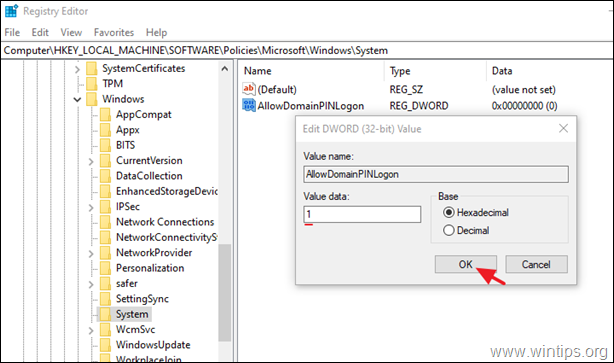
5. Finally double-click to open the new value and set the Value data to 1 and click OK
6. Restart your PC and try to add your PIN again.
That's it! Which method worked for you?
Let me know if this guide has helped you by leaving your comment about your experience. Please like and share this guide to help others.
We're hiring
We're looking for part-time or full-time technical writers to join our team! It's about a remote position that qualified tech writers from anywhere in the world can apply. Click here for more details.
- FIX: Numeric keypad Not Working on Windows 10/11 - July 24, 2024
- How to Share Files or Printers in Hyper-V? - July 22, 2024
- How to invoke Hyper-V Screen resolution prompt? - July 17, 2024


May 10, 2024 @ 10:04 pm
Hi all,
I don't know how it was done, several months ago, everything was working.. After upgraded to Win 11 23H2, suddenly, Start menu was started to not working, then Settings > Accounts and some other pages are started to not working…. I've tried every solutions recommended to fix them but all failed!
Then, I've re-install Windows 11 23H2 on the current Windows (not a fresh install because of the softwares installed)… Start menu and other settings parts were fixed… But, this PIN problem is still not working! I tried all the fix suggestions here (and other sites) on regedit, gpedit, NGC folder, Microsoft account settings etc…
None of them were working!! The PIN options always says, there's something wrong and Hello options currently unavailable message and PIN buttons disabled… TPM reset, TPM disable is also not working!!
July 29, 2023 @ 11:17 am
Method 3. Turn ON the PIN Option through Registry worked for me.
July 5, 2023 @ 3:25 pm
A solution I found on this page fixed my "PIN not available" error. Thank you! I was about to give up. I tried everything else and nothing worked until I found this page. I was able to make a change in the registry and that solved the problem.
June 2, 2023 @ 2:54 pm
The solutions found on this page didn't work for me. It turned out that I had to disable TPM in the BIOS to get Windows Hello for Business (PIN and face) to start working again.