How to Disable Tamper Protection Security on Windows 10
Windows 10 comes with Windows Defender, which is a built-in antivirus and in which Microsoft has introduced a new security feature called "Tamper Protection" in Windows 10 build 1909 and later versions. When Tamper Protection is enabled in the system, a malware can't change the settings of the Windows Defender Antivirus. As real-time protection cannot be tampered with, this adds an extra degree of security to the system.
By default, Tamper protection is enabled in Windows 10. If you want to disable tamper protection, this guide covers two different ways to do so.
How to Enable or Disable Tamper Protection on Windows 10.*
- Method 1. Manage Tamper Protection via Defender Settings.
- Method 2. Manage Tamper Protection via Registry.
* Notes:
1. The methods mentioned below can be used to turn on or off the Tamper Protection security on an individual Windows 10 system. If you are an organization using Microsoft Defender for Endpoint, you should be able to manage tamper protection in Intune similar to how you manage other endpoint protection features. For instructions read the corresponding section of the following Microsoft article:
- Manage tamper protection using Intune.
- Manage tamper protection using Configuration Manager, version 2006.
- Manage tamper protection using the Microsoft 365 Defender portal.
3. The below methods can be used only to enable or disable Tamper Protection within Windows Defender Firewall. For any third-party antivirus that you are using, you have to enable or disable the tamper protection separately.
Method 1: How to Turn Off/On Tamper Protection Security through Windows Defender Settings.
The first method to disable or enable the Tamper Protection security is via Defender settings.
1. Open the Run command box by holding the Win ![]() and R keys at the same time.
and R keys at the same time.
2. Type windowsdefender: and hit Enter:
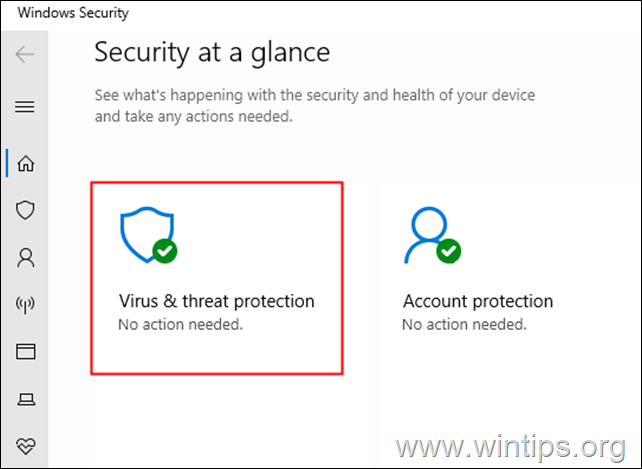
3. In the windows security window, click on the Virus & threat protection tile.
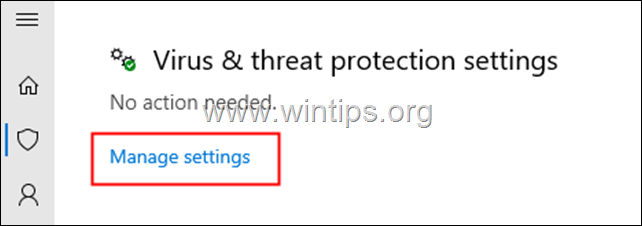
4. Scroll down and locate Virus & threat protection settings and click on Manage Settings.
5. Scroll down and locate Tamper Protection.
6a. In order to Enable Tamper Protection, toggle the switch to On, or…
6b. …toggle the switch to Off to Disable Tamper Protection Security.*
* Note: If you see a UAC popping up asking for permissions, click on Yes.
Method 2: How to Disable or Enable Tamper Protection using Registry Editor.
1. Open the Registry Editor: To do that:
* Note: If you see a User Access Control (UAC) warning window asking for permission, click on Yes.
2. In the search bar at the top, delete any previous values and copy-paste the below registry location and hit Enter. *
- HKEY_LOCAL_MACHINE\SOFTWARE\Microsoft\Windows Defender\Features
* Note: If you are facing any issues, navigate to the above mentioned registry location from the left-hand side panel.
3. Select the Features key at the left and at the right double-click at the TamperProtection REG_DWORD value. *
* Note: If the "TamperProtection" value doesn't exist, right-click anywhere at the right pane and select New > DWORD(32-bit) Value. Name the new value "TamperProtection" and proceed reading below.
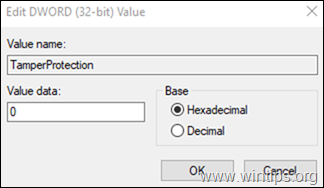
4. In the Edit DWORD window that opens:*
- To Disable Tamper Protection, set the value data to 0 and click on the OK button.*
- To Enable Tamper Protection, set the value to 5 and click OK. *
* Note: If after pressing OK, you receive the error: "Error Editing Value. Cannot edit TamperProtection. Error writing the value's new contents.", proceed below to take the ownership of the "Features" registry key and then repeat the above step.
To take the ownership of Features registry key:
Step 1. Backup Registry.
Since making changes to your Registry settings can be dangerous because even a minor mistake can result in system harm, it's important to make a backup of the Registry Key you're about to update before you start. To do that:
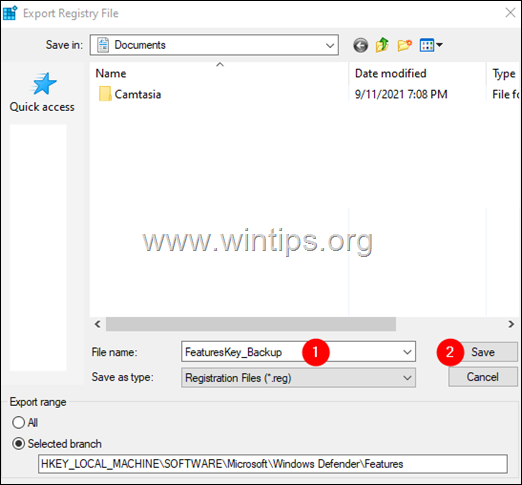
1. Right-Click on the Features key at the left-hand side panel and choose Export.
2. Give a suitable name (e.g. FeaturesKey_Backup), and save the REG file to your desktop. *
* Note: If something goes wrong after editing the registry, you can simply undo the changes by double-clicking the extracted registry key (REG file) on your desktop.
Step 2. Take Ownership of the Registry key.
1. Right-click on the Features key and choose Permissions.
2. In the 'Permissions for Features' window, click on the Advanced button.
3. In the 'Advanced Security Settings for features' window, click on Change.
4. In the 'Select User or Group' window, under Enter the object name to select section, type Administrators, and click on the OK button.
5. Tick the Replace owner on subcontainers or objects option, and click on the Apply button.
6. Now, double-click on the Administrators entry as shown below.
7. In the appearing window, check the Full control box and click on OK.
8. In the 'Advanced Settings' window, click on OK.
9. In the 'Permissions for Features' window, click on OK.
10. Now that you have the necessary permissions, proceed and modify the "TamperProtection" REG value as instructed in method-2 above.
That's it! Which method worked for you?
Let me know if this guide has helped you by leaving your comment about your experience. Please like and share this guide to help others.
We're hiring
We're looking for part-time or full-time technical writers to join our team! It's about a remote position that qualified tech writers from anywhere in the world can apply. Click here for more details.
- FIX: Numeric keypad Not Working on Windows 10/11 - July 24, 2024
- How to Share Files or Printers in Hyper-V? - July 22, 2024
- How to invoke Hyper-V Screen resolution prompt? - July 17, 2024


![clip_image001[14] clip_image001[14]](https://www.wintips.org/wp-content/uploads/2021/09/clip_image00114_thumb.png)

![clip_image003[5] clip_image003[5]](https://www.wintips.org/wp-content/uploads/2021/09/clip_image0035_thumb.png)
![clip_image004[5] clip_image004[5]](https://www.wintips.org/wp-content/uploads/2021/09/clip_image0045_thumb.png)


