FIX: Computer Turns On But No Signal in Monitor.
Many computer users may encounter this problem at some point: the computer turns on, but there is no signal on the screen. This can be a frustrating and confusing problem as it can have a variety of causes. However, with the right knowledge and patience, you can usually discover a solution and get a signal on your monitor again.
In this guide you will learn the possible causes of the "no signal on the screen while the computer is on" problem, along with troubleshooting steps to fix it.
How to FIX: Monitor displays "No Signal", while the Computer in ON. *
* Note: If a monitor displays "No signal" or "Check Video Signal", when connected as a second monitor on a laptop or desktop computer, then first restart the computer and if that does not resolve the problem, adjust the Display settings in Windows.
1. Check the Video Cable Connection.
Before further troubleshooting, make sure the video signal cable is securely connected to the back of the computer and the monitor.
Also make sure the video cable is not kinked or damaged. If it looks damaged, try another cable to see if that fixes the problem.
2. Check that Monitor is Connected to Correct Video Output.
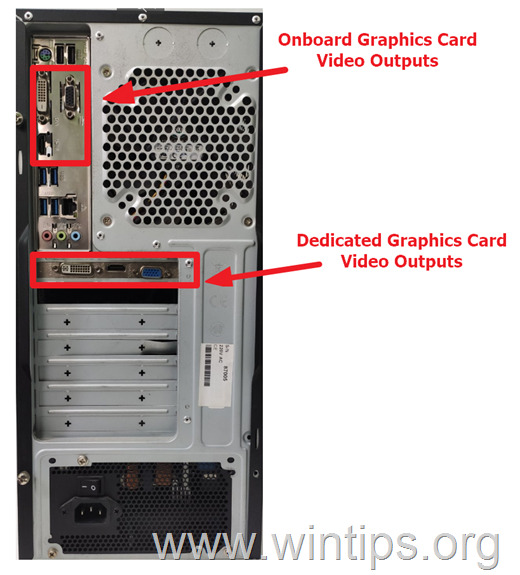
Some modern desktop computers usually have two Graphics Cards (GPU's). The first one, is on the motherboard (Onboard), and the second one is Dedicated.
Therefore, if your computer has a dedicated graphics card, make sure that the monitor video cable is connected to one of the outputs of the dedicated video card and not to the outputs of the onboard video card.
3. Turn Monitor Off and On & Check Input Source
Before troubleshooting further, check if the monitor is turned on and set to the correct input source. So if your monitor has more than one input sources:
1. Power off you monitor and turn it on again using its power button. (Some monitors have the power button on the front or bottom of the monitor and some others have the power button on the back or are remote-controlled).
2. When the monitor is on, check the input video source by pressing the input (source) button on the monitor or in the remote control.
3. Next, make sure that the correct input source is selected (HDMI, VGA, Display port), depending on the type of the video cable you're connecting the monitor to your computer.
4. Ensure that the Computer is Working.
When a computer is turned on, all its components are checked and initialized by the BIOS. This process is called Power On Self-Test (POST).
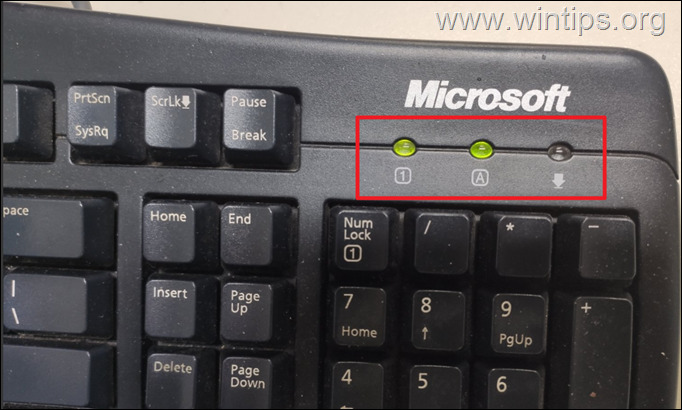
Then, if the POST process is successful, the CAPS LOCK & the NUM LOCK lights will blink once, the screen will turn on, and the operating system will begin to load. So…
1. Press the CAPS LOCK key, or the NUM LOCK (NUM) key, and check if the corresponding key led turns On and OFF.* If nothing happens, skip to step-8
* Info: If the CAPS LOCK or the NUM LOCK led turns on and off when you press the corresponding key, it means that the computer is working normally, and the problem is either the video cable, the monitor or the graphics card.
5. Replace the Video Cable (Monitor Signal Cable)
A damaged video cable can cause the monitor to not receive a signal from the computer. At such a case, test if disconnecting and reconnecting the cable to the computer and monitor fixes the problem, and if it's not replace the video cable. To do that:
1. Continually press the Power button for 5-7 seconds, to turn off the computer.
2. Turn off the Monitor and disconnect the Power Cable and the Video cable.
3. Then reconnect the disconnected cables and turn on your PC.
4. If the monitor still displays "No Signal" or "Check Video Signal", try with another video cable to see if that fixes the problem.
6. Reset Monitor Settings.
Resetting the monitor settings sometimes helps to solve the "no signal" issue on the display.
1. Turn off the computer, by pressing its power button for 5-7 seconds.
2. Unplug the power cable from the back of the monitor, wait for a few minutes, and then plug the power cable back in.
3. Turn on the computer and if you still receive "no signal" on the screen…
4. Check if you can reset the monitor settings, using the monitor's menu-options. (Refer to your monitor's user manual or the manufacturer's website, on how to reset the monitor's settings).
7. Try Another Monitor.
Trying another monitor can help determine if a problem is with the computer or the original monitor. If another monitor attached to the computer works, the problem is most likely with the original monitor. So, if you own another monitor:
1. Turn off the computer and the monitor.
2. Unplug the power cable and the video signal cable from the back of the original monitor.
3. Plug the disconnected cables to the new monitor.
4. Turn on the computer and see if the new monitor displays signal. (If yes, you have to replace your original monitor).
8. Reseat/Check Graphics Card.
If after following the above instructions, the monitor still displays "no signal", then the first possible culprit, is your graphics card which is responsible for rendering and displaying images on the monitor. To check if the problem is with the graphics card:
1. Turn off and unplug the computer from the power source.
2. Remove the screws and open the computer's case.
3. Then, according your case, proceed as follows:
- If your computer does not have a dedicated graphics card, skip to the next steps and if none of them fixes the problem, add a Dedicated Graphics Card on your PC.
- If your computer has a dedicated graphics card, proceed below:
4. Unplug the power cables connected to the graphics card (if any).
5. Release the clip or lever that holds the graphics card in place, and then gently remove the graphics card from the slot.
6. Then check that the graphics card and your computer is clean of dust. If it is not, remove the dust using a brush and compressed air.
7. Then, reseat the Graphics Card on the motherboard and re-connect its power cables (if any).
8. Finally, re-plug the power cable and turn on the computer.
9. If the problem persists and you have a dedicated graphics card, but also an onboard graphics card, do the following:
a. Remove the dedicated graphics card from the computer.
b. Connect the Video cable to the Onboard graphics card and see if that fixes the problem.
9. Reseat RAM Modules
In some cases, a computer turns on but nothing appears on the screen because of a malfunctioning or faulty RAM Memory module.
Additionally, if a RAM module is not attached correctly on its slot or its damaged, the computer is not be able to send a signal to the monitor.
To fix this issue, try first to reseat the RAM module(s) and if the problem remains, check if replacing the RAM Module(s), fixes the problem.
1. Turn off and unplug the computer from the power outlet.
2. Locate the RAM module(s) and gently release the clips on either end to remove them from the slot.
3. Reseat the RAM module(s) on the slot again properly and turn on the PC. *
* Suggestion: If you have more than one RAM Modules try them one-by-one.
10. Reset BIOS/CMOS Settings to Default Configuration
Resetting the BIOS (Basic Input/Output System) to its default configuration can help resolve issues with the monitor not receiving a signal from the computer.
To reset the BIOS/CMOS settings, use one of the following ways:
A. Read your motherboard's instructions manual to find out if there is a Clear BIOS/CMOS switch/button (MOS_SW) button, and if so press it once to clear the CMOS settings.
B. Temporarily, place a jumper cap to short the two pins of the CLEAR CMOS (CLR_CMOS) jumper.
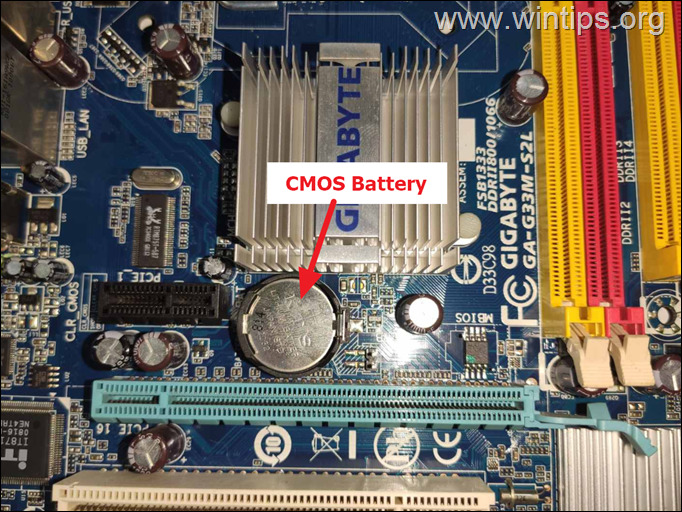
C. Remove the CMOS Battery.
-
- Turn off and unplug the computer from the power outlet.
- Locate and remove gently the CMOS battery* from the motherboard for at least 10 minutes.
- Place back the CMOS battery and then turn on the PC.
* Note: In rare cases, the screen may not show any signal because of a damaged CMOS battery. So, replace the CMOS battery, and see if that solves the problem.
* The CMOS battery is flat and looks like a coin.
11. Remove and Reconnect the Power Cables.
1. Turn off and unplug the computer from the power outlet.
2. Carefully, disconnect all the power cables from the motherboard, the Graphics Card, the hard drive(s), etc..
3. Leave the cables disconnected for a couple of minutes and then reconnected them.
4. Finally, place back the power cord and turn on your PC.
12. Replace the Power Supply (PSU).
If the computer appears to be working normally (fans are spinning, lights are on), but the monitor is not receiving a signal, the problem may be with the power supply. So, replace the power supply (PSU) and see if that solves the problem of not having signal on your screen.
13. Replace the Motherboard.
If none of the above steps work, the problem of no signal on the screen may be caused by the computer's motherboard. In this case, replace the motherboard or better take the computer to a professional computer technician to fix the problem.
That's it! Which method worked for you?
Let me know if this guide has helped you by leaving your comment about your experience. Please like and share this guide to help others.
We're hiring
We're looking for part-time or full-time technical writers to join our team! It's about a remote position that qualified tech writers from anywhere in the world can apply. Click here for more details.
- FIX: Numeric keypad Not Working on Windows 10/11 - July 24, 2024
- How to Share Files or Printers in Hyper-V? - July 22, 2024
- How to invoke Hyper-V Screen resolution prompt? - July 17, 2024


