FIX: Could Not Create the Java Virtual Machine. (Solved)
Java is one of the best development tools for creating games and applications and server-side programs. Games or apps written in Java need the Java Virtual Machine environment to run.
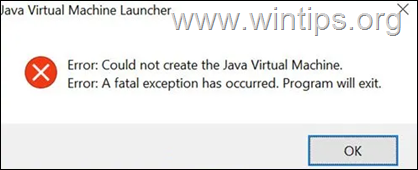
Games or applications developed with Java may crash unexpectedly or fail to open for various reasons, displaying the error "Could Not Create the Java Virtual Machine. Error: A fatal exception has occurred. Program will exit".
Below you will find several methods to resolve the Java Virtual Machine Launcher error "Could Not Create the Java Virtual Machine", in Windows 10/11 OS.
How to FIX: Could Not Create the Java Virtual Machine in Windows 10/11.*
* Suggestion: Before continuing with the following methods, try the following and see if the problem persists
-
- Install all Windows Updates.
- Press CTRL + SHIFT + ESC to open Task Manager and at Processes tab close all instances of Java Virtual Machine (right-click > End Task)
- 1. Install the Correct version of JAVA version for Java IDE app.
- 2. Increase Allocated Memory for JAVA Apps.
- 3. Launch JAVA with Admin rights.
- 4. Completely Remove and Reinstall JAVA.
Method 1. Install the Correct version of JAVA version for Java IDE app*
* Note: This method only applies to users using a JAVA IDE application for coding.
If you receive the mentioned error on a JAVA IDE application, you must ensure that the installed version of Java is compatible with the Java version (JRE or JDK) is running on JAVA IDE (Java Integrated Development Environment) application. So, proceed as follows:
Step 1. Check the JRE/JDK running version of JAVA IDE.
e.g. In the Eclipse IDE, check which version of the JRE or JDK it is running on by following the steps below:
1. From main menu, click Help > About Eclipse.
2. Click on Installation Details and choose the Configuration tab.
3. In the 'Eclipse IDE Installation Details' window, look at the line starting with -vm
4. The value at the line below will show you which JDK or JRE version on which Eclipse is running.
- e.g.: If the path contains “jre6”, that means that Eclipse is running JRE version 6
- e.g.:If the path contains "jdk1.8.0_05" means that Eclipse is running JDK version 8.
Step 2. Check which version of JRE or JDK is installed on Windows.
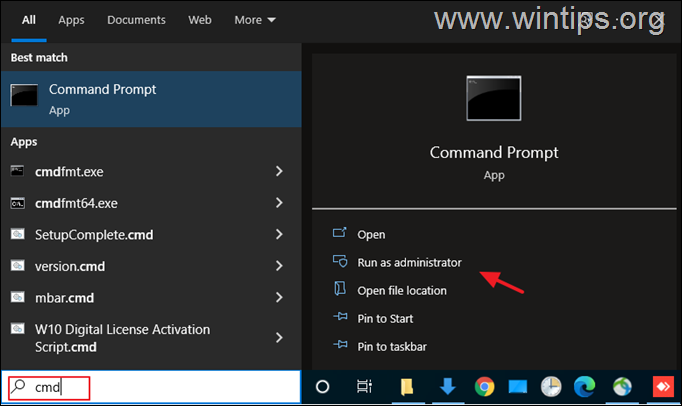
1. In the Search box type: cmd (or command prompt). Then select Run as administrator.
2. To find out the installed JAVA version give the following command and hit Enter:
- java –version
3. If the IDE does not support the Java version on your device, proceed to install the correct version of Java. *
* Note: In some cases the installed JRE & JDK versions may be different. So, if you JAVA IDE application running on JDK, proceed and check also if the installed JDK matches the running JDK of the JAVA IDE app. To find out the installed JDK version on Windows, give the following command:
- javac -version
Method 2. Increase Allocated Memory for JAVA Apps.
Launching an application that exceeds the maximum memory size of the Java virtual machine could result in the error "Could Not Create the Java Virtual Machine". To work around this problem, go ahead and increase the allocated system memory that JAVA can use as follows:
1. Click on the Start menu and type in search bar: view advanced system settings. Then click Open.
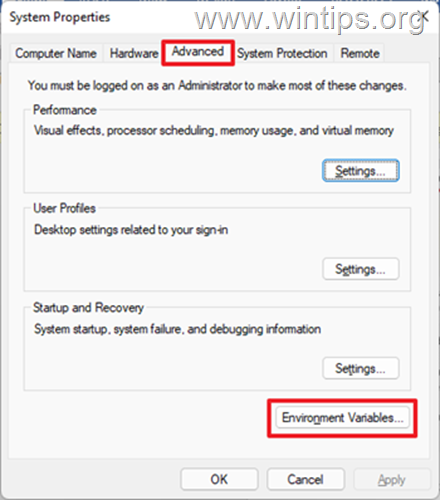
2. In the 'System Properties' window, select the Advanced tab and click Environment Variables.
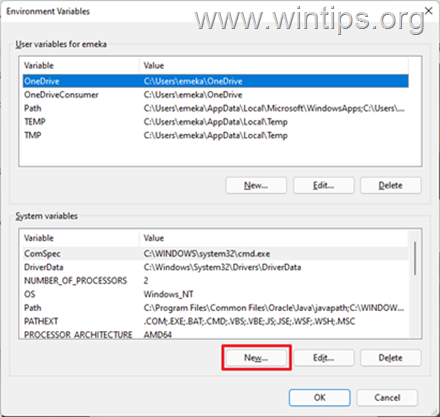
3. Below the System variables pane, select New.
4. Set the Variable name as _JAVA_OPTIONS and the Variable value as -Xmx1024M. Then, click OK twice to save the change and close all open windows. *
* Info: This will adjust the allocated memory for Java to 1GB (1024MB).
5. Restart your machine to apply the change.
6. Finally try to open your game or app on Java Virtual Machine. The problem should be gone.
Method 3. Launch java.exe with Admin rights.
The Java error also appears when the user does not have the admin rights or permissions to launch certain executables. Configuring Java to always run as an Administrator could fix the problem.
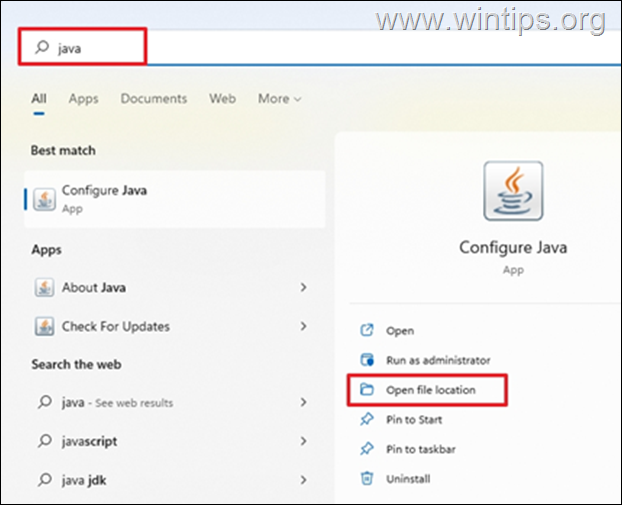
1. Press the Start menu and type Java in the search box.
2. Click Open file location.
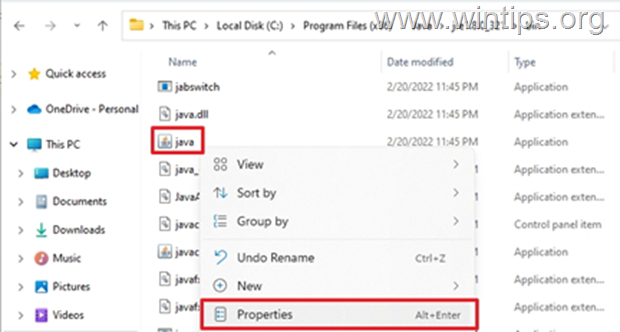
3. In the File Explorer window, right-click the Java executable file and select Properties.
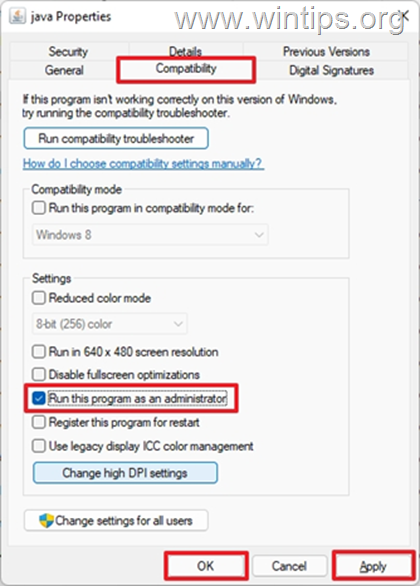
4. At 'java Properties" window select the Compatibility tab and below the Settings pane, check the box Run this program as an administrator. Then click Apply and OK.
5. Finally, start the program that cannot run because of the "Could Not Create the Java Virtual Machine" error and see if the problem persists.
Method 4. Completely Remove and Reinstall JAVA.
In some cases, Java may be corrupted or missing components, causing games or applications you are trying to run to close. In this case, follow the instructions below to remove all versions of JAVA versions from your computer and reinstall it.
1. Download Java Uninstall tool.
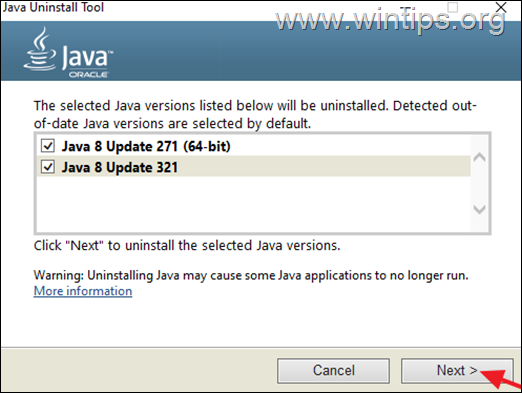
2. Run the tool and select to remove all Java versions.
3. After removal, proceed and delete the Java folder(s) from the following locations on disk (if exist):
- C:\Program Files\
- C:\Program Files (x86)\
4. Restart your computer.
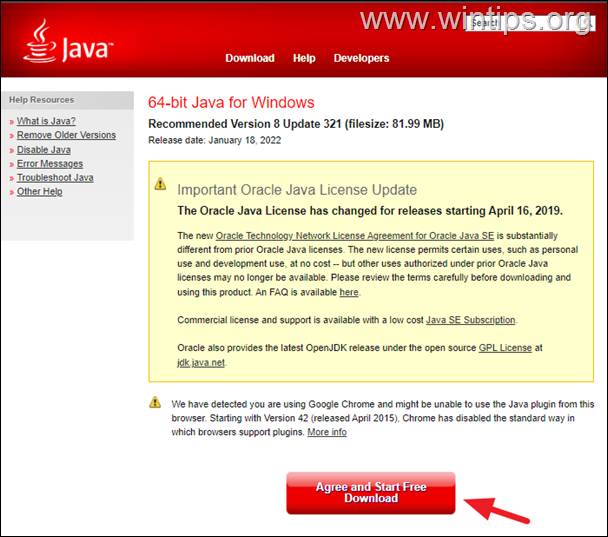
5. After reboot, visit Java official download page to download and install the latest version of Java.
That's it! Which method worked for you?
Let me know if this guide has helped you by leaving your comment about your experience. Please like and share this guide to help others.
We're hiring
We're looking for part-time or full-time technical writers to join our team! It's about a remote position that qualified tech writers from anywhere in the world can apply. Click here for more details.
- FIX: Numeric keypad Not Working on Windows 10/11 - July 24, 2024
- How to Share Files or Printers in Hyper-V? - July 22, 2024
- How to invoke Hyper-V Screen resolution prompt? - July 17, 2024


![image_thumb[8] image_thumb[8]](https://www.wintips.org/wp-content/uploads/2022/02/image_thumb8_thumb.png)
