FIX: Some settings are managed by your organization in Windows Update. (Solved)
Regular and periodic Windows update are essential for security and performance purposes. Microsoft releases both quality and feature updates to ensure that computers are secure and new features are introduced to the public. Windows update also helps in resolving bugs and glitches affecting the performance of devices.
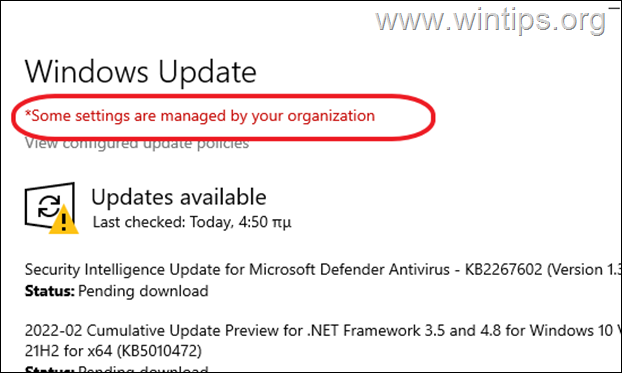
Many users report, that on their personal Windows 10 computer in the Windows Update page, they see the message "Some settings are managed by your organization" even though their computer does not belong to an organization or company. This error may also occurs in the privacy, background and notification settings.
In this article you will find several methods to eliminate the error "Some settings are managed by your organization", in Windows Update* settings on Windows 10 or Windows 11 OS.
* Note: If you see the message on Personalization settings (e.g. at Background, Colors, Themes, etc..), proceed and delete the "Personalization" key at this registry location:
- HKEY_LOCAL_MACHINE\SOFTWARE\Policies\Microsoft\Windows\Personalization
FIX: Some Settings Managed by your Organization in Windows 11/10 Update.
- 1. Remove Work or School Accounts.
- 2. Change Network ID in System Settings.
- 3. Remove Automatic Update Options in Registry.
- 4. Modify Automatic Updates settings in Group Policy.
- 5. Remove Policy registry keys.
Method 1. Remove Work or School Accounts.
Removing the associated account from your work or school could help resolve this issue. Follow the steps below to disconnect the account.
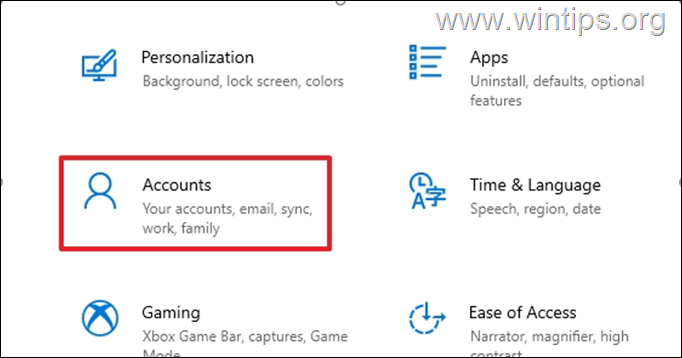
1. Click the Start menu, select Settings and then Accounts.
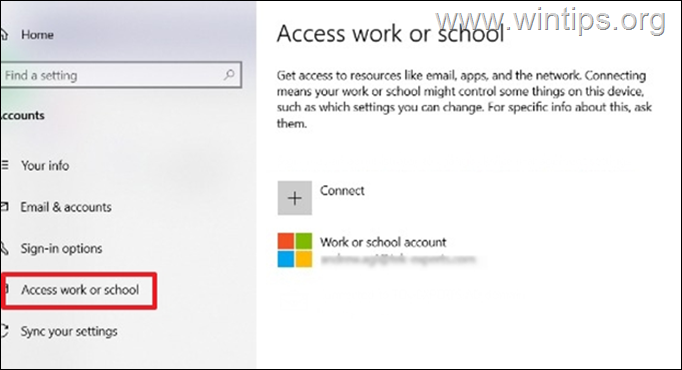
3. From the left pane, select Access work or school.
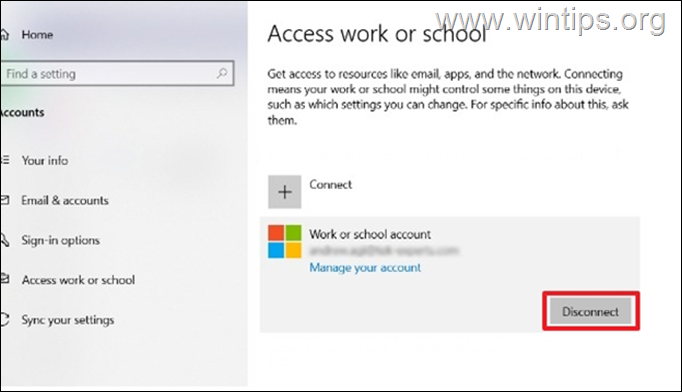
4. Click the associated account from your work or school, select Disconnect.
Method 2. Change Network ID in System Settings.
The second method to remove the error-message "Some settings are managed by your organization", is to change the system's properties to show that this PC is not a part of a business/work network.
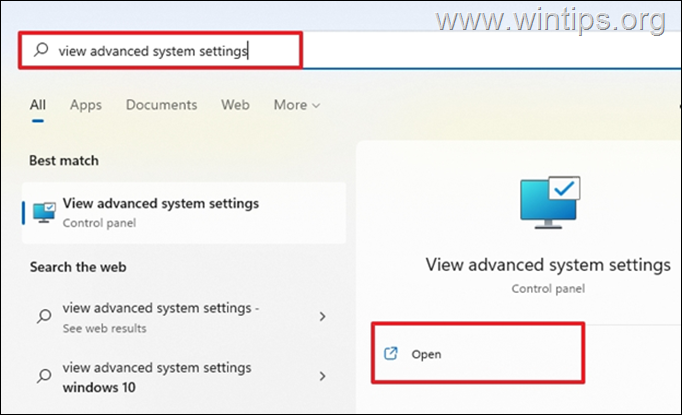
1. Click on the Start menu and type in search bar: view advanced system settings. Then click Open.
2. Select the Computer Name tab, then click on Network ID
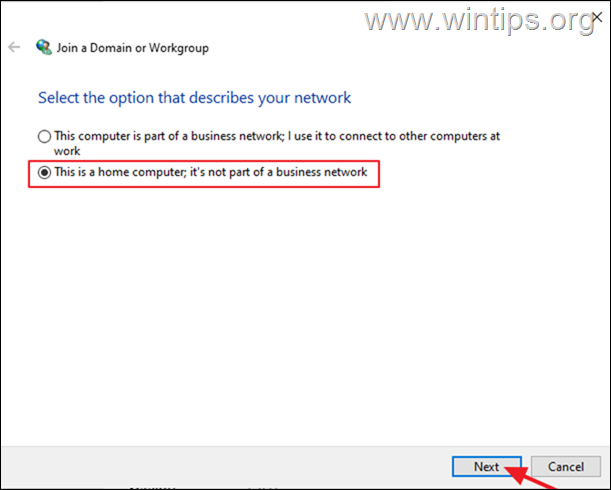
3. A dialog box will prompt you to describe if your device is a home PC or a business computer. Select This is a home computer; it is not part of a business network, then click Next.
4. The PC needs to restart to apply the changes, click Finish to reboot the PC. After restart, check if the issue is resolved.
Method 3. Remove Automatic Update Options in Registry.
1. Simultaneously press the Windows ![]() + R keys to open the Run command box.
+ R keys to open the Run command box.
2. Type regedit and hit Enter to open the Registry Editor.
3. Once you are inside the Registry Editor, navigate to the location mentioned below.
- HKEY_LOCAL_MACHINE\SOFTWARE\Policies\Microsoft\Windows\WindowsUpdate\AU
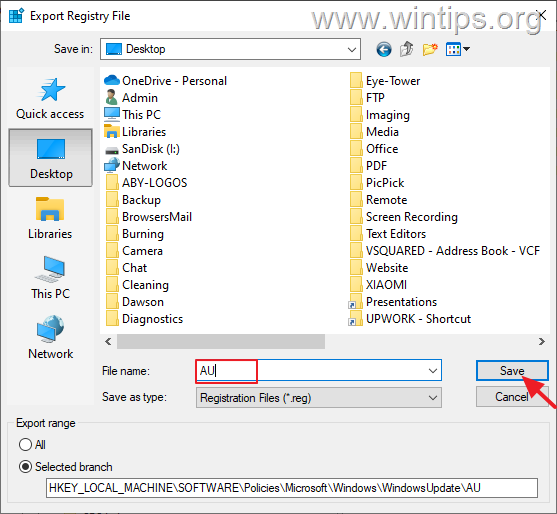
4a. Right-click at AU key and from the File menu choose Export to backup the registry key.
4b. Type a filename (e.g. "AU") and Save the registry file on your desktop. *
* Note: If something goes wrong after editing the registry, you can simply undo the changes by double-clicking the extracted registry key (.REG file) on your desktop.
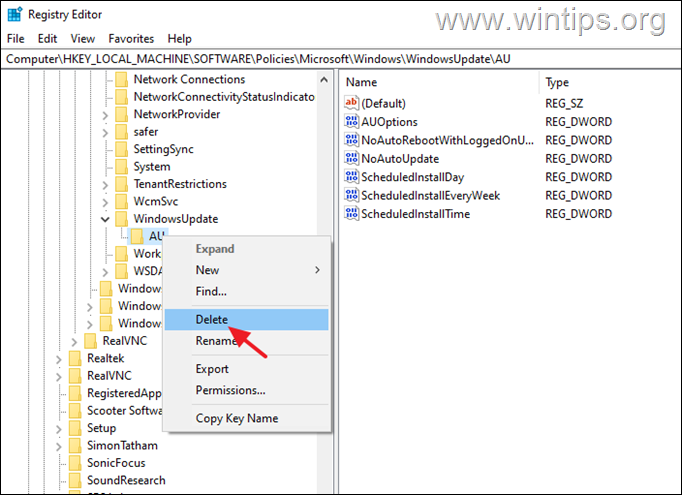
5. Now, right-click again at the AU key and select Delete.
6. Close the Registry Editor and restart your PC.
7. After restart go to Windows Update, and check if the "Some settings are managed by your organization" message has disappeared.
Method 4. Modify Automatic Updates settings in Group Policy.
Changing the Group Policy of the PC also help in correcting this issue. The group policy is a built-in tool for Windows 10 Pro or Enterprise edition only. *
* Note: This method applies only to Windows 10 Pro & Enterprise versions.
1. Simultaneously press the Windows ![]() + R keys to open the Run command box.
+ R keys to open the Run command box.
2. In the text field of the dialog box, type gpedit.msc and hit Enter to open the Group Policy Editor.
3. Navigate to the location below in the Group Policy Editor.
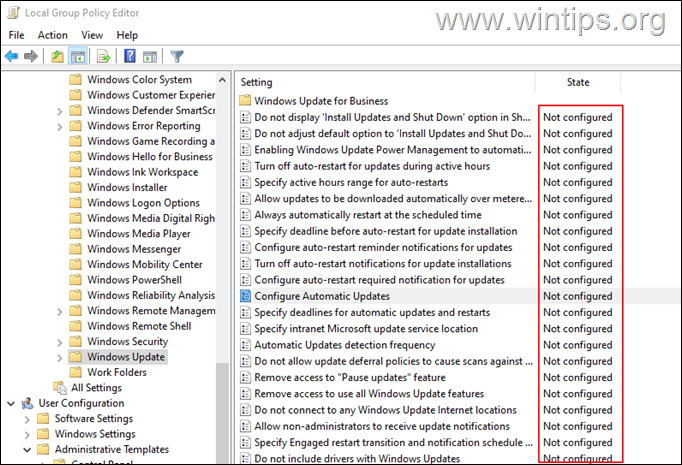
- Computer Configuration\Administrative Templates\Windows Components\Windows Update
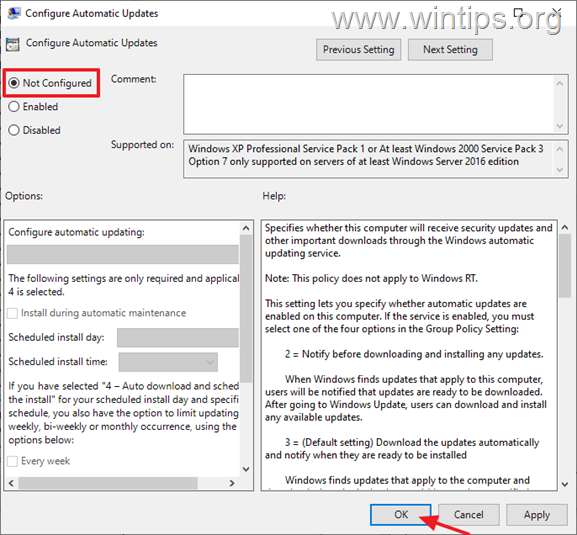
4a. Now open Configure Automatic Updates policy at the right side.
4b. Select Not Configured and click OK. *
* Note: If the policy is already "Not Configured", set it to Enabled, click OK and close the Policy Editor. Then re-open the Group Policy Editor, set this policy to Not Configured and click OK.
5. Ensure that all the rest Windows Update policies here are set to Not Configured. If not, proceed and set them to "Not Configured" as instructed above.
6 Close Group Policy Editor and restart your PC. Normally, after restart, the “Some settings are managed by your organization” message will disappear from Windows Update page.
Method 5. Remove Policy registry keys.
1. Open Registry Editor: To do that:
2. Navigate to the location below in Registry Editor:
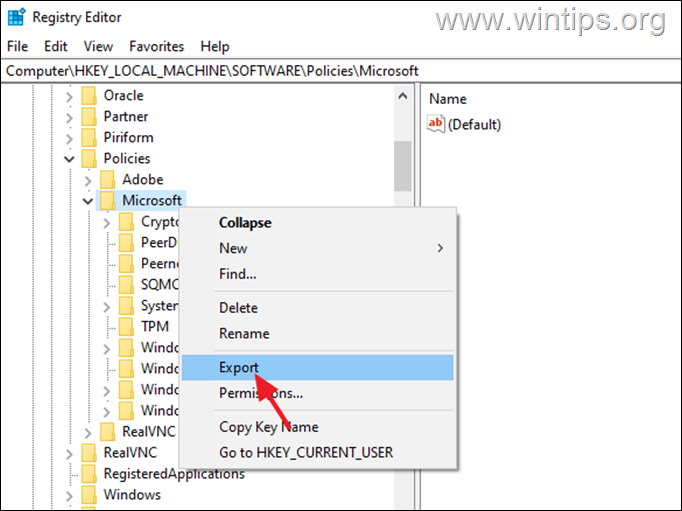
- HKEY_LOCAL_MACHINE\SOFTWARE\Policies\Microsoft
3a. Right-click at Microsoft folder and choose Export to backup the key.
3b. Type a filename (e.g. "Microsoft") and save the registry file on your desktop.*
* Note: If something goes wrong after editing the registry, you can simply undo the changes by double-clicking the extracted registry key (.REG file) on your desktop.
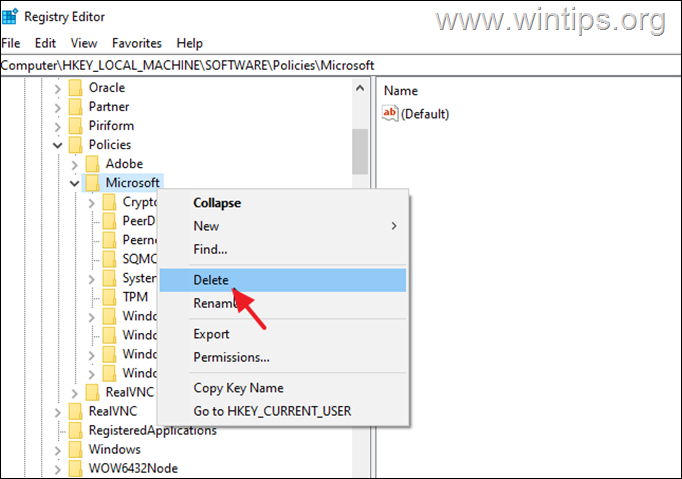
4. Now right-click again and Delete the Microsoft key. (If you get a prompt saying "Cannot delete Microsoft: Error while deleting key", click OK).
5. Now navigate to this location:
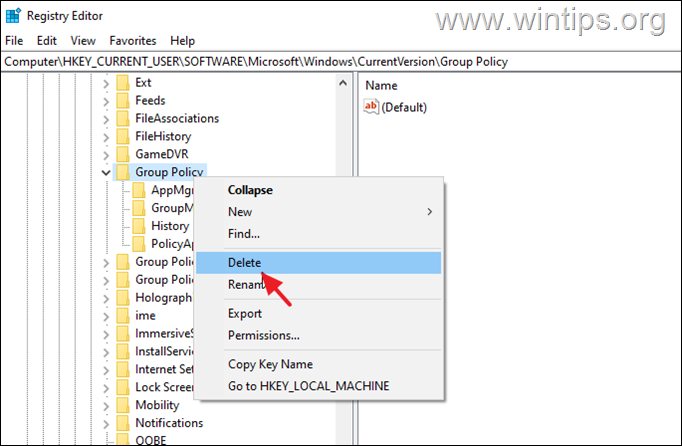
- HKEY_CURRENT_USER\SOFTWARE\Microsoft\Windows\CurrentVersion\Group Policy
6a. Right-click on Group Policy key and choose Export to backup the key.
6b. Type a filename (e.g. "Group Policy") and save the registry file on your desktop.*
* Note: If something goes wrong after editing the registry, you can simply undo the changes by double-clicking the extracted registry key (.REG file) on your desktop
7. Right-click on the Group Policy folder, then click Delete. (You will get a prompt asking if you want to delete the folder and its subkey permanently, click Yes)
8. Close the Registry Editor and restart your PC.
That's it! Which method worked for you?
Let me know if this guide has helped you by leaving your comment about your experience. Please like and share this guide to help others.
We're hiring
We're looking for part-time or full-time technical writers to join our team! It's about a remote position that qualified tech writers from anywhere in the world can apply. Click here for more details.
- FIX: Error 0x8007025d in Windows 10 Update. - April 22, 2024
- How to Disable Device Encryption in Windows 11/10. - April 17, 2024
- How to View Permissions on Shared Folders on Windows 10/11. - April 15, 2024







February 14, 2024 @ 5:24 pm
Γιασου Konstantinos,
Τι να πω. None of them worked.
Ευχαριστώ for your efforts.
September 26, 2023 @ 6:14 am
Did all of them but nothing seemed to work. Number 5 did the job at the end. Thanks for preparing this info.
July 9, 2023 @ 3:09 pm
No.4 did the job
May 23, 2023 @ 5:26 pm
no 5 works perfectly,I was able to update my pc now window 10 😊
April 21, 2023 @ 12:23 am
Step 5, option 2 – delete group policy's is what worked for me. Many thanks
April 18, 2023 @ 2:46 pm
no 5 worked perfectly
March 24, 2023 @ 10:39 pm
Step 5 finally worked! After restarting Windows 11 I was able to open Elgato Video Capture and it worked! I didn't need to set anything else, I just opened the Elgato app and it started capturing the video that was running through the converter (I'm converting Sony Handicam 8mm video tapes to a file format for my pc and phone. The Elgato interface connects the Handicam to a USB port – – works perfect!).
March 12, 2023 @ 9:58 am
Just go to step 5. No need to waste time trying other steps. Thank you, OP!
February 11, 2023 @ 1:08 am
I had to try all methods. The last method 5 helps.
Thx
December 5, 2022 @ 6:52 pm
thanks it work
July 11, 2022 @ 10:01 pm
That worked perfect for me (Win 10 Enterprice_