FIX: Print Processor Does Not Exist – Cannot Install Printer.
If you cannot install printer because of error "The Print Processor Does Not Exist", continue reading below to learn how you can fix the problem.
The print processor is a plug-in (.DLL file), that processes the print job data from the print printer and sends them for printing.Therefore, if you unable to install or connect to a printer because the print processor does not exist, it means that the related DLL file named "winprint.dll" is corrupt or missing.
Below you'll find detailed instructions to troubleshoot the issue "Unable to Install Printer -The Print Processor does not exist" by using several methods.
How To Fix: 'The Print Processor does not exist' on Windows 10/8/7 OS.
- Scan and Repair Corrupted System Files.
- Fix 'Print Processor does not exist' in Registry.
- Restore Print Processor from Another Working PC.
Method 1: Scan and repair corrupted system files.
Printer installation problems may be caused by corrupted or missing system files. So the first method to fix the "Print Processor doesn't exist" error is to repair the Windows system files by using the instructions below:
1. Open command prompt as administrator.
1. In the Search box type: cmd or command prompt
2. Right click on the command prompt (result) and select Run as Administrator.
2. At the command prompt window, type the following command & press Enter:
- Dism.exe /Online /Cleanup-Image /Restorehealth
3. Be patient until DISM repairs component store. When the operation is completed, (you should be informed that the component store corruption was repaired), give this command and press Enter:
- SFC /SCANNOW
4. When SFC scan is completed, restart your computer.
5. After rebooting, try to install the printer.
Method 2: FIX Error 'Print Processor does not exist' by modifying Registry.
The next method for resolving the "Print Editor does not exist" error is to modify the registry, as explained below.
Step 1. Stop the Print Spooler service.
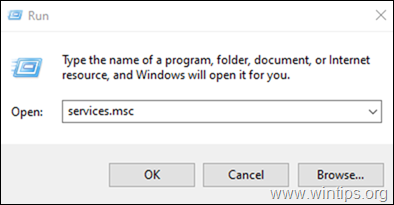
1a. Press Windows + R keys to open the Run widget.
1b. Type: services.msc and press Enter.
2. Locate and right-click on the Print Spooler service and select Stop.
Step 2. Create the "Driver" key in Registry if it doesn't exist.
1a. Press Windows ![]() + R keys to load the Run dialog box.
+ R keys to load the Run dialog box.
1b.Type regedit and hit Enter to open the Registry Editor. (Click Yes in the Confirmation Prompt that appears).
2. In the Registry editor window, navigate to the key below: *
- HKEY_LOCAL_MACHINE\System\CurrentControlSet\Control\Print\Environments\Windows x64\Print Processors\winprint
* Note: On a 32-bit Windows, go to this path:
- HKEY_LOCAL_MACHINE\SYSTEM\CurrentControlSet\Control\Print\Environments\Windows NT x86\Print Processors
3. Now look at the right pane and check if there is a Driver key with value "winprint.dll". If the driver key exists, skip to the next method. If not, continue to the next step to create the key.
4a. To create the missing Driver key, right-click on the blank space, click on New, and then select String Value.
4b. Name the new value Driver and press Enter.
4c. Now, double-click on it and type winprint.dll at the Value data. Press OK to proceed.
7. Close the Registry editor.
8. Start the Print Spooler in Services and try to install your printer again.
Method 3: Replace Print Processor's DLL file from a Working PC.
The "Print Processor does not exist" error occurs when its related DLL file "'winprint.dll' ", is damaged or missing. In this case you need to restore the 'winprint.dll' file from another working computer. *
* Important: To apply the steps in this method, you must have another computer with the same operating system as the computer with the "Print processor does not exist" error.
Step 1. Copy winprint.dll from the working PC:
On the computer that is working properly, plug a USB drive and continue to the steps below:
1. Open Explorer, then navigate to the following folder:
- C:\Windows\System32\spool\prtprocs\x64
2. Copy the file winprint.dll file to a USB flash drive/disk.
3. Eject the USB drive and continue to step-2 to restore the damaged print processor's DLL file.
Step 2. Replace winprint.dll on the problematic PC:
On the computer with the "Print Processor" error:
1. Plug the USB flash drive with the winprint.dll your copied from the working computer.
2. Stop the Print Spooler service (see instructions on step-1 on method-2 above)
3. Navigate to the same folder as above:
- C:\Windows\System32\spool\prtprocs\x64
4. Delete the winprint.dll file if exists.
5. Copy the winprint.dll from the USB flash drive to the same folder.
6. Start the Print Spooler service.
7. Restart the computer and try to install the printer.
That's it! Which method worked for you?
Let me know if this guide has helped you by leaving your comment about your experience. Please like and share this guide to help others.
We're hiring
We're looking for part-time or full-time technical writers to join our team! It's about a remote position that qualified tech writers from anywhere in the world can apply. Click here for more details.
- How to Disable Device Encryption in Windows 11. - April 17, 2024
- How to View Permissions on Shared Folders on Windows 10/11. - April 15, 2024
- FIX 0x80070643 error in KB5034441 update (Solved) - April 10, 2024


