How to Add Table of Contents in Word.
If you want to learn how to add a table of contents in a Word document , continue reading below. After writing an extensive document of numerous pages, you will need to make it easy for your readers to view your content. But you have a lot of pages and chapters, not to mention the subchapters. Writing each chapter with its respective page number manually is not attractive. You should focus on writing and use an automatic table of contents instead.
A Table of Contents (also known as a "List of Contents" or "TOC"), is usually found on the first page of a document and contains the chapters and sections of the document with their page numbers.
In this guide I will show you how to add a table of contents into a Microsoft Word document.
How to Add an Automatic Table of Contents on a Word Document. *
Note: This guide was tested on Microsoft Office 365 & Office 2019/2016 using Windows 10.
1. Open the Word document that you want to add a table of contents on.
2. Place the cursor where you want the Table of Contents to be. *
* Recommended: After the cover page or on a page before your first chapter.
3. Assuming that you want to add a table of contents at the first page of your document, place the cursor before the first word of your document, and insert a blank page by pressing Ctrl + Enter to move content to the next page.
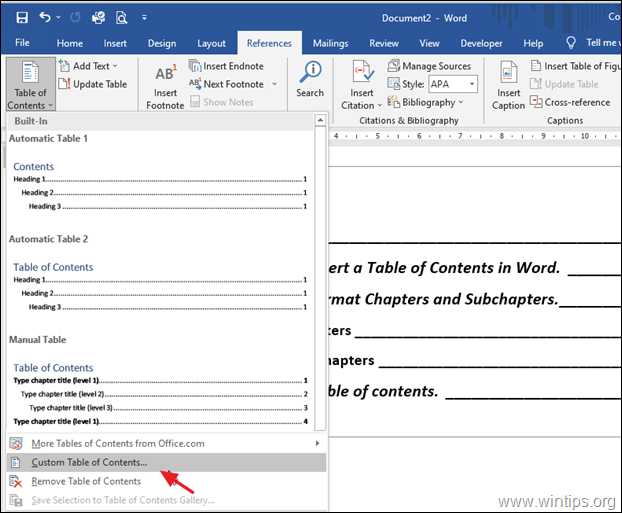
4. Now go to References tab, click Table of contents and choose one of the two "Automatic table" types in the name.
5. Click OK at "Creating a table of contents" prompt.
6. This step is crucial to adding a table of contents. It will take a while, but it's rewarding to get it right. Chapters and sub-chapters are called "headings" in Microsoft Word, and we will use these headings to format the style in the chapter and sub-chapter titles, as follows:
-
- Chapters -> Heading 1
- Subchapters -> Heading 2
a. To change the style in Chapters, highlight the chapter's title(s) and at Home tab choose the Heading 1 from the styles.
b. To change the style in Subchapters, highlight the subchapter's title(s) and at Home tab choose the Heading 2 from the styles.
7. Repeat the same process and change the style in all chapter and sub-chapter titles with the corresponding heading.
8. When done, go at the page where you added the Table of contents.
9. Click inside the table and click Update Table.
10. Congratulations, you have added a table of contents to your document.
Additional help.
1. If you add new chapters and subchapters to your document or new content that affects the page numbering, go back to the table of contents, click update table as mentioned in step 7, and select Update entire table and OK.
2. To format the text style (fonts, color), of the table of contents, select the entire row of each entry (including the tab leader and page number) and then select the style you prefer.
3. If you want to change the TOC levels, or the tab leader style:
a. Click on the TOC and from the References tab, go to Table of Contents -> Custom Table of Contents.
b. Here you can change the TOC style (tab leader, levels, etc.)
4. To remove the table of contents from your document, click on the TOC and from the References tab, go to Table of Contents -> Remove Table of Contents.
That's it! This is how to add a table of contents in a word document.
Let me know if this guide has helped you by leaving your comment about your experience. Please like and share this guide to help others.
We're hiring
We're looking for part-time or full-time technical writers to join our team! It's about a remote position that qualified tech writers from anywhere in the world can apply. Click here for more details.
- FIX: Numeric keypad Not Working on Windows 10/11 - July 24, 2024
- How to Share Files or Printers in Hyper-V? - July 22, 2024
- How to invoke Hyper-V Screen resolution prompt? - July 17, 2024


