How to Change Wi-Fi Name (SSID) and Password.
In this guide, you will learn how to change your router's default Wi-Fi network name and Wi-Fi password.
The Wireless SSID (Service Set IDentifier) is the name of your Wi-Fi network that appears when you search for available networks on your device, while the Wireless password is the key that allows you to connect to your Wi-Fi network.
Changing the SSID and password of your Wi-Fi network can help you to personalize and secure your Wireless network.
How to change your wireless network name and wireless password.
Requirement: Router's Credentials.
The Router credentials are the username and password that are required to access the settings and configuration options of your router. The default username (usually is "admin") and password are usually printed on a label on the bottom or back of the router, or can be found in the router's manual (manufacturer's documentation). *
Notes:
1. It is recommended to change the default credentials to prevent unauthorized access to your router and network.
2. If you have changed the default credentials and forgotten them, the only way to gain access to the router's settings is to reset your router to its factory settings. (To do this, consult your router's Manual or see the instructions in "Additional Help" at the end of this article).
Step 1. Find Router's Local IP Address.
To change your Wi-Fi network name or password, you need to log into your router's configuration settings page via its local IP address. To find the local IP address of your router, do the following:
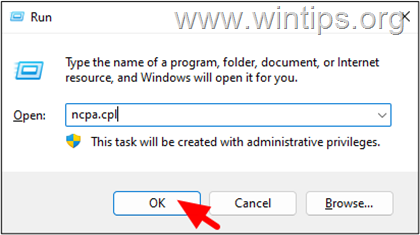
1. Press the Windows ![]() + R keys to open the Run dialog box.
+ R keys to open the Run dialog box.
2. In the Run command box, type ncpa.cpl and hit Enter to open Network Connections.
3. Double-click on the connected network adapter (Ethernet or Wi-FI).
4. At 'Status' window, click Details.
5. At Network Connection Details, notice the IPv4 Default Gateway address which is the "Local IP Address" of your router. (e.g. "192.168.1.1" in this example)
Step 2. Change Wi-Fi Name and Password.
Once you know your router's local IP address, you're ready to log into your router's interface to change the Wireless Name and/or Password. To do that:
1. Open your web browser (e.g. Chrome, Firefox, etc.).
2. In address bar type the IPv4 Gateway address you noticed in step-1 above. (e.g. "192.168.1.1" in this example), and press Enter.
3. Type the router's credentials (Username and Password) to Login to the router's web interface.
4. Navigate to the Wireless settings section of the router's web interface.
5. Here, type the new Name (SSID) for your Wi-Fi network, then type a new stronger password and click Apply to save the changes. (The router will restart).
6. Wait 4-5 minutes for the router to reboot, then connect to the "new" SSID (Wi-Fi name), with the new "password".
Additional Help.
If something goes wrong and you can't connect to your wireless network, do one of the following:
-
Connect your computer to the router using an Ethernet cable, and then login to the router's interface to make sure that the wireless network password you type to connect on your Wi-Fi network is correct.
-
Reset your router to factory settings: To do that:
1. Locate the Reset button on the router. The reset button is usually a small button located on the back of the router, labeled "Reset"
2. Press and hold the Reset button for 10-15 seconds until the router's lights start to blink or flash. In some routers you must press the reset button using a paperclip or a similar tool.
3. Release the reset button.
4. Wait for the router to reboot: The router will now reboot and reset itself to its factory default settings. (This process may take a few minutes).
5. Connect to the router's default SSID (Wi-Fi Name) using the default Wi-Fi Password (key).
6. Follow the instructions in step-2 above to specify a new Wi-Fi Name (SSID) and Password.
That's it! Let me know if this guide has helped you by leaving your comment about your experience. Please like and share this guide to help others.
We're hiring
We're looking for part-time or full-time technical writers to join our team! It's about a remote position that qualified tech writers from anywhere in the world can apply. Click here for more details.
- FIX: Numeric keypad Not Working on Windows 10/11 - July 24, 2024
- How to Share Files or Printers in Hyper-V? - July 22, 2024
- How to invoke Hyper-V Screen resolution prompt? - July 17, 2024


