How to Map Network Drive in Windows 10/11 from Explorer, Command Prompt or PowerShell.
This guide explore all the available ways to map a network drive on windows 10/11. Mapping a network drive is the process of assigning a drive letter to a shared network folder, so that you can easily access the shared folder's data through File Explorer.
As in Windows 7 and 8 operating systems, Windows 10/11 makes it easy to assign a drive letter to network shared folder(s) in order to quickly and easily access your network folder and its files directly from File Explorer.
Mapping a network drive in Windows 10/11 can be done via File Explorer, Command Prompt and PowerShell, and this article provides step-by-step instructions on how to do this.
How to Map a Network Shared Folder to a Drive Letter in Windows 10/11.
Method 1: Map a Network Drive using File Explorer.
Using File Explorer is probably the most common way to map a network shared folder to a drive letter in Windows 10/11.
1. Open File Explorer and select This PC from the left-hand side panel.
2. Now, either right-click on This PC and choose Map network drive, or choose the same option on the Computer options-toolbar above.
3. At the 'Map Network Drive' window, do the following and click Finish:
a. Choose a Drive letter to assign to the network drive (or leave the default "Z:").
b. Type in "Folder" box the full path* of the network shared folder that you want to map as a network drive, or click Browse to locate and select the shared folder on the network.
* Note: The folder path to the network shared folder must be typed in one of the following ways:**
- \\Computer-Name\Name-of-Shared-Folder
- \\Computer-IP-Address\Name-of-Shared-Folder
Where…
- Computer-Name = the name of the network computer with the shared folder. (e.g. "desktop1" in this example)
- Computer-IP-Address = the IP Address of the network computer with the shared folder.
- Name-of-Shared-Folder = the name of the shared folder (e.g. "shared_folder" in this example)
c. Select the Reconnect at sign-in check box if you want to make the mapping permanent so that you connect to the network shared folder every time you connect to your computer.
d. Select the Connect using different credentials check box, if the credentials required to connect/access the shared folder are different from what you use to log on to Windows.
4. (Optional) Type the credentials to access the network shared folder if prompted and click OK.
5. When, done the network drive will now show up in File Explorer under the This PC section.
Method 2. Map Network Drive using RUN Command.
If you know the Name or the IP Address on the computer with the shared folder, you can assign a drive letter to a network shared folder as follows:
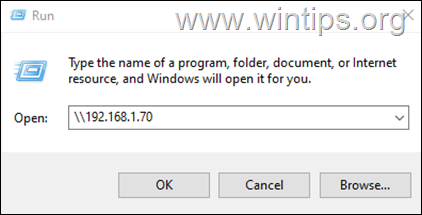
1. Press Windows + R keys to open the "Run" command box.
2. In RUN command box, type one of the following commands, to view the shares on the network computer and press Enter:*
- \\Computer-Name
- \\Computer-IP-Address
* Notes: In the above command replace:
1. The "Computer-Name" with the name of the network computer with the shared folder e.g. "Desktop1"
2. The "Computer-IP-Address" with the IP address of the network computer with the shared folder e.g. "192.168.1.70"
Example. To view the shares on computer "desktop1" with IP address "192.168.1.70", you can type either:
- \\desktop1
- \\192.168.1.70
3. After pressing Enter, type the credentials to connect to the network PC (if prompted) and check the Remember my credentials check box, if you want to map the drive permanent.
4. Right-click on the shared folder that you want to map to a network drive and select Map network drive.
5. Finally, choose the drive letter that you to map the shared folder to, and hit Finish. The mapped network drive will shown on File Explorer.
Method 3: Mapping a Network Drive Using Command Prompt.
Another way to map a network drive in Windows is by using the "net use" command. To do that:
1. Open Command Prompt and use one of the following command to map the network shared folder and press Enter:*
- net use X: \\Computer-Name\Name-of-Shared-Folder
- net use X: \\Computer-IP-Address\Name-of-Shared-Folder
* Note: In the above commands replace:
-
- The letter "X" with the desired drive letter you want to map the shared folder to (e.g. "Y" in this example).
-
- The "Computer-Name", with the name of the network computer with the shared
folder. (e.g. "DESKTOP-AIFS0G0" in this example) - The "Computer-IP-Address", with the IP Address of the network computer with
the shared folder. - The "Name-of-Shared-Folder", with the name of the shared folder (e.g.
"Public" in this example)
- The "Computer-Name", with the name of the network computer with the shared
Example1: The following command will assign the drive letter "Y" to the "Public" shared folder on the "DESKTOP-AIFS0G0" computer:
- net use Y: \\DESKTOP-AIFS0G0\Public
2. To map a network drive and let Windows to automatically assign a drive letter, type an asterisk after typing "net use":
- net use * \\Computer's-Name-OR-IP\Name-of-Shared-Folder
* Note: The asterisk (*) option in the command above instructs Windows to allocate any drive letter that is not currently in use to the mapped shared folder. e.g.
- net use * \\DESKTOP-AIFS0G0\Public
3. To map a network drive using different credentials than the one you use to sign-in to Windows and make the mapping permanent, give the following command:*
- net use X: \\Computer's-Name\Name-of-Shared-Folder PASSWORD /user:USERNAME /persistent:yes
* Notes:
1. In the above commands replace the "PASSWORD" and the "USERNAME", with the credentials for the network share.
2. The "persistent" option keeps the folder mapped even after reboot.
Example: To authenticate on the "DESKTOP-AIFS0G0" computer with username "admin" and password "12345" and to map the shared folder "Public" to drive letter "H:", give the following command:
- net use H: \\DESKTOP-AIFS0G0\Public 12345 /user:admin /persistent:yes
When you finish the steps, the network folder will be mapped on the device and will appear in File Explorer.
Method 4: Map Network Drive Using PowerShell on Windows 10/11
Finally, you can use PowerShell in Windows 10/11 to map to a drive letter a network shared folder.
1. Open Windows PowerShell.
2. In PowerShell, give the following command to map the network drive and hit Enter:*
- New-PSDrive -Name "X" -PSProvider "FileSystem" -Root "\\Computer-Name-OR-IP\Name-of-Shared-Folder" -Persist
* Note: In the above command replace:
- The letter "X" with the desired drive letter you want to map the shared folder to (e.g. "H" in this example).
- The "Computer-Name-OR-IP", with the name or the IP Address of the network computer with the shared folder. (e.g. "192.168.1.70" in this example)
- The "Name-of-Shared-Folder", with the name of the shared folder (e.g. "Public" in this example)
Example: New-PSDrive -Name "H" -PSProvider "FileSystem" -Root "\\192.168.1.70\Public" -Persist
3a. To map a network drive using different credentials than the ones you use to log into Windows, provide the following PowerShell command and hit Enter:
- New-PSDrive -Name "X" -PSProvider "FileSystem" -Root "\\Computer-Name-OR-IP\Name-of-Shared-Folder" -Persist -Credential USERNAME
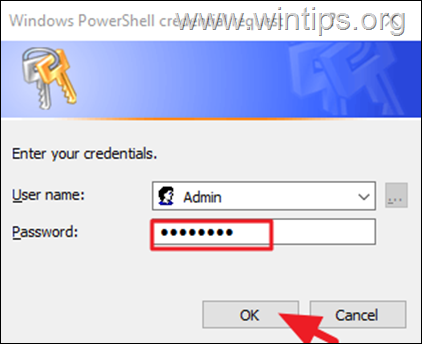
* Note: In the above command replace the USERNAME with the username for the network share. e.g. "Admin" in this example:
- New-PSDrive -Name "H" -PSProvider "FileSystem" -Root "\\192.168.1.70\Public" -Persist -Credential Admin
3b. At the "credential request" window, type the password for the network share and hit OK.
3c. After completing the steps, the shared network folder will be mapped to your computer and will show up in File Explorer.
Final Words.
In summary, mapping a network drive in Windows 10/11 is a simple process that makes accessing network resources effortless. You can map a network drive using Windows Explorer, Command Prompt, or PowerShell and have the shared folders as if they were on your own computer.
That's it! Which method worked for you?
Let me know if this guide has helped you by leaving your comment about your experience. Please like and share this guide to help others.
We're hiring
We're looking for part-time or full-time technical writers to join our team! It's about a remote position that qualified tech writers from anywhere in the world can apply. Click here for more details.
- How to Disable or Remove BitLocker from Windows RE. - April 24, 2024
- FIX: Error 0x8007025d in Windows 10 Update. - April 22, 2024
- How to Disable Device Encryption in Windows 11/10. - April 17, 2024


