How to Convert Physical Machine to VirtualBox Machine.
If you want to convert a physical machine to a virtual machine ready to run in VirtualBox, continue reading below.
Sometimes you may need to keep an old computer for the programs and files it contains. In such a case you can either keep the old computer (if it has no hardware problems), or convert the physical computer into a virtual machine that you can open using VirtualBox.
In this tutorial you will learn how to turn a physical Windows XP machine into a VirtualBox machine. The same instructions can be used to convert any physical machine running Windows 7, 8 or 10 OS to VirtualBox.
How to Convert a Physical Windows PC to a VirtualBox Virtual Machine.
Step 1. Convert Physical Machine's Hard Disk to Virtual Disk.
The first step to convert a physical machine to a VirtualBox machine, is to convert the physical machine's hard disk to a Virtual Hard Disk image file (VHD or VHDX). To do that, the only you need is the disk2vhd utility from www.sysinternals.com.*
* Info: Disk2vhd is a utility that can create a Virtual Hard Disk image file (VHD or VHDX) from a physical disk for use in VirtualBox, Microsoft Virtual PC or Microsoft Hyper-V virtual machines (VMs).
To convert a physical disk to virtual disk with Disk2vhd:
1. Download and extract the Disk2vhd.zip file on the computer that you want to convert to a VirtualBox machine, or on another computer where you have attached the disk of the physical machine that you want to convert to virtual.
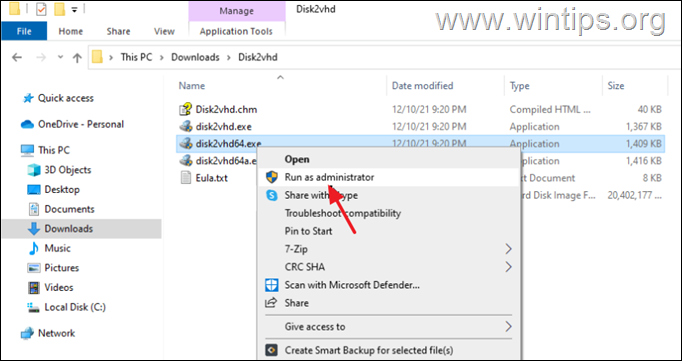
2. From the extracted folder, right-click on disk2vhd64.exe and select Run as administrator. Then ask yes at UAC warning.
3. At Disk2vhd window:
-
- Uncheck the Use Vhdx checkbox. *
- Select the physical disk that you want to convert to virtual disk. (In this example I have connected the disk I want to convert to virtual to another pc).
- Select a destination folder and type a name for the created virtual disk file (e.g. "WindowsXP.vhd"). **
- Finally, click Create to create the virtual disk image from the physical disk.
* Notes:
1. VirtualBox supports VHD files but not VHDX.
2. If you are running Disk2vhd on the same machine that you want to convert to virtual, then save the virtual disk file to another drive and not in disk C:
4. Now wait until the virtual disk file is created. Once done, continue to next step.
Step 2. Convert VHDX image file to VDI file (OPTIONAL). *
Note: As I said above, VirtualBox can read VHD disk image files without any problem but not VHDX files. If for any reason you have created a VHDX file, then proceed to convert it to a VDI file by following the steps below otherwise, skip to next step.
To convert VHDX to VDI:
1. Open Command Prompt as Administrator.
2. In command prompt, give the following command and hit enter:
-
cd C:\Program Files\Oracle\VirtualBox
3. Now give the following commnand to convert the VHDX file to a VDI file:
-
VBoxManage clonehd FILENAME1.vhdx FILENAME2.vdi –format VDI
* Note: Where FILENAME1=the filename (and the path) of the VHDX file & FILENAME2=the filename of the converted VDI file. e.g.:
-
VBoxManage clonehd C:\VHDX\WindowsXP.VHDX C:\VHDX\WindowsXP.VDI –format VDI
Step 3. Setup a new VM in VirtualBox using the VHD file.
1. Open VirtualBox Manager and select New to create a new VM machine.
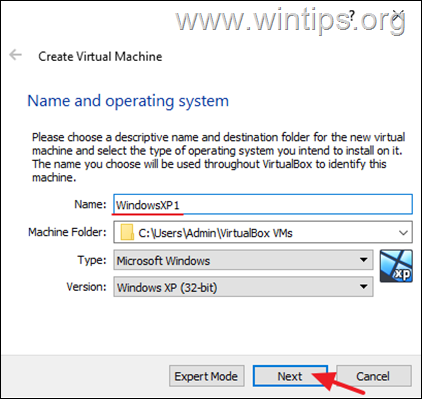
2. Give a name for the VM machine and click Next.
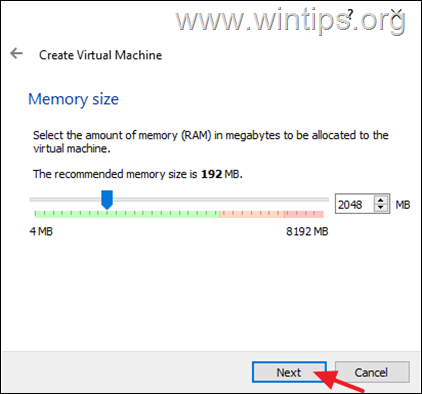
3. Specify the allocated memory size for the new VM and click Next.
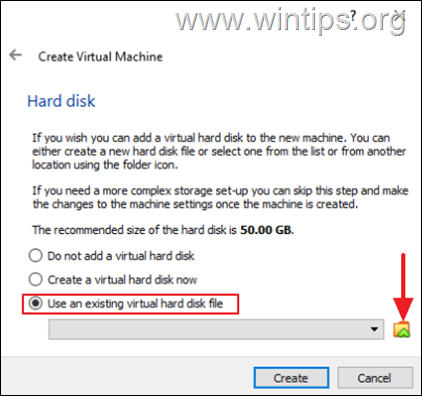
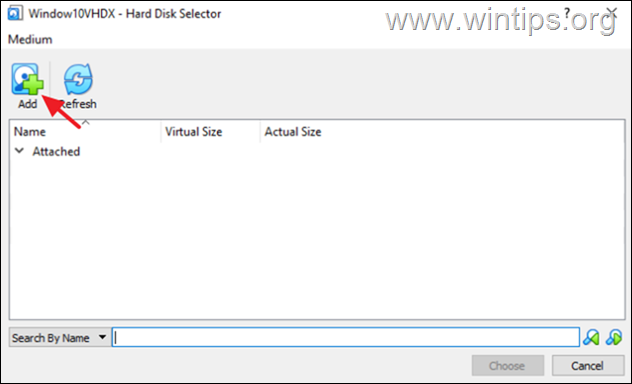
4a. Select Use an existing virtual hard disk file and click Browse.
4b. Choose Add and select the VHD (or the VDI) file.
4c. Finally select Create to create the new VM machine.
5. When the virtual machine is created go to System and in Motherboard settings apply the following actions:
-
-
Set Hard Disk as first boot device.
-
Enable I/O APIC extended feature. (otherwise the VM machine wouldn't boot).
-
Also, if the guest OS is UEFI based, Enable EFI (special OSes only). (Otherwise leave this setting unchecked).
-
6. Start the Virtual machine. *
* Note: If Windows couldn't boot with Blue Screen (BSOD) error 0x0000007b, then go to Storage menu and change the Controller Type to AHCI. If it is already AHCI, change it to ICH6.
7. Once the VM is started, proceed to install the VirtualBox guest additions to optimize the operating system for better performance and usability and you're done!
That's it! Let me know if this guide has helped you by leaving your comment about your experience. Please like and share this guide to help others.
We're hiring
We're looking for part-time or full-time technical writers to join our team! It's about a remote position that qualified tech writers from anywhere in the world can apply. Click here for more details.
- FIX: Error 0x8007025d in Windows 10 Update. - April 22, 2024
- How to Disable Device Encryption in Windows 11/10. - April 17, 2024
- How to View Permissions on Shared Folders on Windows 10/11. - April 15, 2024





March 4, 2024 @ 3:35 pm
Thank You