How to define which user on your network can access your shared files and folders.
While working in a network environment there is the need to share files and folders across your network with others. But before proceeding to share your files with other users on your network, you must seriously think and write down the permissions level for each account that has access to your files, to ensure your file's safety and security.
Example: Lets say that we work in a network environment with three (3) workstations running Windows 7 Professional operating system and we want to share a folder in our (1st) workstation with other user/s in our network: e.g. User1 from Workstation No2 and User2 From Workstation No3.
Step 1: Create the user/s that should have access to your files.
The first action is to create the user/s from other workstations that we want to share with (e.g. User1, User2, etc.).
How to create a new user in Windows 7 Pro.
1. Go to “Start” > “Control Panel”
2. Click to open to open “Add or remove user accounts”.
3. Click on “Create a new account”.
4. Give a name for the new account (e.g. User1) and specify the permission level in the current workstation (e.g. Standard user), then click on “Create Account” button.
5. Repeat the above procedure if you wish to create more accounts (e.g. User2).
6. Finally on your screen you should view three (3) active user accounts and the Guest account which is “off / Disabled”.
1st account = Admin from our -1st- workstation with Administrator privileges.
2nd account = User 1 from Workstation No2 as a Standard user.
3rd account = User 2 from Workstation No3 as a Standard user.

Step 2: Create the folder you want to share.
The next step is to create a folder to share with others in your network.
How to create a new shared folder*.
* e.g. Lets say that we want to create a new shared folder named “Public” inside “My Documents” folder.
1. Right click inside My Documents folder and choose “New” > “Folder”.
2. Name the new folder with a preferred name e.g. “Public” in our example. and press “Enter”.
Step 3: Specify the sharing permission level.
How to specify sharing permissions.
1. Right click on the newly created folder and choose “Share with” > “Specific people”
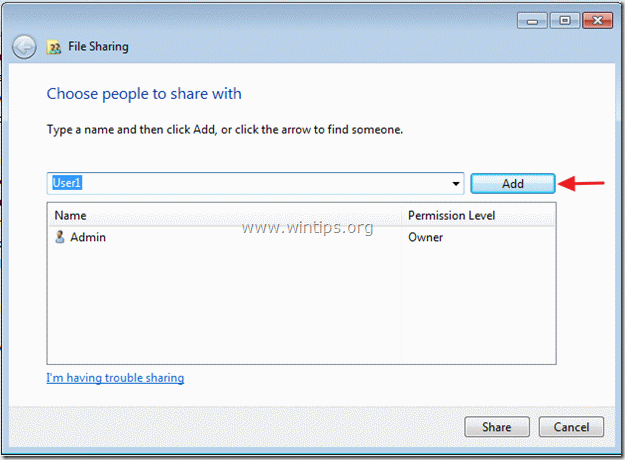
2. In “File Sharing” window, click on the drop-down arrow to display the current users installed on your computer.
3. Select the User/s you wish to share your files with (e.g. Useer1) and click “Add”.
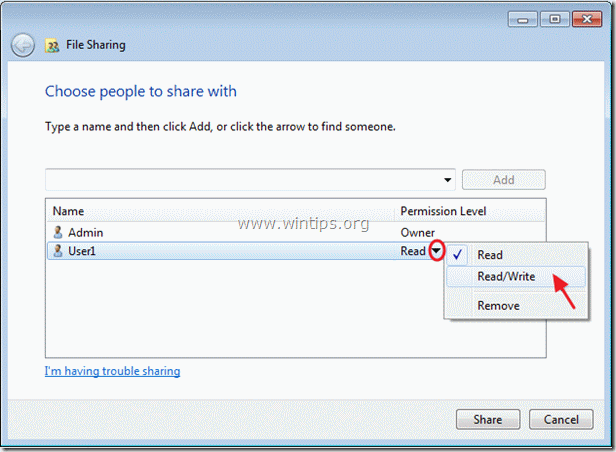
4. Now using the drop-down arrow beside each added user, modify the share permissions: Read or Read/Write.
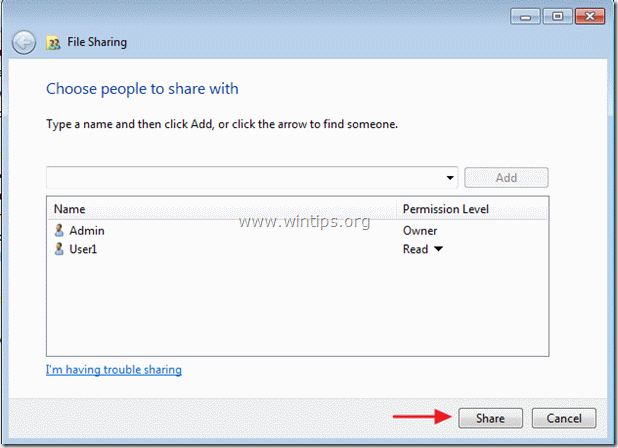
5. When finished, click the “Share” button.
6. In the next screen click “Done”.
Step 4: Modify the sharing permissions*.
* Proceed to this step if you wish to specify advanced sharing permissions.
How to modify sharing permissions.
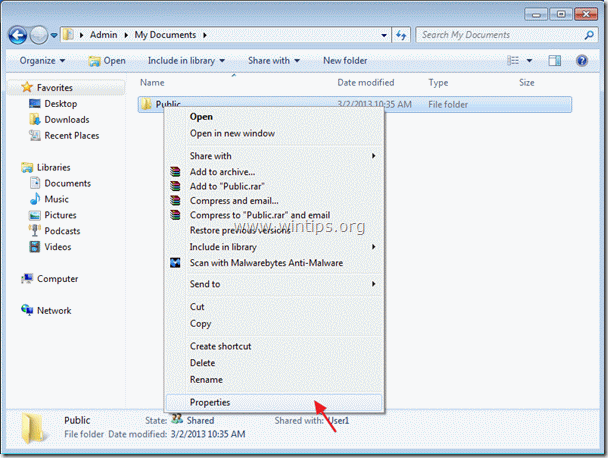
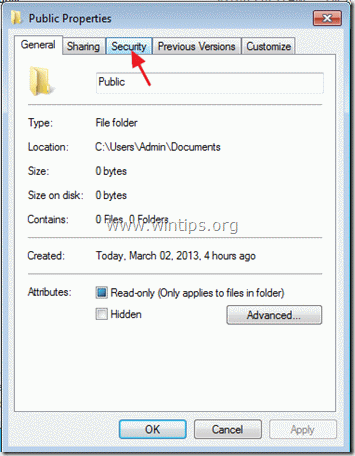
1. Right click on the shared folder (e.g. Public) and choose “Properties”.
2. In the folder properties window, click on “Security” tab.
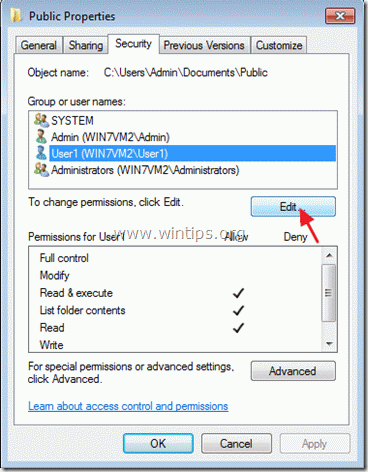
3. Select the user you want to modify it’s sharing permissions (e.g. User1) and choose “Edit”.
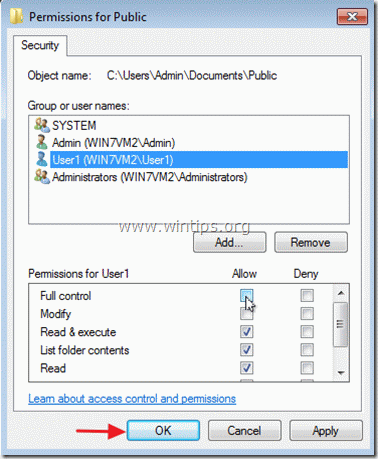
4. Look at “Permissions for User1” part and modify its' sharing permissions by checking the corresponding box:
Allow or Deny beside each permission.
Permission levels description:
a. Full control: means that the user/s have full rights inside the shared folder (Read, Write, Modify, Delete and Execute)
b. Read & Execute: Means that the user/s can only Read and open files or applications from inside the shared folder.
c. List folder contents: Means that the user/s can view the contents inside the shared folder but cannot perform other actions (e.g. open or write files ).
d. List folder contents: The user/s can only view a list of the files inside the shared folder.
e. Read: The user/s can only read the folder contents.
f. Write: The user can only write inside the shared folder.
5. When finish specifying the sharing permissions, click “OK” twice to exit.
Now proceed to try your sharing settings and start to share with others.
We're hiring
We're looking for part-time or full-time technical writers to join our team! It's about a remote position that qualified tech writers from anywhere in the world can apply. Click here for more details.
- FIX: Numeric keypad Not Working on Windows 10/11 - July 24, 2024
- How to Share Files or Printers in Hyper-V? - July 22, 2024
- How to invoke Hyper-V Screen resolution prompt? - July 17, 2024





September 29, 2023 @ 7:25 am
Thank you very much its soo helpful