
How to fix: "Windows cannot verify the digital signature for this file" error in Windows 8.1, 8, 7 & Vista.
In Windows 8 (& 8.1), 7 & Vista Operating Systems, you cannot load a driver or execute a program that hasn’t a Driver Signature. Driver Signing is a method to verify the identity of the software publisher or the hardware (driver) vendor in order to protect your system from been infected with malware rootkits, that are able to run on the lowest level of Operating System. This means that all drivers and programs must be digitally signed (verified) in order to be installed and run on latest Windows Operating Systems.
Digital Signatures ensure that the software publisher or hardware vendor is trusted and verified by Microsoft. But in real life, publishers and vendors cannot always pay Microsoft to verify all their products or Microsoft cannot verify all the drivers or programs that are published every day. But this becomes a problem in the case that you own an old unsigned legitimate software or driver and you want to install or load it to your computer, because the OS doesn't allow it to work or load.
Problems-Symptoms that are solved with this guide:
– Windows cannot verify the digital signature for this file. (0xc0000428)
– Windows requires digitally signed driver OR Digitally signed driver is required.
– Digital Signature Not Found.
– Cannot load or install an unsigned driver.
– Cannot run (execute) an unsigned software (program).
– Windows did not find a Microsoft signature associated with the software package you want to install.
In order to resolve digitally signed driver installation errors, follow the steps below:

How to Disable Driver Signature Enforcement in Windows 8.1, Windows 8, Windows 7, Windows Server 2008, or Windows Vista.
Attention: Keep in mind that disabling the Driver Signature Enforcement is a security risk, and you must disable it only if you are sure that the driver or program that you want to install and run is trusted and legitimate.
Solution 1: Disable Driver Signature once.
Solution 2: Disable Driver Signature completely.
Solution 1: Disable Driver Signature once.*
* Note: Use this solution to disable driver Signature Enforcement just once in order to install a unsigned driver (e.g. your old printer driver).
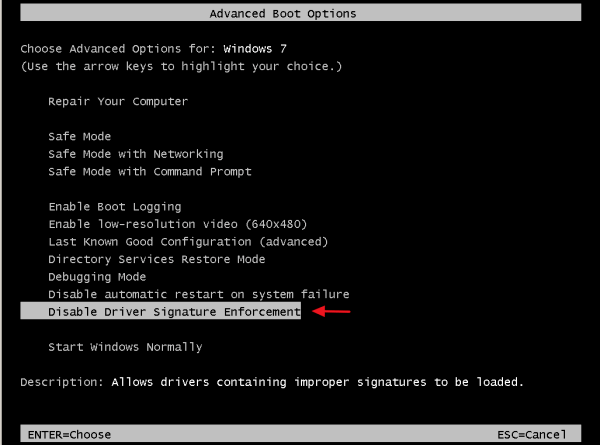
Step 1. Enter in Advanced Options menu.
Windows 7 & Vista
To enter in Advanced Options menu in Windows 7 and Vista OS:
- Close all programs and reboot your computer.
- Press the "F8" key as your computer is booting up, before the appearance of the Windows logo.
- When the "Windows Advanced Options Menu" appears on your screen, use your keyboard arrow keys to highlight the “Disable Driver Signature Enforcement” option and then press "ENTER".
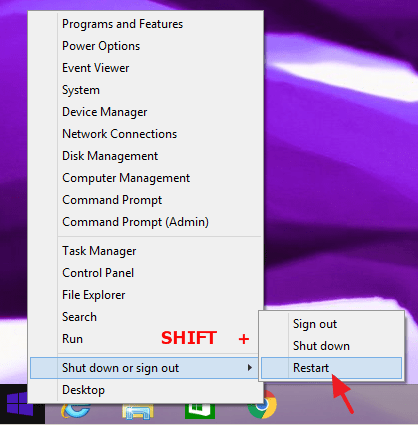
Windows 10, 8 & 8.1
To enter in Advanced Options menu in Windows 10, 8.1 & 8 OS:
1. Right click at the Windows Start button ![]() and select Shut Down or sign out.
and select Shut Down or sign out.
2. Press and HOLD down the SHIFT key and then click Restart.
3. When Windows restarts, press “Troubleshoot” .

4. In the “Troubleshoot options” screen, choose “Advanced options”.

5. In the “Advanced Options” window, choose “Startup Settings”.

6. In “Startup Settings” screen, click “Restart”.

7. After restart, select the "Disable driver signature enforcement" option and press Enter. *
* Note: If you see the below screen (Startup Settings), press the “F7” (or the “7”) key on your keyboard to select the“Disable driver signature enforcement” option.

8. Then, proceed to install your unsigned driver. During the installation procedure, Windows will inform you that can’t verify the publisher of this driver software. At this point, ignore the warning message and choose “Install this driver software anyway” to complete the installation.

Normally installation should be done without errors now. Keep in mind that after the restart, the driver signature enforcement will be enabled again to avoid security risks. If you want to keep driver signature enforcement always disabled, then you must apply solution 2.
Solution 2: Disable Driver Signature completely.*
*Note: Use this solution only if you want to keep driver signature enforcement always disabled. (e.g. if you always want to run an old legitimate software).
In this solution, we are going to modify Windows Boot loader options with the BCDEDIT tool.
Step 1. Disable Secure Boot in BIOS.
1. Power On your computer and launch BIOS SETUP settings.
2. In BIOS, disable the Secure Boot option. (the setting is commonly found at Security section or at Boot Options section)
Step 2. Modify Windows Boot Loader.
– In order to modify boot loader, open “Command Prompt” in administrative mode:
1. Right click at the Windows Start button ![]() and choose “Command Prompt (Admin)”.
and choose “Command Prompt (Admin)”.

2. Choose “Yes” at User Account Control” warning message:

3. Inside the command prompt window, type the following command and press “Enter”:
- bcdedit /set testsigning on

You should receive “The operation completed successfully” message.

4. Close command prompt window and restart your computer.
From now on, you will be able to install or run any unsigned driver or program without problems.
How to enable Driver Signature Enforcement.
1. In case that you want to enable driver signature enforcement in the future and avoid security risks, then open “Command Prompt” with elevate rights again.
2. Type type the following command and press “Enter”
- bcdedit /set testsigning off

You should receive “The operation completed successfully” message.

3. Close command prompt window and restart your computer.
4. Install the unsigned driver. *
* Note: If you still cannot install unsigned drivers then:
1. Open a command prompt with Administrative privileges and type this command:
- bcdedit /set nointegritychecks ON
2. Restart your computer
3. Install the unsigned driver.
To re-enable device driver signing, again type: bcdedit /set nointegritychecks OFF
That’s it!

- How to Resolve Hyper Backup Error "Failed to Export System Configuration" on Synology NAS. - June 17, 2026
- How to Require MFA for All Users in Microsoft 365 with a Conditional Access Policy. - June 15, 2026
- How to Resolve Error "Something Went Wrong 657rx" in Outlook or Microsoft 365 Apps. - June 10, 2026


October 19, 2023 @ 6:14 pm
Well done! Your article provided great tips and advice.
August 13, 2023 @ 10:27 am
Doesnt help me with Ralink Bluetooth Pcie Adaptor when I updated a HP Pavilion 23 AIO windows 8.1 to windows 10.
Attempted all methods upto ' bcdedit /set nointegritychecks ON', but still the yellow exclamation mark refuses to go with code 39 error.
July 21, 2023 @ 5:17 pm
Regarding last nvidia 474.44 drivers, to avoid installing telemetry and other bloatware, unzip the 474.44-desktop-win7-64bit-international.exe file, delete all the folders but the ones listed below:
display.drivers
hdaudio
nvi2
phisyx
update.core
setup.exe
eula.txt
listdevices.txt
setup.cfg
Open setup.cfg with notepad and remove these 3 lines near the bottom:
Now you can have a clean installation of the latest win 7 nvidia drivers without thetelemtry and other useless crap.
July 13, 2022 @ 3:42 pm
Win7SP1 does not have SHA-2 support. There are 2 KB hot-fixes that may need to be installed. The drivers you are attempting to install may be digitally signed but Win7SP1 cannot determine it.
Install KB4474419 and KB4490628 (in that order) and then try to install the drivers.
July 21, 2023 @ 5:08 pm
Hello, i have these two KB installed, was able to install last 474.44 nvidia drivers for Win 7 BUT after the reboot the device got disabled with a yellow mark, again the signature error.
To solve this issue one time for all the only way is to use the "bcdedit /set testsigning on" and disable the signature check.
Side note:
Do not use the "bcdedit /set nointegritychecks ON", an annoying signature warning message appear on the bottom right of the screen, the first command line is enought.
July 16, 2019 @ 11:31 am
windows 10 ,8 & 8.1 first option done. I appreciate you. Bundle of Thanks.
June 4, 2019 @ 7:03 pm
Very thanks!! it works!!
August 7, 2018 @ 12:08 am
i am reserrecting an old dell Inspiron 600, with Win7 Home Premium, with a Atheros 1506 internet adapter(IA). when i updated BIOS, drivers and OS, I lost the IA because of digital signature issue (Code 52). Your step by step solution ended a week of loading/unloading, enable/disable h/w as well as drivers as directed by dell support assistant, and some 'experts' in MicroSoft. now, it is millertime, thanx
February 17, 2018 @ 2:44 pm
This is a 1 time PERM way to turn it off!
"bcdedit.exe -set loadoptions DDISABLE_INTEGRITY_CHECKS"
January 28, 2018 @ 1:11 am
My solution, if got w7, upgrad w10, free, then crash, check this, devicemanager, show hiidden drivers, go to jraid ,sys, set automatic, (worked for me) or deactivated, No more probs.
To mount a black/blue screen, hold f4, then go to f8, hold, then choose shut of driver forced …ok?
November 3, 2017 @ 7:17 pm
Thank You!
June 7, 2017 @ 4:59 pm
Does anyone know how to get into the F8 or F7 menus on a Surface Book if the keyboard isn't responding?
Or how to ensure the Surface Book boots from bootable USB? I changed the boot order in the UEFI, but it still won't boot from USB
February 26, 2017 @ 12:07 am
When performing solution 1, I get to step 7, but every time I press 7 or F7, it just automatically restarts my computer and wont proceed to step 8? I have followed your steps and multiple times, and it occurs every time.
February 26, 2017 @ 12:54 pm
@Jacob winckowski: After pressing the “F7” (or the “7”) key, your system should reboot (it is normal). When Windows starts, proceed to step 8 and install the unsigned driver.
February 4, 2017 @ 3:48 pm
it does not work
only the temporary solution works
January 31, 2017 @ 4:31 pm
HELP I have a PROBLEm VOxALDRIVER64.SYS IS SCREWIN MY Speakers There is no sound
when i go into device manager it has a yellow ! triangle warrning simbol can you help me fix this OS:WINDOWS 7 XP ULTIMATE i installed voxal sound changer i think i got it from that it says that it isnt verified it was verified before but the voxal sound changet added anotha file thingy and that file thingy isnt verified and now i cant have sound any sound even with headphones
January 31, 2017 @ 5:56 pm
@helpmeSAVEME: Uninstall the 'Voxal Voice Changer' program and then restore your computer to a previous working state.
November 6, 2016 @ 1:19 pm
i HAd problem with test mode windows 8 build 9200 and i searched how to remove it with a method in cmd i dont remember how it was and after i did it i restarted my laptop it went to automatic repair and atpemting repair and it took like 30 min and i pressed the f7 key which was disable signature or smthing then i was able to log in to my laptop and i tried method 2 and wORKEDD THANKKKKKSSS!!!
September 5, 2016 @ 9:50 pm
I have been trying to install W7pro on to a laptop with 8.1 which automatically upgraded to W10. It seems that W10 will not be overwritten.
Neither your solution 1 or 2 worked and this is the message I get:
C:\WINDOWS\system32>bcdedit /set testsigning on
An error has occurred setting the element data.
The value is protected by Secure Boot policy and cannot be modified or deleted.
Your advice would be greatly appreciated.
September 6, 2016 @ 9:29 am
@Actionaunty: A. Disable the Secure Boot option in BIOS settings. (This option is usually in either the Security tab, the Boot tab, or the Authentication tab).
or
B. From Windows: 1. Hold down the Shift key and click Restart. 2. After PC restarts go to: Troubleshoot > Advanced Options: UEFI Firmware Settings and find the Secure Boot setting and set it to Disabled.
After disabling the secure boot try install the unsigned driver or delete all disk partitions and perform a clean Windows installation.
Good luck!
August 11, 2016 @ 5:16 pm
I think the correct comand to DISABLE completly driver signature (metod 2) is:
bcdedit /set testsigning OFF
And, of course, in Windows 7 be sure to run the CMD promt as an administrator…
August 10, 2016 @ 9:11 am
I'm sorry but I tried both solutions and does not work. I had an HP notebook with Win pro 7. Having Motherboard problems. Went out bought Lenova ideapad 300 with Win 10. I want win pro 7. I successfully partitioned the C drive. Went to install win pro 10 from disc. Goes thru 1 & 2 and then goes to restart and get error message about the signature verification. Have tried mat least 6 times now and same error. I tried the method for win 7 and for win 10 and same results. What else can be done?
August 17, 2016 @ 2:20 pm
@Judy M: 1. Create first the LENOVO recovery disks (for backup reasons) and then 2. Boot from the Win7 install disk and start the Windows installation. 3.Delete all the partitions on the disk. 4. Select the "Unpartitioned" space to install Windows. 3. When asked DO NOT enter a serial number and finish the installation.
From Windows: After installing all the drivers needed for your system, try to "Activate Windows" automatically (enter the Serial number and activate) and if you have problems with automatic activation: Click Start and in the Search box, type: "slui.exe 4" (without quotes). Select your country and click the "Phone Activation" option and activate Windows by phone.
July 4, 2016 @ 10:19 am
Unable to load the Os and digital signature status shows : 0xc0000428
August 17, 2016 @ 1:52 pm
@Abhishek: Press F8 to enter to Advanced options menu and select to boot to "Last Known Good Configuration" or Select "Disable driver signature" and then from Windows disable the driver signature completely (Solution 2 on this post).
June 24, 2015 @ 4:41 pm
Sorry, but when I press Restart in the Startup Settings it say that I need to enter a Recovery Key or something like that… (Im using a Surface RT).
¿What is that and what can I do?
June 24, 2015 @ 5:31 pm
@CeuxDruman: I don't understand what you mean. But, if you have problems with solution-1 try solution-2.
February 24, 2015 @ 6:20 am
windows does not have enough information to verify this certificate
What about this problem on installed drivers?
http://i.imgur.com/UOsI2kJ.jpg
February 24, 2015 @ 11:37 am
Ignore this error and just install AMD drivers. I think it is not an important error!
February 22, 2015 @ 10:42 pm
Solution 2 for Windows 7 in Safe mode command prompt says successful, but still get warnings
February 18, 2015 @ 7:15 am
I'm not good at computers and these software stuff but I happen to encounter this "cannot verify" notification when I tried to download a software so I searched google and it lead me here.
I tried to do the 'Solution 1' to minimize potential risks but I have a problem when I typed the "shutdown /r /o" because nothing happens. I'm wondering if I typed the wrong command or there's just something wrong. I use Windows 7
January 27, 2015 @ 9:47 am
Thank you very much for this complete and detailed tutorial. This will help a lot of people in the future.
As years go by i like more and more Win XP.
December 11, 2014 @ 10:02 pm
Hello, I miss more than 1 hour for this problem…I FIXED only then CHANGED in The BIOS settings in "Security" section "save boot" from enabled To DISABLED. (I recommend in bios to look in the right screen for more details and cereafull read something like "Signature", "Software security boot". by this time I use Toshiba, but I hope should work with others laptops too) good luck.
July 22, 2014 @ 7:26 am
This is a very nice article and gives in-depth information. Thanks for this nice article, which is a really good to read. I must admit that you are one of the best bloggers I ever saw. Thanks for posting this informative article, which is an excellent example of Windows cannot verify the digital signature for this file. I really appreciate it and I think people will like you.