How to Forward Outlook Email to Gmail or Vice Versa.
If you want to forward Outlook emails to Gmail or your Gmail messages to another account, continue reading because we have listed some of the easiest ways to do so in this guide.
You might find it challenging to stay on top of all customer/business related inquiries or correspondence at times, especially when all the messages are being received in the same inbox.
An easy way to organize, read, and respond to important email messages is by forwarding them to another email address that you always have access to, and thankfully most email services and applications, including Outlook and Gmail, allow to their users to do so.
How to Forward Outlook to Gmail or Gmail to Outlook.
To automatically forward Outlook emails to your Gmail or another email account, follow the instructions in the methods listed below.
- Method 1: Forward Outlook Mail messages to Gmail in Outlook for Desktop.
- Method 2: Forward Outlook Emails to Gmail in Outlook for WEB (Outlook.com).
- Method 3: Forward Gmail (Emails) to Outlook.
Method 1. How to forward Outlook e-mails to GMAIL (Outlook for desktop app)
To forward your emails from Outlook to Gmail in Outlook 365/2016/2013:
1. Navigate to the Home tab, click Rules and select Create Rule. *
* Note: Alternatively, you can also select Manage Rules & Alerts > New Rule and continue to step-4a below.
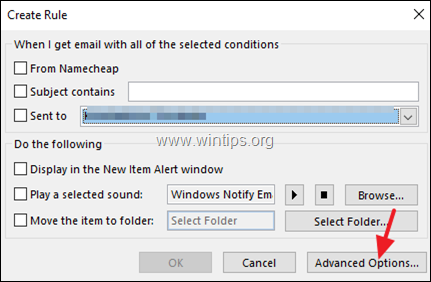
2. At the next window click Advanced options.
3. Select Apply rule on messages I receive and click Next. *
* Note: To forward all the messages you send, select Apply rule on messages I send.
4. The next window will display a list of actions you can take for the messages. To automatically forward all your Outlook emails to Gmail or other email account, select through the specified account and click on specified.
4b. Select the email account from which you want to forward all received (or sent messages) and hit OK. Then click Next.
5a. At next screen, select forward to people or public group and then click people or public group.
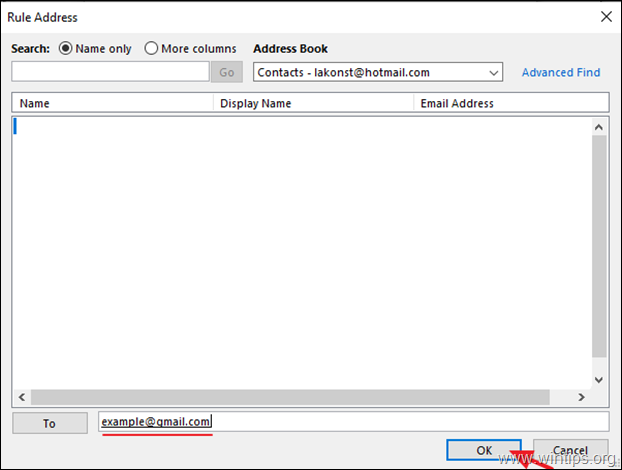
5b. Now enter in the "To" field the email address to which you want to forward your emails. When done, click OK and Next.
6. At the exceptions options, set any options you want and click Next again.
7. Finally type a name for your rule and ensure that the Turn on this rule checkbox is selected. Once done, click Finish to save your changes.
Method 2: How to Forward Outlook Emails to Gmail in Outlook for WEB.
- Part 1. Forward all emails to another email account.
- Part 2. Forward emails under a specific condition to another account.
PART 1. HOW TO FORWARD ALL EMAILS TO ANOTHER ACCOUNT IN OUTLOOK.COM.
1. Navigate to Outlook.com email.
2. Click the cog icon ![]() on the toolbar and click on View all Outlook settings.
on the toolbar and click on View all Outlook settings.
2. In the Settings window, select Mail from the left panel and then click on Forwarding.
3. Check the Enable forwarding box and in the box below enter the Gmail address that will receive the forwarded emails.
* Note: You can also checkmark the box associated with Keep a copy of forwarded messages if you want Outlook to keep a copy of the forwarded emails.
PART 2. HOW TO FORWARD ONLY EMAILS WITH CERTAIN CRITERIA TO ANOTHER ACCOUNT IN OUTLOOK.COM.
In case you want Outlook to forward only the messages with certain criteria, follow the steps mentioned below.
1. In Outlook.com, go to Settings ![]() and select View all Outlook settings.
and select View all Outlook settings.
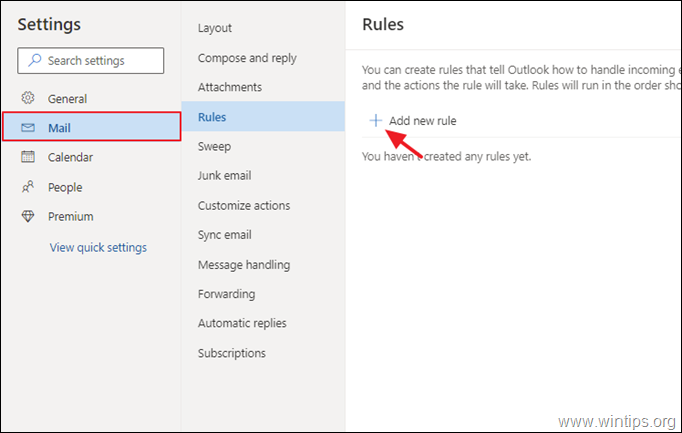
2. From the left panel, select Mail > Rules and click Add a new rule from the right pane.
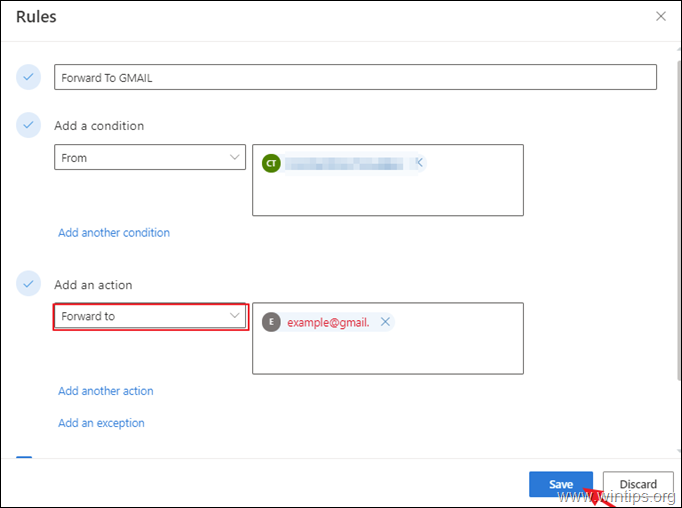
3. In the next window, give the rule a descriptive name and select the conditions for the forwarded message.
4. Once done, expand the dropdown menu under Add an action and select Forward to.
5. Type the email address that you would like to forward the messages to and hit Save
Method 3. How to Forward GMAIL messages to another email account.
Like Outlook.com, Gmail also allows you to forward your emails to any other email address you want.
- Part 1. Forward all incoming emails to another email account.
- Part 2. Forward only emails with a specific criteria to another email account.
Part 1. HOW TO FORWARD ALL INCOMING GMAIL TO ANOTHER EMAIL ACCOUNT.
If you want to forward all your incoming Gmail messages to another email address:
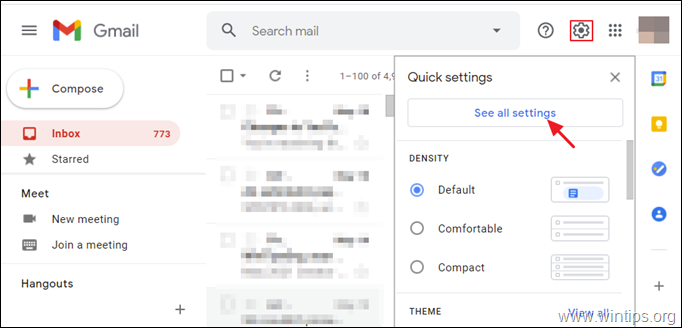
1. In Gmail, click on the gear icon ![]() at the top-right corner of the window and then select See all settings from the list of options available.
at the top-right corner of the window and then select See all settings from the list of options available.
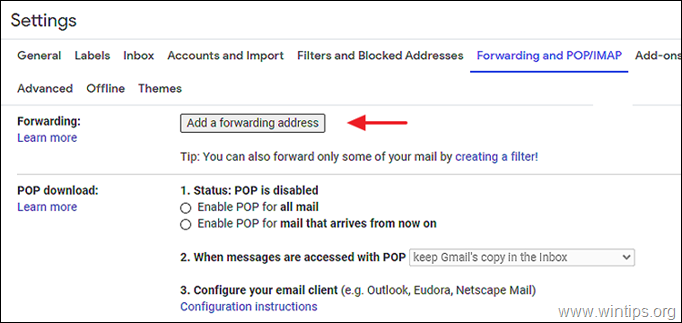
2. Navigate to the Forwarding and POP/IMAP tab.
3. Click on the Add a forwarding address button.
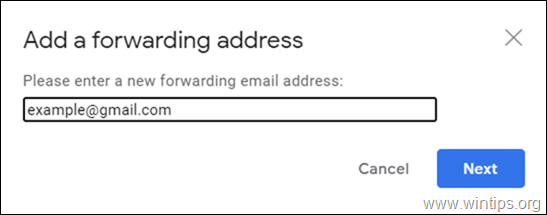
4. Type the email address for the forwarded messages. and click Next.*
* Note: You can only add one email address at a time so if you want to add multiple email addresses, repeat the 3rd step.
5. Now, GMAIL will send a confirmation code to the email address you entered to authorize you to forward emails. Once the email owner click the link inside the email to grant you permission you can start to forward your emails to the new email address with one of the following options for the forwarded messages:
- Keep the email in the inbox, untouched
- Mark the message as read in your inbox
- Archive the original message
- Delete the original
6. Upon performing the above steps, all your incoming Gmail will be forwarded automatically to the email address you specified. If you want to stop the forwarding on the future just check the Disable forwarding option in Forwarding and POP/IMAP tab.
Part 2. HOW TO FORWARD ONLY SPECIFIC GMAIL MESSAGES IN ANOTHER EMAIL ACCOUNT.
If you don't want to forward all the incoming emails, but to forward only the email under a specific criteria, then you can use Gmail filters.
1. In Gmail, click on the gear icon ![]() at the top-right corner and then click See all settings.
at the top-right corner and then click See all settings.
2. At Forwarding and POP/IMAP tab, click creating a filter. *
* Note: Alternatively select the Filters and Blocked Addresses tab and click Create Filter.
3. At the next screen specify the forwarding condition and click Create Filter. *
* e.g. if you want to forward only the received emails from a specific email address, type the email address on the "From" field).
4. At the next screen check Forward it and add the forwarding address. When done click Create filter.
5. You're done. To disable the forwarding in the future, navigate to Filters and Blocked Addresses tab in GMAIL settings, select the forwarding rule and click Delete.
That's it! Let me know if this guide has helped you by leaving your comment about your experience. Please like and share this guide to help others.
We're hiring
We're looking for part-time or full-time technical writers to join our team! It's about a remote position that qualified tech writers from anywhere in the world can apply. Click here for more details.
- FIX: Numeric keypad Not Working on Windows 10/11 - July 24, 2024
- How to Share Files or Printers in Hyper-V? - July 22, 2024
- How to invoke Hyper-V Screen resolution prompt? - July 17, 2024


