How to Migrate Active Directory Server 2003 to Active Directory Server 2016 Step by Step.
In this tutorial I 'll show to you how to migrate Windows Server 2003 Active Directory to Windows Server 2016 AD. As you may know Windows Server 2003 support and updates ended back in July 2015 and many companies have already migrated, or they are planning to upgrade their Windows Servers 2003 Server(s) to Windows Server 2012R2 or to Windows Server 2016.
The Active Directory migration is an important and serious procedure, because as you may know an AD Server provides all the required Authentication services and security policies that affect all the users and computers on the network.
How to Migrate Active Directory Server 2003 to Active Directory Server 2016
Step 1. Install Windows Server 2016.
Step 2. Configure the IP Address in Server 2016.
Step 3. Join Windows Server 2016 to AD 2003 Domain.
Step 4. Login to Server 2016 with the Domain Administrator account.
Step 5. Raise the Domain & Forest Functional Levels on AD Server 2003.
Step 6. Add Active Directory Domain Services to Server 2016.
Step 7. Promote Server 2016 to Domain Controller.
Step 8. Transfer the Operation Masters Role to Server 2016.
Step 9. Change the Active Directory Domain Controller to Server 2016.
Step 10. Change the Domain Naming Master to Server 2016.
Step 11. Change the Schema Master to Server 2016.
Step 12. Verify that all FSMO Roles have transferred to Server 2016.
Step 13. Remove Server 2003 from Global Catalog.
Step 14. Change the Preferred DNS Address on Server 2003 to match Server's 2016 IP.
Step 15. Demote Server 2003 from Domain Controller.
Step 16. Change the Static IP Addresses on Server 2003 & Server 2016.
Step 17. Login to Active Directory 2016 from the Workstations.
Step 18. (Optional) Remove Server 2003 from the Domain & Network.
Step 1. Install Windows Server 2016.
Before proceeding to migrate an Active to Directory from Windows Server 2003 to Server 2016, you must first install Windows Server 2016 on a new machine which will then be promoted to Active Directory Server 2016. To perform that task, read the instructions in the following guide:
Step 2. Configure the IP Addresses in Server 2016.
The next step is to configure the IP and the DNS Addresses on the new server, as follows:
1. The IP Address must belong to the same subnet as the existing domain.
2. The DNS address must be the same, as in the existing Domain.
Let's suppose for this example (guide), that:
a. The existing AD Server 2003 (which is also a DNS Server) for the domain "wintips.local", is named "Server2K3" and has the IP Address "192.168.1.10".
b. The new Server 2016 is named "Server2k16".
According to the above information, you can see at the table below, the current IP settings of Server 2003 and the IP settings that I have applied on the new Server 2016, before proceeding to the Active Directory Migration process.
| Windows Server 2003 OS | Windows Server 2016 OS | |
| Computer Name: | Server2K3 | Server2k16 |
| Domain Name: | WINTIPS.LOCAL | |
| Domains' NetBIOS Name: | WINTIPS | |
| IP Address (Static): | 192.168.1.10 | 192.168.1.20 |
| Subnet Mask: | 255.255.255.0 | 255.255.255.0 |
| Default Gateway: | 192.168.1.1 | 192.168.1.1 |
| Preferred DNS Server: | 192.168.1.10 | 192.168.1.10 |
Step 3. Join Windows Server 2016 to AD 2003 Domain.
After applying the necessary IP Settings, proceed to join the new Server 2016 on the existing 2003 domain.
1. Open the Server Manager (on Server 2016) and click Local Computer on the left pane.
2. Click on WORKGROUP
3. Click Change.
4. At 'Member of' section, choose Domain. Then type the domain name of the existing Domain (e.g. "WINTIPS.LOCAL" at this example), or the Domain's NETBIOS name (e.g. "WINTIPS" at this example) and click OK.
5. Type "Administrator" at the user name field and then type the password for the domain Administrator account. When done, click OK.
6. Click OK at the "Welcome to Domain" message, close all open windows and restart the computer.
Step 4. Login to Server 2016 with the Domain Administrator account.
After restarting your new Server 2016, press Ctrl+Alt+Del and login using the domain administrator account and password. To do that:
1. At login screen, click Other User
2. At user name, type: "DomainName\Administrator" (e.g. "wintips\Administrator").
3. Type the password for the domain administrator.
4. Press Enter to login.
5. Leave Windows to create a new user profile for the new account and proceed to the next step.
Step 5. Raise the Domain & Forest Functional Levels on AD Server 2003.
1. On Windows Server 2003, open Active Directory Users and Computers.
2. Right click on the Domain Name (e.g. "wintips.local") and choose Raise Domain Functional Level.
3. Using the drop down arrow, set the functional level to Windows Server 2003 and click Raise.
4. Hit OK at Raise Functional Level warning message.
5. When the 'Raise' is completed, click OK again at the information message.
6. Then, open Active Directory Domain and Trusts.
7. Right click at Active Directory Domain and Trusts and choose Raise Forest Functional Level.
8. Make sure that the Windows Server 2003 is selected and click Raise.
9. Click OK twice and proceed to the next step.
Step 6. Add Active Directory Domain Services to Server 2016 & Promote Server 2016 to Domain Controller
The next step is to add "Active Directory Services" to Server 2016 and to promote it as a Domain Controller.
1. Open the Server Manager on the new server 2016.
2. Click Add roles and features.
3. Click Next at the "Before you begin" information window.
4. Make sure that the Role-based or feature-based installation is selected and click Next.
5. At destination server, click Next again (the default selection here is the new server 2016 machine).
6. Click Active Directory Domain Services and then click Add Features.
7. When done, click Next again to proceed.
8. Click Next at the Features and at AD DS (Active Directory Domain Services) screen.
9. Check to Restart the destination server automatically if required and then click Yes at the pop up message.
10. Finally click Install to add the selected roles and features to your new server.
11. Once the feature installation is completed, don't close this window and continue to the next step.
Step 7. Promote Server 2016 to Domain Controller.
After installing the AD services on Server 2016:
1. Click Promote this server to a domain controller.
2. At the Deployment Configuration screen, apply the following settings and then click Next:
1. Select Add a domain controller to an existing domain.
2. Make sure that the existing domain name is already selected. (If not, press the Select button and choose the proper domain.)
3. At Domain Controller Options:
1. Leave the default settings as is (with the DNS server and the Global Catalog selected).
2. Type the Domain Administrator password for the 'Directory Services Restore Mode'.
3. Click Next.
4. At DNS Options, click Next .
5. At Additional Options screen, select to replicate from the old active directory server 2003 (e.g. "server2k3.wintips.local") and click Next.
6. Leave the default paths for the Database, Log Files and SYSVOL folders and click Next.
7. Click Next again at Preparation Options and at Review Options screens.
8. When the 'Prerequisites Check' is completed successfully, click the Install button.
9. The installation process, should take some time to complete. So be patient until the server restarts* and then proceed to the next step.
* Note: After Server 2016 restarts, if you go to your old server 2003 at Active Directory Users and Computers -> Domain Controllers, you should see that the new server 2016 is already listed as a domain controller.
Step 8. Transfer the Operation Masters Role to Server 2016.
1. On Server 2016: open Server Manager.
2. From Tools menu, select Active Directory Users and Computers.
3. Right click on the domain name and choose Operations Masters.
4. At RID tab, click Change.
5. Click Yes to transfer the operations master role.
6. Click OK to the message that informs you that the operations masters' role was successfully transferred.
7. Then select the PDC tab and click Change.
8. Click Yes again to transfer the role and then click OK.
9. Then select the Infrastructure tab and click Change.
10. Click Yes again to transfer the role and then click OK.
11. Make sure that the operations masters' role is transferred to the new server in all tabs (RID & PDC & Infrastructure) and then click Close.
Step 9. Change the Active Directory Domain Controller to Server 2016.
1. From Tools menu in 'Server Manager' select Active Directory Domains and Trusts.
2. Right click on 'Active Directory Domains and Trusts' and select Change Active Directory Domain Controller.
3. Make sure that the Current Directory Server is the new Server 2016 (e.g. the "server2k16.wintips.local") and click OK. *
* Notice. If the current directory server is the old server 2003 (e.g. the "server2k3.wintips.local"), then:
1. Select (Change to:) This Domain Controller or AD LDS instance.
2. Choose the new server 2016 from the list and click OK.
3. Click Yes to apply changes and then click OK.
Step 10. Change the Domain Naming Master to Server 2016.
1. Open Active Directory Domains and Trusts.
2. Right click on 'Active Directory Domains and Trusts' and select Operations Master.
3. Click Change and to transfer the domain naming master role to the new Server 2016.
4. Click Yes to transfer the role, then click OK and then Close the window.
Step 11. Change the Schema Master to Server 2016.
1. On the new Server 2016: open Command Prompt as Administrator.
2. Type the following command the click Enter:
- regsvr32 schmmgmt.dll
3. Click OK at "DllRegisterServer in schmmgmt.dll succeeded" message.
4. Then type mmc and press Enter.
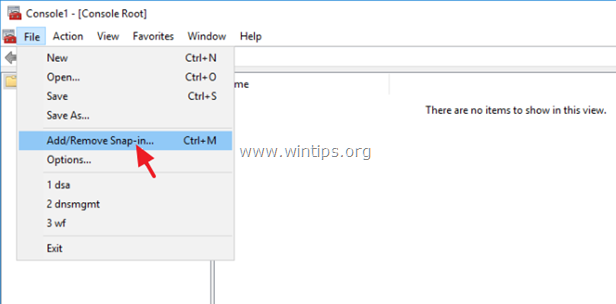
5. At MMC console click File and select Add/Remove Snap in…
6. Select Active Directory Schema on the left, click Add and then click OK.
7. Now in MMC console, right click on 'Active Directory Schema' and choose Change Active Directory Domain Controller.
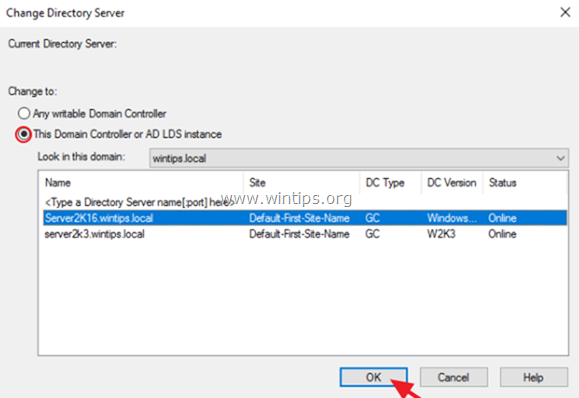
8. At 'Change Directory Server' window:
1. Select (Change to:) This Domain Controller or AD LDS instance.
2. Choose the new server 2016 from the list (e.g. the "server2k16.wintips.local") and click OK.
3. Click Yes to apply changes and then click OK
9. Click OK at the warning message: "Active Directory Schema snap-in is not connected to the schema operations master…".
10. Right click again at 'Active Directory Schema' and choose Operations Master.
11. Click Change to transfer the Schema Master role to the new server 2016,
12. Click Yes, then click OK and then Close the window.
13. Finally, close the MMC console (without saving any changes) and continue to the next step.
Step 12. Verify that all FSMO Roles have transferred to Server 2016.
1. On the new Server 2016: open Command Prompt as Administrator.
2. Type the following command and press Enter:
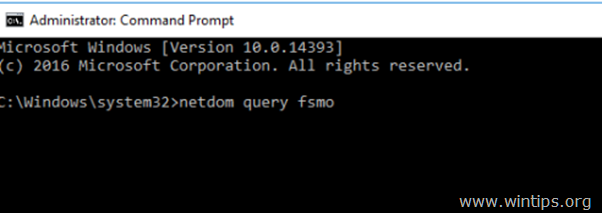
- netdom query fsmo
3. Verify that all the FSMO roles have transferred to your new Server 2016 (e.g. to "Server2k16.wintips.local")
4. If all the FSMO (Flexible Single Master Operation) roles have been transferred to Server 2016, then you have successfully upgraded your Server 2003 Active Directory to Server 2016 Active Directory. A few more steps and are you ready to go…
Step 13. Remove the Server 2003 from Global Catalog.
1. On Server 2016: open Active Directory Users and Computers.
2. Double click at your domain (e.g. "wintips.local") and click Domain Controllers.
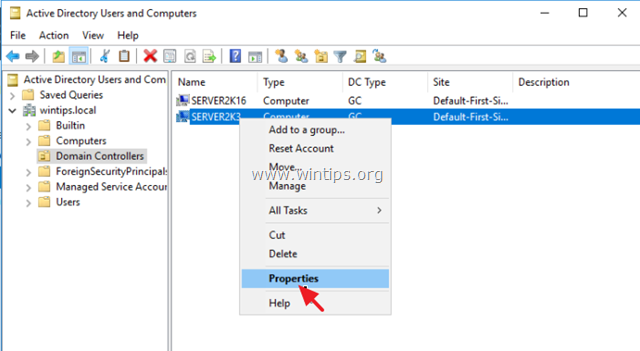
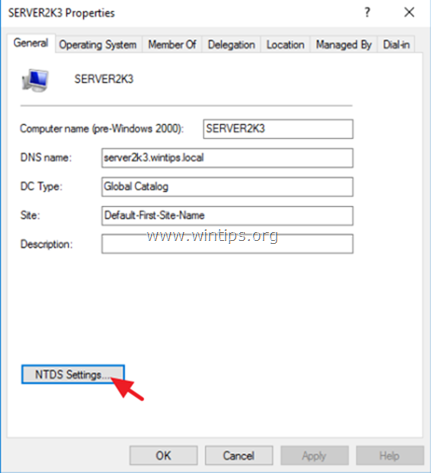
3. Right click at your old server (e.g. "Server2k3") and choose Properties.
4. Click NTDS Settings.
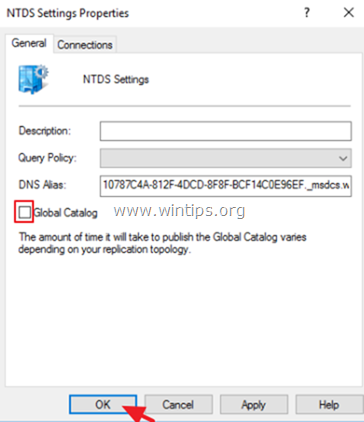
5. Uncheck the Global Catalog checkbox and click OK twice to close all windows.
6. Wait a few minutes to replicate the new configuration to the old server 2003 and proceed to the next step.
Step 14. Change the Preferred DNS Address on Server 2003 to match Server's 2016 IP.
1. On Server 2003: Open Network and Sharing Center.
2. Right click on Local Area Connection and click Properties.
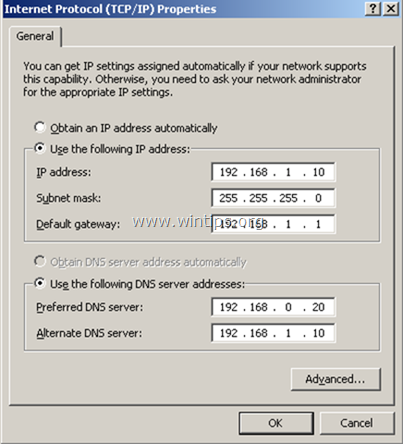
3. Double click on Internet Protocol TCP/IP.
4. Change the Preferred DNS server address to match the Server's 2016 IP Address.
5. Change the Alternate DNS server address to Server's 2003 IP Address.
6. Click OK and close all windows.
Step 15. Demote Server 2003 from Domain Controller.
Now let's remove the Active Directory services from Server 2003.
1. On your old Server 2003 open Command Prompt.
2. Type the following command and press Enter.
- dcpromo
3. Press Next at Welcome to Active Directory Installation Wizard.
4. Click Next to remove the Active Directory from the old server.
5. Type a new password for the local administrator account and click Next.
6. Click Next again to remove the Active directory from the old server 2003.
7. Be patient until Active Directory transfers the remain data to the new server 2016.
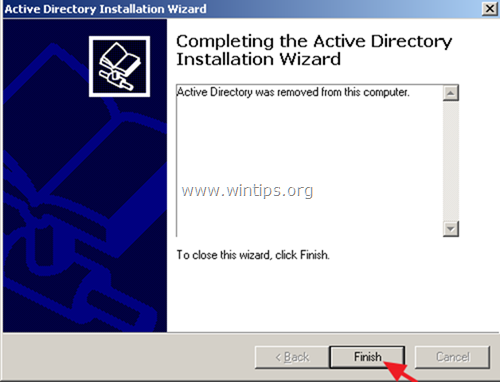
8. When the operation is completed click Finish.
9. Restart the computer.
10. After the restart, login to server 2003 using the local Administrator account.
Step 16. Change the Static IP Address on Server 2003 & Server 2016.
Until now, you have successfully upgraded your Active Directory Server 2003 to Server 2016 and you have removed the AD services from your old Server 2003.
But, before trying to login from the network workstations to the new Active Directory Domain 2016, you must change the IP Addresses to both servers, in order to match the already configured DNS settings on your network.
In fact, you have to assign the IP address of Server 2003 in Server 2016 and vice versa (or to assign a new IP address in Server2003). To do that:
1. Temporarily, disconnect the Server 2003 from the network (remove the LAN cable)
2. Apply the following IP Address changes to both Servers:
- At Server 2003 side:
- a. Change the current IP address (e.g. "192.168.1.10") to match the Server's 2016 IP address (e.g. "192.168.1.20") or assign a new (available) IP Address.
- At Server 2016 side:
- a. Change the current IP address (e.g. "192.168.1.20") to old Server's 2003 IP Address (e.g. "192.168.1.10")
- b. Set as Preferred DNS Server the same IP address (e.g. "192.168.1.10")
- c. (Optional): If your old domain controller (server 2003) acting also as a WINS server, then click the Advanced button and at WINS tab type the same IP Address (e.g. 192.168.1.10)
* For your help, in the table below you can see the IP configuration that I have applied for this example.
| Windows Server 2003 AD | Windows Server 2016 (New) | |
| Computer Name | Server2K3 | Server2k16 |
| Domain Name | WINTIPS.LOCAL | |
| Domains' NetBIOS Name | WINTIPS | |
| IP Address | 192.168.1.20 | 192.168.1.10 |
| Subnet | 255.255.255.0 | 255.255.255.0 |
| Gateway | 192.168.1.1 | 192.168.1.1 |
| Preferred DNS Server | 192.168.1.10 | 192.168.1.10 |
| 192.168.1.20 |
3. Finally to apply changes, from Server 2016 machine, open Command Prompt As Administrator and run the following commands in order:
- ipconfig /flushdns
- ipconfig /registerdns
- dcdiag /fix
4. Reconnect the Server 2003 on the network (re-attach the LAN cable).
5. Reboot both Servers.
Step 17. Login to Active Directory 2016 from the Workstations.
1. Power-on (or reboot) the network workstations and see if you can login to the new Active Directory Server 2016.
2. If you can login and all looks good, then you have finished with the Active Directory upgrade/migration.
Step 18. (Optional) Remove Server 2003 from Domain & Network.
The last step, is to remove the old Server 2003 from the Network (if you want). But, before doing that, make sure that you have transferred any other data that you may need (e.g. files, databases, etc.) to another computer (or to the new server). *
* Suggestion before removing the Server 2003 from network: Shut down the old server 2003 and leave it powered off for as long as it takes to ensure that all its information has transferred to the new server.
To remove Server 2003 from the Domain & the Network:
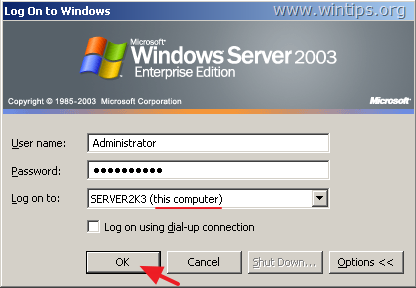
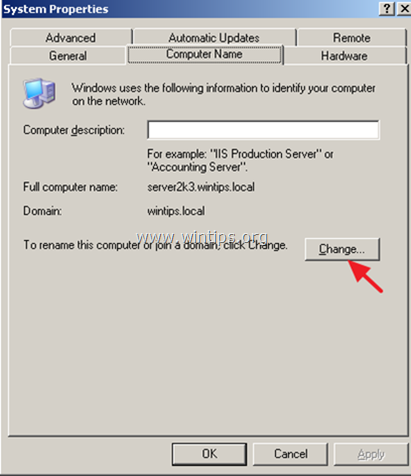
1. Right click on My Computer and select Properties.
2. At Computer Name tab, click Change.
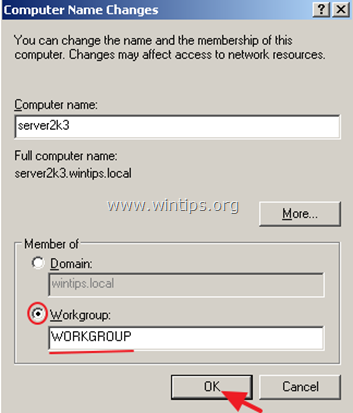
3. Select Workgroup, type the workgroup name and click OK.
4. Close all open windows and restart the computer.
5. Disconnect Server 2003 from network.
That’s it! Let me know if this guide has helped you by leaving your comment about your experience. Please like and share this guide to help others.
We're hiring
We're looking for part-time or full-time technical writers to join our team! It's about a remote position that qualified tech writers from anywhere in the world can apply. Click here for more details.
- FIX: Numeric keypad Not Working on Windows 10/11 - July 24, 2024
- How to Share Files or Printers in Hyper-V? - July 22, 2024
- How to invoke Hyper-V Screen resolution prompt? - July 17, 2024












May 18, 2022 @ 3:19 pm
Hello thank you for the detailed steps, I am planning to do this over the weekend. One question about backup DC's, will I leave them alone and they will connect to the new after completed or do the same steps need to be taken that are executed on the old DC? We have a PDC Win2003 and we have a backup DC Win2003 that also serves as LDAP. Finally we have a second backup DC we use for AD maintenance. Ultimately I would like to move the LDAP to the new DC and retire all the older Win2003 machines so maybe this would be the time to do that.
May 19, 2022 @ 10:31 am
1. After you transfer all the roles to the new DC, you don't (I think) need to keep the old backup DCs unless you are running other services on them that you need. If you want to keep them as backup DC's, maybe it's better to clean install the OS on them (after ensuring that all their services/data are transferred somewhere else) and then to join the new DC from scratch).
2. Yes, the best action is to transfer LDAP to the new DC and retire the older Win2003 machines.
May 21, 2022 @ 6:06 pm
Great news, all steps worked perfectly, we are now running our DC on Win server 2016.
Thank you for your help. Next step is to install LDAP on the new DC server and then turn it off on the old backup DC. Currently the LDAP is running normal under the new domain and users are able to login to the applications with it so I am happy.
May 24, 2022 @ 12:48 pm
I'm glad for that!
February 23, 2021 @ 5:19 pm
Is this migration tested from Windows Server 2003 to Windows Server 2012?
December 9, 2020 @ 10:40 pm
Thanks lakonst, this worked perfectly for a 2k3 to 2k16 migration. This saved me a ton of work, and I was able to move on to FRS -> DFSR migration afterward. One note, if your domain uses conditional forwarders in DNS, those don't get replicated (for some reason) and will need to be rebuilt manually.
January 24, 2020 @ 10:48 pm
ok, I figured out the step at 8.4. I had to connect to the 2016 server.
But now I hit a snag at 15.6
I get an error "The Operation Failed because: A domain controller could not be contacted for the domain mydomain.local that contained an account for this computer. Make the computer a member of a workgroup then rejoin the domain before retrying to promotion.
"The specified domain either does not exist or could not be contacted."
I tried to make it a part of a work group, but it would not let me do that.
January 25, 2020 @ 2:03 pm
If you cannot remove the old Domain Controller (Server 2003) and you don't want the machine anymore, then simply shutdown it, skip this step and continue to remove the old domain controller from the console of the new Domain Controller (Server 2016).
January 24, 2020 @ 8:48 pm
Everything went well, until I get to 8.4. On the RID tab it shows the old server name in both Op Master, and transfer to selection. It will not allow me to type in the new server name. I looked at the PDC tab and it shows the same. Any help would be great
December 28, 2019 @ 12:10 pm
I agree with @lars: How to migrate from FRS to DFSR after migrating FSMO?
I think it`s only possible from 2003 to 2008 R2, but no upward.
For migration from 2003 to 2016 (or 2012 / R2) my leel of knowledge is, that you have to install a temp. 2008 R2, have to migrate from 2003 to 2008 R2, demote 2003, raise the leven from 2003 to 2008, migrate FSR to DFSR and so on …
Otherwise SYSVOL will be empty and replication will not work …
But if there is a direct way for 2003->2016 with migration from FSR to DSFR it would be great and helpfull from you to give uns a hint.
Many thanx and regards,
Jan
December 30, 2019 @ 10:09 am
To migrate from FRS to DFSR read this tutorial: File Replication Service (FRS) is Deprecated after Migration to Active Directory 2012 or 2016
November 26, 2019 @ 9:14 am
on step 5.. when Right click at Active Directory Domain and Trusts and choose Raise Forest Functional Level. then show
"MMC has detected an error in a snap-in. It is recommended that you shut down and restart MMC."
what should i do? please give advice
November 26, 2019 @ 7:36 pm
See this solution from Microsoft.
November 7, 2019 @ 4:08 pm
Your steps are really comprehensive but when i tried demoting my old 2003 server i got the message:
"The operation failed because:
A domain controller could not be contacted for the domain syntax.local that contained an account for this computer.
Make the computer a member of a workgroup then rejoin the domain before retrying the promotion.
"The specified domain either does not exist or could not be contacted."
November 7, 2019 @ 6:26 pm
Did you follow exactly the steps?? Also have you changed correctly the Preferred DNS Address on Server 2003 to match Server's 2016 IP? (step-14)
November 8, 2019 @ 1:55 pm
Yeah i did. I will try again out of working hours where i will have more time to troubleshoot. Thank you.
November 18, 2019 @ 10:59 am
The problem i am having, seems to be relevant to a dns misconfiguration in my old 2003 ad. I am currently investigating. Thank you for your excellent guide!
November 19, 2019 @ 12:45 pm
Ok, after a week of troubleshooting, i finally found out that i was getting journal wrap errors so my sysvol was not replicating. i ran a chkdisk and i can now wait to finish replicating and then dcpromo to demote the 2003. Thank you so much for your excellent article.
November 6, 2019 @ 1:51 pm
I'm trying to use this procedure to migrate W2K3 to Server 2019 (which appears very similar to 2016) but I can't get past step 7.3. When I attempt to promote the server, the message is "Verification of replica failed. The forest functional level is not supported. To install a Windows Server 2019 domain or domain Controller, the forest functional lever must be 2008 or higher". I can't open Domain Controller Options – it just takes me back to the Deployment Configuration menu.
November 6, 2019 @ 3:43 pm
I think that you cannot Migrate from Windows 2003 to 2019 because you cannot Raise the Domain Functional level in AD 2003 to 2008 (Step-5 on the post) which is required in Server 2019 to migrate the AD successfully.
February 23, 2021 @ 3:22 pm
Highest supported Domain OS for 2003 is 2016* and there are caveat's with that. Server 2016 RS1 is the only one that still supports FRS to DFSR migration.
https://docs.microsoft.com/en-us/windows-server/identity/ad-ds/active-directory-functional-levels
October 5, 2019 @ 9:57 pm
After all this – Why wouldn't you raise the Domain Function Level to Windows 2016 ???
October 7, 2019 @ 9:28 am
Because, before raising the Domain Functional Level to Server 2016, you have to:
1. Verify that all other DC's are running the same OS version (Windows Server 2016).
2. Verify that the Active Directory is replicating properly to all other DCs.
3. Verify that all third-party apps can be run at the Windows Server 2016 Functional level.
September 20, 2019 @ 2:03 am
Excelent!
When does the domain functionality rise to 2016?
August 9, 2019 @ 2:33 pm
Do you need to restart 2003 after the Raise of Domain Functional Level?
I did this step but I can not promote 2016 to Domain controler – it still sees that the Forest Functional Level is Windows 2000.
August 13, 2019 @ 11:25 am
@Sometimes the restart is needed.
May 22, 2019 @ 9:49 pm
Hi,
why change the IP Adress of the old server and new server? is it a problem, that the new server as permanently a new ip adress?`
thanks!
May 23, 2019 @ 9:04 am
@Stefan: You have to change the IP Address if you want to match the already configured DNS settings on your network.
February 22, 2021 @ 5:20 am
Very well laid out step by step process that I'm eager to follow as I work to move an old organization from 2003 to 2019 by the interim step of first moving to 2016.
I'm confused a bit by this step. I have my 2016 in a different location\subnet, so it won't be able to re-use the old 2003's IP address. This means I'm not working in the same scenario that you've noted from step 2.
What gets broken, or will need to be fixed up in DNS in this scenario? For example our server2k3 is 192.168.0.1 and server2k16 is in another city on our mpls with an ip of 192.168.1.1
February 22, 2021 @ 12:30 pm
To perform the migration you have to use the same IP Range (e.g. 192.168.1.x) in both servers. Otherwise you'll not be able to perform the migration.
April 29, 2019 @ 6:15 pm
Is this migration tested from Windows Server 2003 to Windows Server 2019?
May 1, 2019 @ 9:15 am
@No, his is tested for migrating Server 2003 to Server 2016 without any problem.
August 2, 2019 @ 3:49 pm
You need at least WS 2008 to migrate to WS 2019. I've just failed with 2003 to 2019 migration.
March 5, 2019 @ 8:24 am
What about the FRS Warning in Step 7.8?
Did you migrate to DFS afterwards?
March 5, 2019 @ 10:46 am
@Lars: Yes, migrate to DFS at the end of this process.