How to Move Shares to Another Drive and Change the Share Path in Windows.
This guide contains step-by-step instructions on how to move shares (shared folders) to another drive and change the share path in Windows OS.
As an administrator, at some point you may need to add a new disk to a Windows File Server because you're running out of space on the existing disk, and then to move all shared folders along with their permissions to the new disk.
This process involves moving all shared folders, including their subfolders, files, and permissions, to the new location, and then changing the share path.
Because several times I had to move shared files to a another disk among their security permissions, I decided to write this guide with the steps I followed to do it, in order to help other users that may want to do the same.
How to Move a Shared Folder with its Permissions to Another Disk in Windows Server & Windows 11/10 Pro.
Some information before you continue below:
- The first step to move a shared folder to another drive, is to copy the shared folder(s) with its permissions to the new drive. For that task, I use the ROBOCOPY command, because copying through Windows Explorer does not work properly and is slow.
- Other reliable programs that you can use to COPY/MOVE the Shares are the Freefilesync, Syncback, Gs Richcopy 360.
- If you want you use the Windows Explorer's Copy to move/copy the shares, you should be aware that when you copy or move an object to another NTFS volume, the object inherits the permissions of its new folder/volume. To modify this behavior in order to retain the object's original permissions, you must modify the registry as instructed below (source) before making the copy . *
* Note: If you want to use ROBOCOPY or one of the other programs listed above for the copy/move, you don't need to modify the registry):
1. Open the Registry Editor and navigate to this key:
- HKEY_CURRENT_USER\SOFTWARE\Microsoft\Windows\CurrentVersion\Policies\Explorer
2. Right-click on Explorer key and select New > DWORD (32-bit) value.
3. Name the new value to "ForceCopyAclwithFile"
4. Now open the newly created value and set its Value data to 1.
5. Close the Registry Editor and restart the computer.
Step 1. Copy Shares to the New Drive using ROBOCOPY GUI.
To copy a shared folder and its contents with its permissions to another disk, with Robocopy:
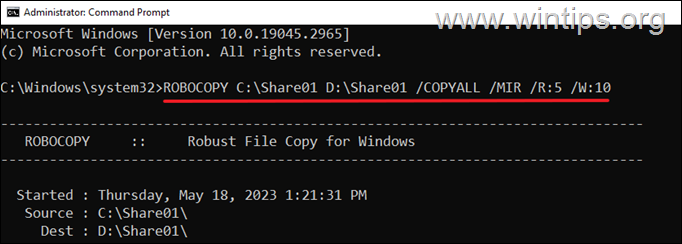
1. Open Command Prompt as Administrator, and use the following command to copy the Shared folder to the new drive:*
- ROBOCOPY C:\SOURCE-SHARED-FOLDER D:\DESTINATION-FOLDER /COPYALL /MIR /R:5 /W:10
* Notes:
1. In the above command replace the "SOURCE-SHARED-FOLDER" with the name of the folder that you want to copy to another drive, and in the "DESTINATION-FOLDER" type the name of the folder.
2. The above command will copy the selected folder with its subfolders and files, with all their information (Data, Attributes, Time stamps, NTFS access control list (ACL), Owner information & Auditing information), mirrors the directory tree, retries 5 times on files that are not copied, and waits 10 seconds between retries.
e.g. To copy the folder "Share01" from drive "C:\" to drive "D:\", give the following command:
- ROBOCOPY C:\Share01 D:\Share01 /COPYALL /MIR /R:5 /W:10
2. Wait for the copying to complete, and then proceed to the next step.
Step 2. Change Drive Letter in Share Path.
When you copy all the folders you need to the new drive, proceed to modify the Drive letter of the shared folder path in registry.
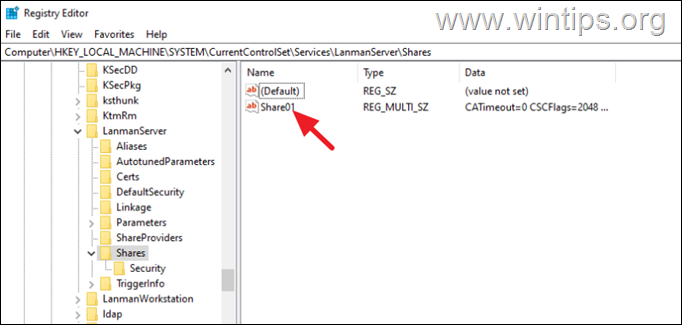
1. Open Registry Editor and navigate to this location:
- HKEY_LOCAL_MACHINE\SYSTEM\CurrentControlSet\Services\LanmanServer\Shares
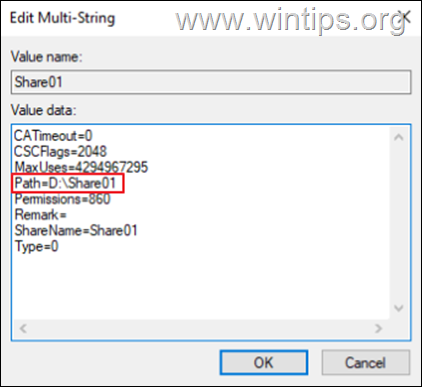
2. At the right pane double-click at the "Shared folder" value.
3. In the "Path" field, change the drive letter with the letter of the new disk and click OK. (For example, change "C" to "D" if the data has been moved to the “D” drive, as in this example).
4. Close the registry editor and restart the computer to apply the change. *
* Note: If for any reason you can't restart the computer, restart the "Server" service.
5. After restarting, users should be able to access the shares on the new drive.
6. If everything is OK, delete the Shared Folder from its old location and you're done!*
* Note: I suggest that before deleting, you run the Robocopy command one more time to make sure all the files have been transferred to the new location.
That's it! Let me know if this guide has helped you by leaving your comment about your experience. Please like and share this guide to help others.
We're hiring
We're looking for part-time or full-time technical writers to join our team! It's about a remote position that qualified tech writers from anywhere in the world can apply. Click here for more details.
- FIX: Numeric keypad Not Working on Windows 10/11 - July 24, 2024
- How to Share Files or Printers in Hyper-V? - July 22, 2024
- How to invoke Hyper-V Screen resolution prompt? - July 17, 2024


