How to Setup L2TP VPN Server 2016 with a Custom Preshared Key for Authentication.
In this tutorial you will find step by instructions to setup an L2TP VPN Access Server on Windows Server 2016. The Virtual Private Network (VPN) allows you to securely connect to your private network from Internet locations and it is protecting you from Internet attacks and data interception.To install and configure the L2TP/IPSec VPN access on Server 2016 it's a multi step process, because you have to configure several settings on the VPN server's side to accomplish the successful VPN operation.
How to Install a L2TP/IPSec VPN Server 2016 with Custom Preshared Key.
In this step by step guide, we go through the L2TP VPN Server 2016 setup using the Layer Two Tunneling Protocol (L2TP/IPSEC) with a custom PreShared key, for a more secure VPN connection.
Step 1. Install the Routing and Remote Access Role on Server 2016.
Step 2. Configure and Enable Routing and Remote Access on Server 2016.
Step 3. Configure the Preshared Key for the L2TP/IKEv2 connections.
Step 4. Open the Required Ports in Windows Firewall.
Step 5. Configure the VPN Server to Allow the Network Access.
Step 6. Enable L2TP/IPsec Connections Behind NAT.
Step 7. Check that the Required L2TP Services are running.
Step 8. Select the VPN Users.
Step 9. Configure ISP's Firewall to Allow the L2TP VPN Access.
Step 10. Setup the L2TP/IPSec VPN Connection on Clients.
Step 1. How to Add Remote Access (VPN Access) role on a Server 2016.
The first step to setup a Windows Server 2016, as a VPN server is to install the Remote Access role {Direct Access & VPN (RAS) services} to your Server 2016. *
* Info: For this example we're going to setup VPN on a Windows Server 2016 machine, named "Srv1" and with IP Address "192.168.1.8".
1. To install VPN role on Windows Server 2016, open 'Server Manager' and click on Add Roles and Features.
2. At the first screen of 'Add Roles and Features wizard', leave the Role-based or feature-based installation option and click Next.
3. At the next screen, leave the default option "Select server from the server pool" and click Next.
4. Then select the Remote Access role and click Next.
5. At 'Features' screen leave the default settings and click Next.
6. At 'Remote Access' information screen, click Next.
7. At 'Remote Services', choose the Direct Access and VPN (RAS) role services and then click Next.
8. Then click Add Features.
9. Click Next again.
10. Leave the default settings and click Next (twice) at 'Web Server Role (IIS)' and 'Role Services' screens.
11. At 'Confirmation' screen, select Restart the destination server automatically (if required) and click Install.
12. At the final screen, ensure that the installation of the Remote Access role is successful and Close the wizard.
13. Then (from Server Manager) Tools menu, click on Remote Access Management.
14. Select Direct Access and VPN on the left and then click to Run the Getting Started Wizard.
15. Then click Deploy VPN only.
16. Continue to step-2 below to configure Routing and Remote Access.
Step 2. How to Configure and Enable Routing and Remote Access on Server 2016.
The next step is to enable and configure the VPN access on our Server 2016. To do that:
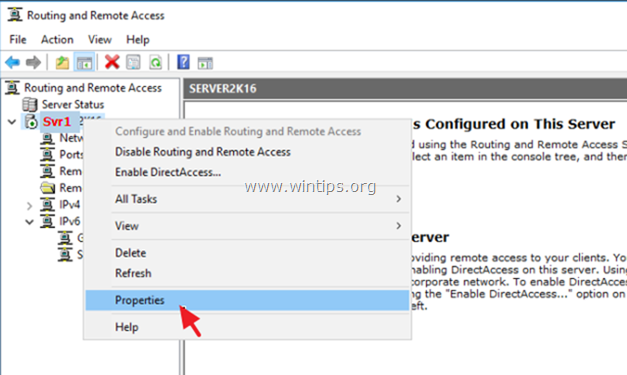
1. Right click on the Server's name and select Configure and Enable Routing and Remote Access. *
* Note: You can also launch Routing and Remote Access settings, by using the following way:
1. Open Server Manager and from Tools menu, select Computer Management.
2. Expand Services and Applications
3. Right click on Routing and Remote Access and select Configure and Enable Routing and Remote Access.
2. Click Next at 'Routing and Remote Access Server Setup Wizard'.
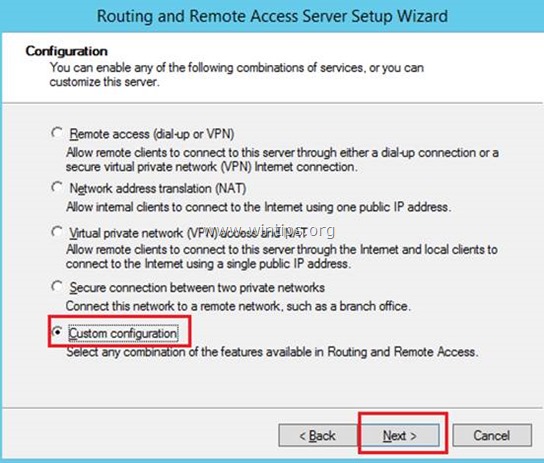
3. Choose Custom configuration and click Next.
4. Select VPN access only in this case and click Next.
5. Finally click Finish.
6. When prompted to Start the service click Start.
7. Now you will see a green arrow beside your Server's name (e.g. "Svr1" in this example).
Step 3. How to Enable Custom IPsec policy for L2TP/IKEv2 connections.
Now its time, to allow a custom IPsec Policy on Routing and Remote Access server and to specify the custom Preshared key.
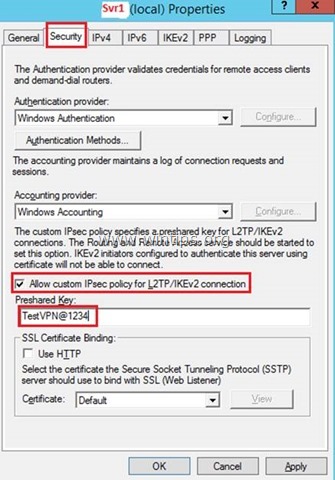
1. At Routing and Remote access panel, right click on your server's name and select Properties.
2. At Security tab, choose Allow custom IPsec policy for L2TP/IKEv2 connection and then type a Preshared key (for this example I type: "TestVPN@1234").
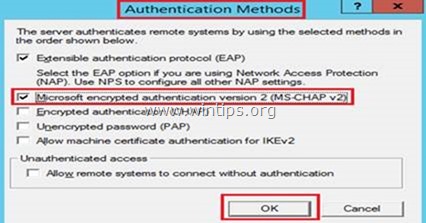
3. Then click the Authentication Methods button (above) and make sure that the Microsoft encrypted authentication version 2 (MS-CHAP v2) is selected and then click OK.
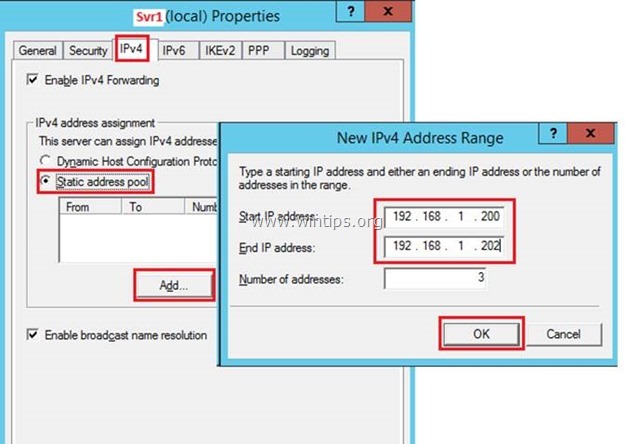
4. Now select the IPv4 tab, select Static address pool and click Add.
5. Here type the IP Address Range that will be assigned to VPN connected clients and click OK (twice) to close all windows.
e.g. For this example we're going to use the IP address range: 192.168.1.200 – 192.168.1.202.
6. When you are prompted with the pop up message: "To enable custom IPsec policy for L2TP/IKEv2 connections you must restart Routing and Remote Access", click OK.
7. Finally right click on your server (e.g. "Svr1") and select All Tasks > Restart.
Step 4. Open the Required Ports in Windows Firewall.
1. Go To Control Panel > All Control Panel Items > Windows Firewall.
2. Click Advanced settings on the left.
3. At the left, select the Inbound Rules.
4a. Double click at Routing and Remote Access (L2TP-In)
4b. At 'General' tab, choose Enabled, Allow the connection and click OK.
5. Now, right click at Inbound Rules on the left and select New Rule.
6. At the first screen, select Port and click Next.
7. Now select the UDP protocol type and at 'Specific local ports' field, type: 50, 500, 4500.
When done click Next.
8. Leave the default setting "Allow the Connection" and click Next.
9. At the next screen, click Next again.
10. Now, type a name for the new rule (e.g. "Allow L2PT VPN") and click Finish.
11. Close the Firewall settings.
Step 5. How to Configure the Network Policy Server to Allow the Network Access.
In order to allow the VPN users to access the network through the VPN connection, proceed and modify the Network Policy Server as follows:
1. Right click on Remote Access Logging and Policies and select Launch NPS
2. At the 'Overview' tab, select the following settings and click OK:
-
- Grant access: If the connection request matches this policy.
- Remote Access Server (VPN-Dial up)
3. Now open the Connections to other access servers policy, select the same settings and click OK.
-
- Grant access: If the connection request matches this
policy. - Remote Access Server (VPN-Dial
up)
- Grant access: If the connection request matches this
4. Close the Network Policy Server settings.
Step 6. How to Enable L2TP/IPsec Connections Behind NAT.
By default, modern Windows Clients (Windows 10, 8, 7 or Vista) and the Windows Server 2016, 2012 & 2008 operating systems do not support L2TP/IPsec connections if the Windows computer or the VPN server are located behind a NAT. To bypass this problem you have to modify registry as follows, in the VPN Server and the Clients:
1. Simultaneously press the Windows ![]() + R keys to open run command box.
+ R keys to open run command box.
2. Type regedit and press Enter.
3. At the left pane, navigate to this key:
- HKEY_LOCAL_MACHINE\SYSTEM\CurrentControlSet\Sevices\PolicyAgent
4. Right click on PolicyAgent and select New –> DWORD (32 bit) Value.
5. For the new key name type: AssumeUDPEncapsulationContextOnSendRule and press Enter.
* Note: The value must be entered as shown above and with no space.
6. Double click on this new DWORD key and enter for Value data: 2
7. Close Registry Editor. *
* Important: To avoid problems when connecting to your VPN server from a Windows client computer (Windows Vista, 7, 8, 10, and 2008 Server), you must apply this registry fix to clients too.
8. Reboot the machine.
Step 7. Verify that IKE & IPsec Policy Agent services are running.
After the restart, go to services control panel and make sure that the following services are up and running. To do that:
1. Simultaneously press the Windows ![]() + R keys to open run command box.
+ R keys to open run command box.
2. In run command box, type: services.msc and press Enter.
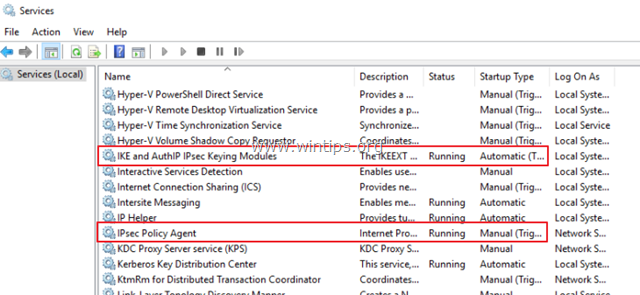
3. Make sure that the following services are running: *
-
- IKE and AuthIP IPsec Keying Modules
- IPsec Policy Agent
* Notes:
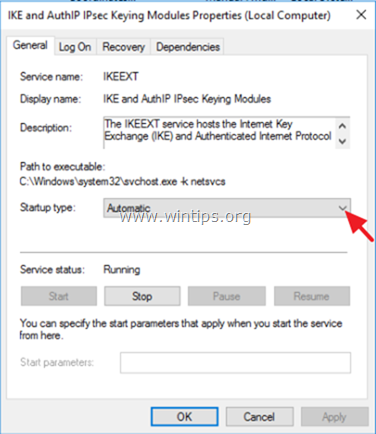
1. If the above services are not running, then double click on each service and set the Startup Type to Automatic. Then click OK and restart the server.
2. You must ensure that the above services are also running in the Windows client machine.
Step 8. How to Select which users will have VPN Access.
Now it's time to specify which users will be able to connect to the VPN server (Dial-IN permissions).
1. Open Server Manager.
2. From Tools menu, select Active Directory Users and Computers. *
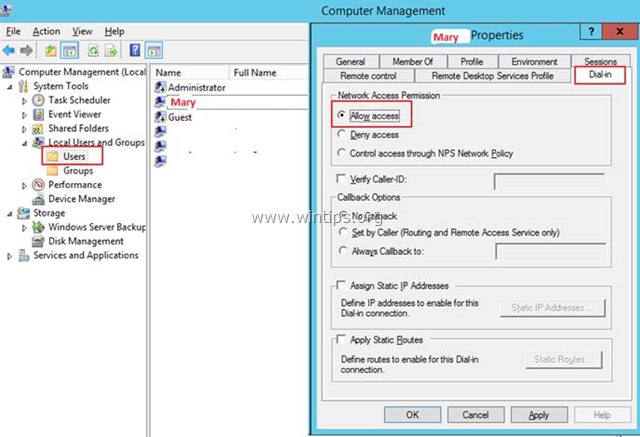
* Note: If your server doesn't belong to a domain, then go to Computer Management -> Local Users and Groups.
3. Select Users and double click on the user that you want to allow the VPN Access.
4. Select the Dial-in tab and select Allow access. Then click OK.
Step 9. How to Configure Firewall to Allow L2TP VPN Access (Port Forwarding).
The next step is allow the VPN connections in your Firewall.
1. Login to router's web interface.
2. Inside the Router configuration setup, forward the ports 1701, 50, 500 & 4500 to the IP address of the VPN Server. (See your Router’s manual on how to configure Port Forward).
- For example, if the VPN Server has the IP address "192.168.1.8" then you have to forward all the above mentioned ports to that IP.
Additional Help:
- In order to be able to connect to your VPN server from a distance you have to know the public IP Address of the VPN server. To find the pubic IP Address (from the VPN Server PC) navigate to this link: http://www.whatismyip.com/
- To ensure that you can always connect to your VPN server it is better to have a Static Public IP Address. To obtain a Static Public IP Address you must contact your internet service provider. If you don’t want to pay for a static IP Address, then you can setup a free Dynamic DNS service (e.g. no-ip.) on your router’s (VPN Server) side.
Step 10. How to Setup the L2TP VPN Connection on a Windows Client Computer.
The final step is to create a new L2TP/IPSec VPN connection to our VPN Server 2016 on the client computer, by following the instructions below:
- Related article: How to Setup a PPTP VPN Connection on Windows 10.
ATTENTION: Before you continue to create the VPN Connection, proceed and apply the registry fix in step-6 above, on the client computer too.
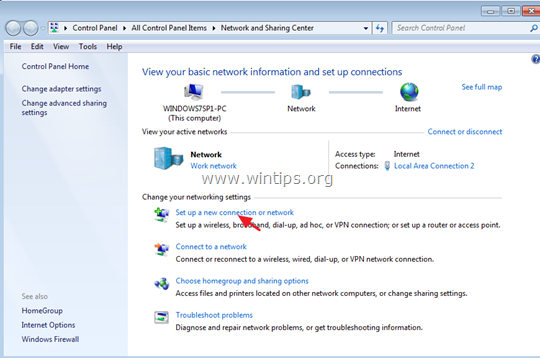
1. Open Network and Sharing Center.
2. Click Set up a new connection or network
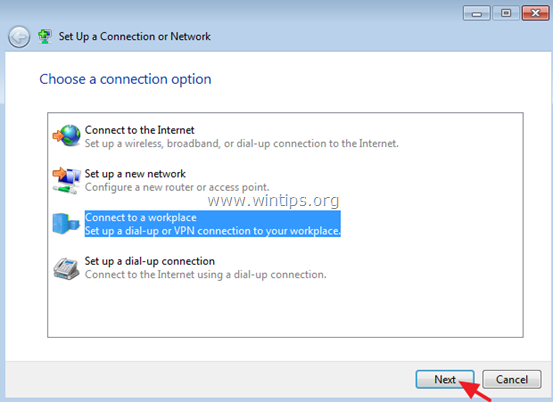
3. Select Connect to workplace and click Next.
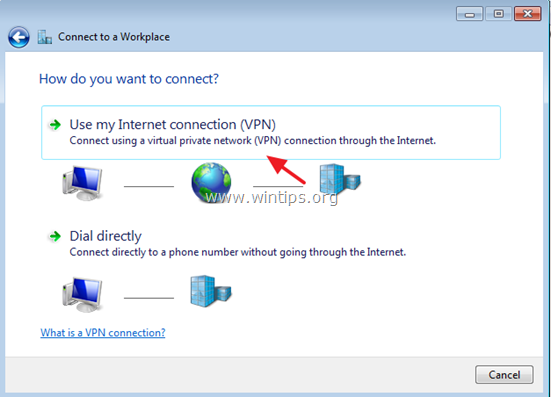
4. Then select Use my Internet connection (VPN).
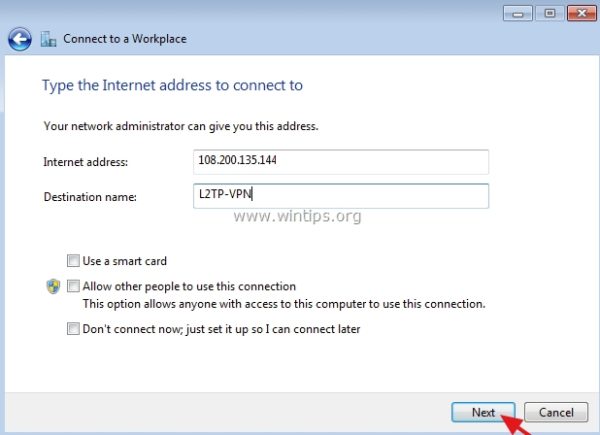
5. On the next screen type the VPN’s server public IP Address and the VPN Port that you have assigned on the router side and then click Create.
e.g. If the external IP address is: 108.200.135.144, then type: "108.200.135.144" at Internet Address box and at 'Destination name' filed, type any name you want (e.g. "L2TP-VPN").
6. Type the username and the password for the VPN connection and click Connect.
7. If you setup the VPN on a Windows 7 client machine it will try to connect. Press Skip and then click Close, because you need to specify some additional settings for the VPN connection.
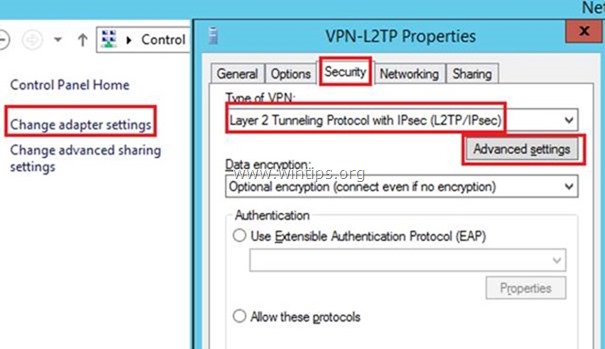
8. On Network and Sharing center click on Change adapter settings on the left.
9. Right click on the new VPN connection (e.g. "L2TP-VPN") and select Properties.
10. Select the Security tab and choose Layer 2 (Tunneling Protocol with IPsec (L2TP/IPsec) and then click on Advanced settings.
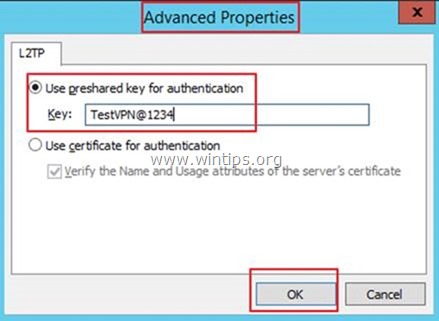
11. In 'Advanced settings' type the Preshared key (e.g. "TestVPN@1234" in this example) and click OK
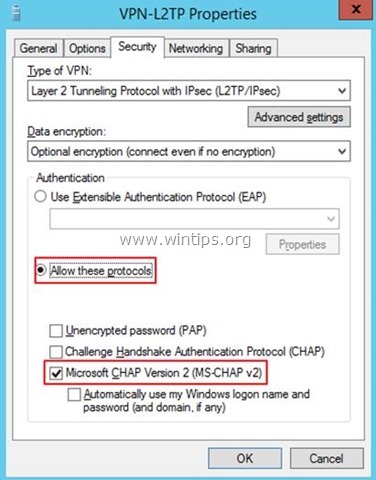
12. Then click on Allow these protocols and select the Microsoft CHAP Version 2 (MS-CHAP v2)
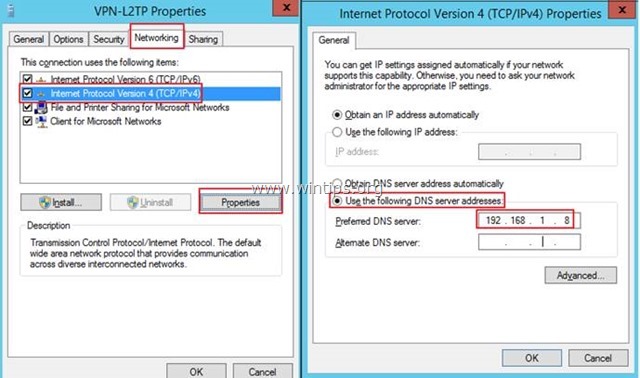
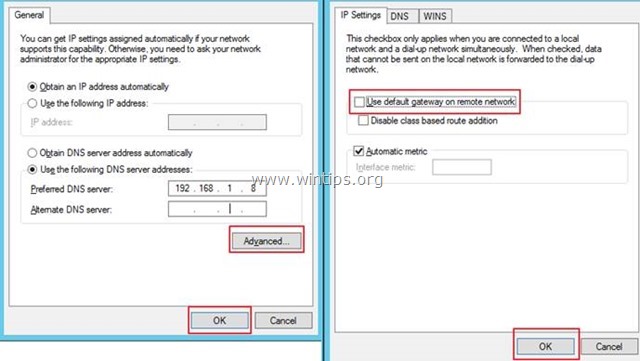
13. Then select the Networking tab. We will double click on Internet Protocol Version 4 (TCP/IPv4) to open its Properties.
14. For Preferred DNS server type the Local IP Address of the VPN Server (e.g. "192.168.1.8" in this example). *
* Note: This setting is optional, so apply it only if you needed.
15. Then click the Advanced button and uncheck the Use default gateway on remote network because we want to separate our PC Internet browsing from VPN connection.
16. Finally click OK continually to close all windows.
17. Now double click on the new VPN connection and click Connect, to connect to your workplace.
That’s it! Let me know if this guide has helped you by leaving your comment about your experience. Please like and share this guide to help others.
We're hiring
We're looking for part-time or full-time technical writers to join our team! It's about a remote position that qualified tech writers from anywhere in the world can apply. Click here for more details.
- FIX: Error 0x8007025d in Windows 10 Update. - April 22, 2024
- How to Disable Device Encryption in Windows 11/10. - April 17, 2024
- How to View Permissions on Shared Folders on Windows 10/11. - April 15, 2024







![image_thumb[11] image_thumb[11]](https://www.wintips.org/wp-content/uploads/2020/03/image_thumb11_thumb-1.png)







December 31, 2021 @ 7:38 am
There is no port 50 here. 50 is a protocol that must be allowed through the firewall.
April 20, 2021 @ 8:27 am
Hey I think in step 5 you are missing steps 2 and 3a??
Thanks for the guide though.
July 25, 2020 @ 11:01 pm
Thank you so much for the instructions of setting up the L2TP VPN server.
I am trying to access the web using an Android device with those same settings, but I am unable to reach out to the web.
It connects successfully, but then I am unable to to view internet while using the VPN.
March 3, 2020 @ 1:10 pm
Hi thank you a lot for your working l2tp tutorial !
There is just one error : you need to open the 500 & 4500 ports instead of the 1723.
March 4, 2020 @ 1:11 pm
Sorry, you 're absolutely right! In fact you must open the ports: 1701, 50, 500 & 4500. (Article updated)