How to Install and Use CCleaner to Optimize Windows Performance.
One of my favorite cleaning and protection programs, is the CCleaner. I use this tool for many years now and I ‘m very pleased with its capabilities. CCleaner helps you to clean your computer from unwanted programs, cookies and temporary files from your Internet browsing and protects your online privacy.
Additionally, with CCleaner, you can easily remove the invalid entries in Windows registry and to increase the Windows performance by removing all the unwanted programs from Windows startup.
This is a small tutorial on how to install and use CCleaner to increase Windows performance in Windows 10, 8, 7, Vista & XP.
How to Install and Use CCleaner to Increase Windows Performance.
Part 1. How to Install CCleaner.
Part 2. How to Optimize Windows with CCleaner.
Part 1. How to Install CCleaner.
1. Proceed and download CCleaner Free. *
* Note: Please note, that due to the popularity of CCleaner, and after it was sold to AVAST, there have been incidents of hackers and managing to inject malicious code into the official versions. Therefore always download CCLEANER from its official distributor only: https://www.ccleaner.com/ccleaner/download
2. When the download is completed, run the executable file to start the installation of CCleaner.
3. Choose Run and then Yes at the UAC security warning.
4. At the CCleaner Setup screen, uncheck the 'Install Google Chrome' or the 'Install Avast' box (unless you want to install the offered programs) and then click Customize. *
* IMPORTANT NOTICE: Since the acquisition of CCLEANER by Avast in July 2017, there have been many complaints that the latest versions of CCLEANER installers install other bundled software that is not needed for the program to work properly. So, during the installation DECLINE to install any other software bundled.
5. Leave checked only the first two options and click Install.
6. When the installation is completed, uncheck the 'View release notes' box and click Run CCleaner.
Part 2. How to Increase Windows Performance with CCleaner.
Step 1. Remove Useless files from your system with CCleaner.
1. Launch CCleaner.* When CCleaner starts you 'll see the the screen below.
* Notice: If you have already installed CCleaner, then you can find the program’s shortcut on your desktop or in programs menu list.
2. By default, CCleaner erases lot of unwanted files from your computer (History, Cookies, Temporary Internet Files, etc.), but is always better to review which useless files will be removed by checking the Windows and the Applications tabs. (At this section, I prefer to use the program with its default options).
3. To start cleaning the useless files from your system, press the Run Cleaner button at the right bottom side of CCleaner’s program.
4. At the next information window, first choose Do not show me this message again and then press Continue.
5. At next, the program will start the cleaning procedure and you‘ll see a similar screen
6. When The clean process is complete, CCleaner informs you about the amount of junk and privacy files (cookies) that have been removed.
Step 2. Optimize Windows Registry with CCleaner.
CCleaner offers a Registry Cleaner that can be used to remove all the invalid entries for the Windows Registry. But, it is better not to use it, because sometimes causes problems to Windows functionality and doesn't offer a significant improvement to Windows performance. Anyway, if you want to use the registry cleaner, at you own risk: *
DISCLAIMER: I do not recommend using the Registry Cleaner & Driver Updater tools included in the latest versions of CCLEANER, because they can cause significant problems with Windows operation.
1. Select the Registry option from the left side and at the right pane, choose Scan for Issues.
2. When the registry scan is completed, the program will display the registry problems that found. At this point review the results and if you want to fix the issues found, click the Fix selected issues button to continue.
4. At the "Do you want to backup changes to the registry?" message choose Yes, in order to backup the current registry state before making changes.
5. Then save the registry backup file to your computer and use that file to restore the registry, if you face problems after the registry cleaning process.
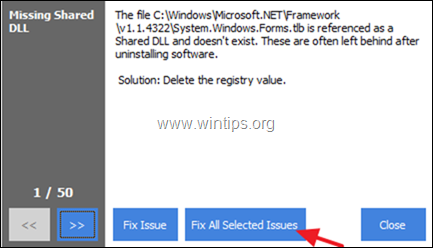
6. Finally click Fix All Selected Issues to continue.
7. When the cleaning process is completed, click Close to return to the main CCleaner window.
Step 3. Remove the Unwanted Installed Programs with CCleaner.
With CCleaner you can view and remove easy, any unwanted program (or Store App in Windows 10) from your system. To manage the installed programs/apps with CCleaner:
1. Click Tools from left side and then choose the Uninstall option.
2. Review the installed programs and apps and if you want to remove a program or app, select it and click Uninstall.
Step 4. Remove the Unwanted Background Programs with CCleaner.
One of the most useful features of CCleaner, is that you can easy view and manage the programs that start at Windows startup or running in the background from a scheduled task.
To disable the unwanted startup programs with CCleaner:
1. At the the Tools options, click the Startup button and then select the Windows tab.*
* Info: At the 'Windows' tab, you will see a list of all the startup programs that run automatically when Windows starts.
2. To increase your system's performance, select the programs that you don't want to start with Windows and click the Disable button. **
** Notes:
1. By decreasing the number of programs at Windows Startup, you 'll increase the Windows performance dramatically.
2. If after restarting your computer, you face problems with any of the disabled programs, just run CCleaner again and re-enable it.
To disable the unwanted scheduled programs/tasks with CCleaner:
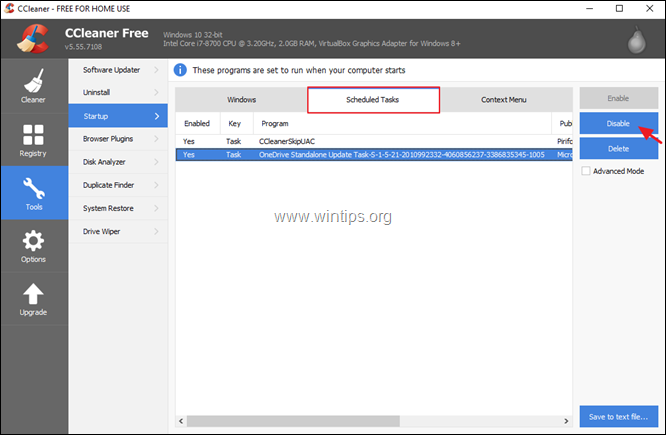
1. At the the Tools options, click the Startup button and then select the Scheduled Tasks* tab.
* Info: At 'Scheduled Tasks' tab, you will see a list of all the programs that are set to start in the background, by using the Task Scheduler.
2. Review carefully the listed programs and disable the ones that don't needed to run in the background.
3. When finishing with CCleaner, restart your computer to apply the changes made, and then start using your "clean" computer.
- Related article: Ten+ tips to keep your computer fast and healthy.
That's it! Let me know if this guide has helped you by leaving your comment about your experience. Please like and share this guide to help others.
We're hiring
We're looking for part-time or full-time technical writers to join our team! It's about a remote position that qualified tech writers from anywhere in the world can apply. Click here for more details.
- FIX: Numeric keypad Not Working on Windows 10/11 - July 24, 2024
- How to Share Files or Printers in Hyper-V? - July 22, 2024
- How to invoke Hyper-V Screen resolution prompt? - July 17, 2024


October 11, 2015 @ 8:13 am
I have learned something from reading your article today. I appreciate your presentation and knowledge on this subject. This has given me reason to consider the points you made here and I will be back.
May 3, 2014 @ 8:15 pm
After months and months of pain, someone's helped me to get rid of that mess !
Great job. Recommended, I will do it on other computers as a preventive action.
July 17, 2013 @ 10:33 pm
just works. fixed in 10 minutes
July 10, 2013 @ 3:43 am
Very well done and thanks for your efforts………….Slainte
March 20, 2013 @ 5:59 am
Very very helpful. Thanks