Remove Adsupplyads.com Ads (Removal Guide)
Adsupplyads.com Ads get in your computer after the installation of a malicious software on it. The “Adsupplyads” adware may install additional plugins (toolbars, extensions or add-ons) inside the Web browser in order to present unwanted advertisements to the computer's user. Adware programs like this, may contain malware (malicious software) in their code in order to compromise the computer's security and make it vulnerable to hackers or malicious Internet attacks.
Technically, “Adsupplyads” is not a virus and is categorized as a malware program (“Potentially Unwanted Program (PUP)”) that may contain and install malicious programs on your computer, like adware, toolbars or viruses. If a computer is infected with “Adsupplyads” adware, then more pop-up ads, banners and sponsored links are displayed on the victim’s computer screen or in the Internet browser and in some cases, the computer speed may be slowed down due to malicious programs running on the background.
Adsupplyads adware program was probably installed without the user's knowledge because it is commonly bundled inside other freeware software which are downloaded -and installed- from known internet sites like “download.com (CNET)”, “Softonic.com”, etc. For that reason, you must always pay attention to the installation options for any program you install on your computer, because most software installers contain additional software that you never wanted to install. In simple words, DO NOT INSTALL ANY IRRELEVANT SOFTWARE that comes with the software installer of the program that you want to install. More specifically, when you install a program on your computer:
- DO NOT PRESS the “Next” button too fast at the installation screens.
- READ VERY CAREFULLY the Terms and Agreements berore clicking “Accept”..
- ALWAYS SELECT: “Custom” installation.
- DECLINE to install any offered additional software that you don’t want to install.
- UNCHECK any option that says that your homepage and search settings will be modified.
How to remove Ads by Adsupplyads.com from your computer:
Step 1. Remove Adsupply ads with RogueKiller.
RogueKiller is an anti-malware program written and is able to detect, stop & remove generic malwares and some advanced threats such as rootkits, rogues, worms, etc.
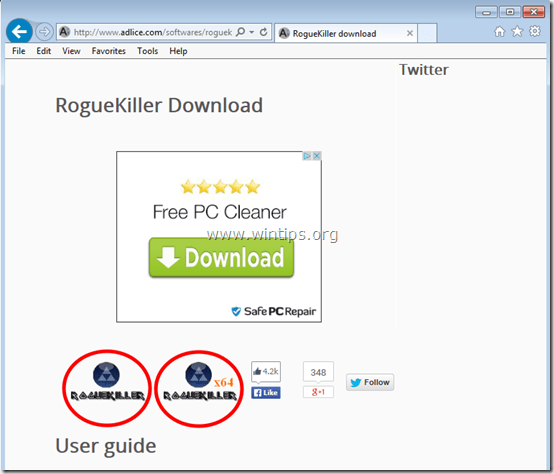
1. Download and save "RogueKiller" utility on your computer'* (e.g. your Desktop)
Notice*: Download version x86 or X64 according to your operating system's version. To find your operating system's version, "Right Click" on your computer icon, choose "Properties" and look at "System Type" section
2. Double Click to run RogueKiller.
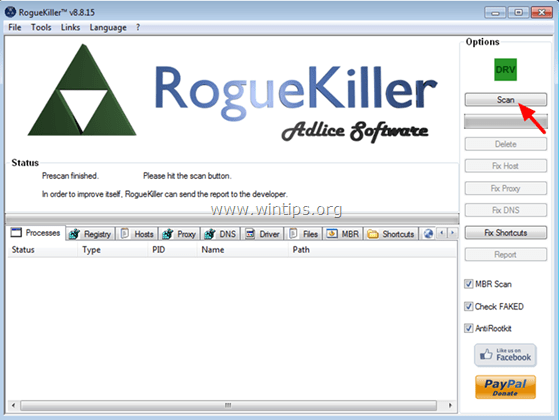
3. Wait until the pre-scan is completed and then, read and “Accept” the license terms.
4. Press the “Scan” button to scan your computer for malicious threats and malicious startup entries.
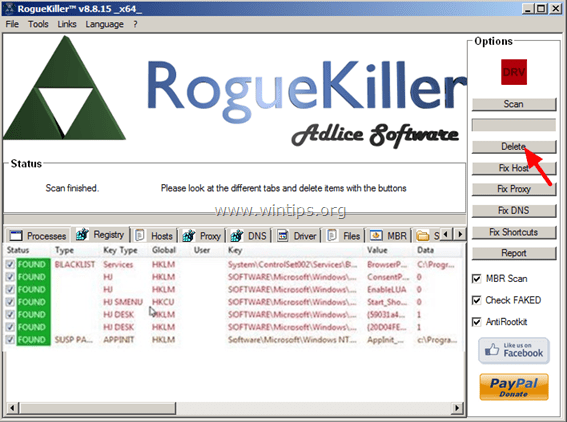
5. Finally, when the full scan is completed, click the “Registry” tab, select all malicious items found and then press the "Delete"button to remove them.
6. Close “RogueKiller” and continue to the next step.
Step 2. Uninstall Adsupplyads from your Control Panel.
1. To do this, go to:
- Windows 7 & Vista: Start > Control Panel.
- Windows XP: Start > Settings > Control Panel
- Windows 8 & 8.1:
2. Double click to open:
- Add or Remove Programs if you have Windows XP
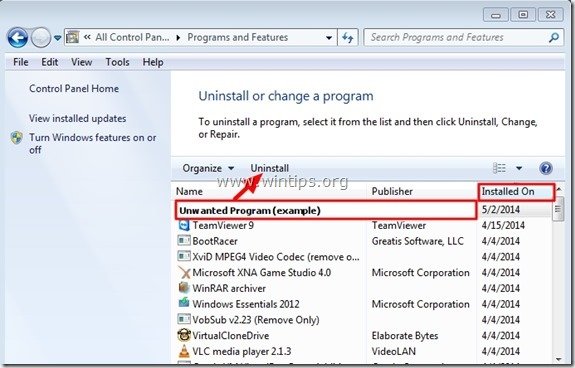
- Programs and Features (or “Uninstall a Program”) if you have Windows 8, 7 or Vista.
3. When the program list is displayed on your screen:
3a. Sort the the programs displayed by Installation date (Installed On) and then find and Remove (Uninstall) any unknown program that was recently installed on your system.
3b. Also remove any of these malicious applications:
- Adsupplyads
Step 3: Remove Adsupplyads.com Ads with “AdwCleaner”.
1. Download and save “AdwCleaner” utility to your desktop.
2. Close all open programs and Double Click to open ”AdwCleaner” from your desktop.
3. After accepting the “License Agreement”, press the “Scan” button.
4. When the scan is completed, press “Clean” to remove all the unwanted malicious entries.
4. Press “OK” at “AdwCleaner – Information” and press “OK” again to restart your computer.
5. When your computer restarts, close "AdwCleaner" information (readme) window and continue to the next step.
Step 4 – Remove Ads by Adsupplyads from Internet Explorer, Chrome & Firefox.
To ensure that Ads by Adsupplyads are completely removed from your Internet browser, reset your Internet Browser Settings to their default values.
Internet Explorer, Google Chrome, Mozilla Firefox
Internet Explorer
Remove Adsupplyads Ads from Internet Explorer
1. From Internet Explorer main menu, click: "Tools " ![]() and choose "Internet Options".
and choose "Internet Options".
2. Click the “Advanced” tab.
3. Choose “Reset”.
4. Check (to enable) the “Delete personal settings” box and choose “Reset”.
5. After the resetting action is completed, press “Close” and then choose “OK” to exit Internet Explorer options.
6. Close all windows and restart Internet Explorer.
Google Chrome
Remove Adsupplyads.com Ads from Chrome
1. Open Google Chrome and go to chrome menu ![]() and choose "Settings".
and choose "Settings".
2. Look at the end of “Settings” options and press the “Show advanced settings” link.
3. Scroll all the page down and press the “Reset Browser Settings” button.
4. Press the “Reset” button again.
5. Restart Google Chrome.
Mozilla Firefox
Remove Ads by Adsupplyads.com from Firefox.
1. From Firefox menu, go to “Help” > “Troubleshooting Information”.
2. In “Troubleshooting Information” window, press “Reset Firefox” button to reset Firefox to its default state.
3. Press “Reset Firefox" again.
4. After the resetting job is completed, Firefox restarts.
Step 5. Remove Adsupplyads with Junkware Removal Tool.
1. Download and run JRT – Junkware Removal Tool.
2. Press any key to start scanning your computer with “JRT – Junkware Removal Tool”.
3. Be patient until JRT scans and cleans your system.
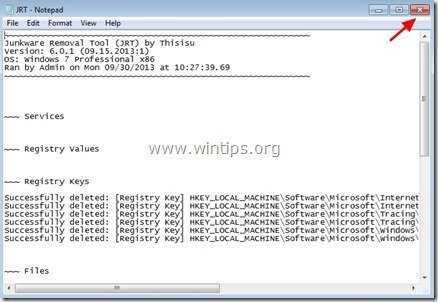
4. Close JRT log file and and then reboot your computer.
Step 6. Remove Adsupplyads infection with Malwarebytes Anti-Malware Free.
Download and install one of the most reliable FREE anti malware programs today to clean your computer from remaining malicious threats. If you want to stay constantly protected from malware threats, existing and future ones, we recommend that you install Malwarebytes Anti-Malware Premium:
Malwarebytes™ Protection
Removes Spyware, Adware & Malware.
Start Your Free Download Now!
Quick download & Installation instructions:
- After you click the above link, press at the “Start My Free 14-Trial” option to start your download.
- To install the FREE version of this amazing product, uncheck the “Enable free Trial of Malwarebytes Anti-Malware Premium” option at the last installation screen.
Scan & Clean your computer with Malwarebytes Anti-Malware.
1. Run "Malwarebytes Anti-Malware" and allow the program to update to its latest version and malicious database if needed.
2. When the update process is completed, press the “Scan Now” button to start scanning your system for malware and unwanted programs.
3. Now wait until Malwarebytes Anti-Malware finishes scanning your computer for malware.
4. When the scan has completed, press the “Quarantine All” button to remove all threats found.
5. Wait until Malwarebytes Anti-Malware removes all infections from your system and then restart your computer (if required from the program) to completely remove all active threats.
6. After the system restart, run Malwarebytes' Anti-Malware again to verify that no other threats remain in your system.
Advice: To ensure that your computer is clean and safe, perform a Malwarebytes' Anti-Malware full scan in Windows "Safe mode". Detailed instructions on how to do that you can find here.
Step 7. Clean unwanted files and entries.
Use “CCleaner” program and proceed to clean your system from temporary internet files and invalid registry entries.*
*If you don’t know how to install and use “CCleaner”, read these instructions.
We're hiring
We're looking for part-time or full-time technical writers to join our team! It's about a remote position that qualified tech writers from anywhere in the world can apply. Click here for more details.
- FIX: Numeric keypad Not Working on Windows 10/11 - July 24, 2024
- How to Share Files or Printers in Hyper-V? - July 22, 2024
- How to invoke Hyper-V Screen resolution prompt? - July 17, 2024







![malwarebytes-downlaod_thumb1_thumb2_[1]_thumb_thumb_thumb malwarebytes-downlaod_thumb1_thumb2_[1]_thumb_thumb_thumb](https://www.wintips.org/wp-content/uploads/2014/05/malwarebytes-downlaod_thumb1_thumb2_1_thumb_thumb_thumb_thumb.jpg)


