FIX: 550 5.1.10 RESOLVER.ADR.RecipientNotFound in Office 365 (Solved)
If you try to send emails from Office365 users to on-premises users/mailboxes and you receive the error "550 5.1.10 RESOLVER.ADR.RecipientNotFound", continue reading below to fix the problem.
Problem description: Microsoft 365 users are not able to send invitations (e.g. from "Teams") or forward emails to recipient mailboxes hosted on a on-premises/external mail server. (e.g. from "user@domain.onmicrosoft.com" to "user@domain.com"), due to error "550 5.1.10 RESOLVER.ADR.RecipientNotFound; Recipient not found by SMTP address lookup".
The error "550 5.1.10 RESOLVER.ADR RecipientNotFound" when trying send emails from Microsoft365/Office365 Exchange Online accounts to recipients to on-premises mail server, may occur for the following reasons:
- The recipient's email address doesn't exist or couldn't be found on the external/on-premises mail server.
- The recipient has set an incorrect forwarding rule, which forwards their email to an email address that does not exist.
- The sender sent a message to an email address hosted by Office 365, but the sender or the recipient does not have a valid Office 365 license.
- The sender sent a message to an email address hosted by the on-premises mail server, but the on-premises mail server's domain is not added/set as "Internal Relay" in Office 365.
- An Office365 connector is not configured to route emails that does not exist in Office 365 to the on premises mail server.
How to fix "NDR error 550 5.1.10 RESOLVER.ADR.RecipientNotFound" in Office365 Exchange Online.
Step 1. Verify that the recipient's email address exist on the on-premises/external mail server.
Step 2. Check if the recipient has set an incorrect forwarding rule. To check if this is the case, send an email to the recipient from an email address outside the organization (e.g. from GMAIL), and if you receive the "NDR 550 5.1.10" error ask the recipient to check their forwarding rules.
After checking the above, do the following in Office365/Microsoft365 (Admin Center).
Step 3. Check the forwarding rules on the Office 365 account (@onmicrosoft.com). To check the forwarding rules for an account in Office365. go to Office365 Admin Center > Users > Active Users > select the recipient > Mail > Manage Email forwarding.
Step 4. Ensure that you have assigned an Office365 License to the sender account (e.g. to "user@domain.onmicrosoft.com"). To assign a license, go to Office365 Admin Center > Users > Active Users > select the recipient > Licenses and Apps.
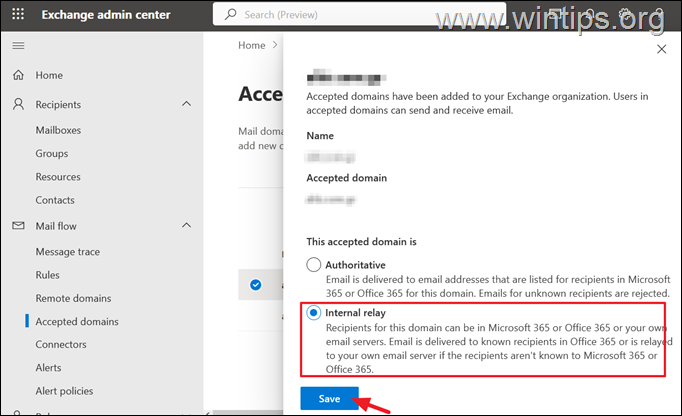
Step 5. Add the on-premises mail server's domain (e.g."domain.com") to Accepted Domains as Internal Relay. To do that:
1. Go to Office365 Admin Center > Settings > Domains and add and verify the on-premises mail server domain (e.g. "domain.com") in Office365, if you haven't done it already.
2. Then go to Exchange Admin Center > Mail flow > Accepted domains and set the on-premises mail server's domain (e.g. "domain.com") to Internal Relay.
Step 6. Finally, proceed and set up a new Connector in Exchange Online to route email messages to accounts that do not exist in Office365 on the On-Premises/External Mail Server. To do that:
1. Go Exchange Admin Center > Mail Flow > Connectors & click Add a connector.
2. At the first screen select connection from Office 365 to "Your organization's email server" if you have an on-premises exchange server (e.g. Exchange), or "Your Partner organization" if the mail server is external (e.g. SMTP).
3. Type a description for the connector and then click Next.
4. At the next screen, select "Only when email messages are sent to these domains" and then type the external domain name (e.g. "domain.com"). When done, click the Add "+" symbol and then Next.
5. Now type the Fully Qualified Domain Name (FQDN) or the external mail server (e.g. "mailserver.domain.com"), and then click the Add "+" and Next.
6. At the next screen leave the default options and click Next.
7a. Now type an email address of a mailbox that exist on the external/on-premises mail server and click Add "+".
7b. Click Validate to validate the connection and then click Next.
8. Finally click Create Connector and then Done.
9. You're done. From now on, all emails sent from Microsoft 365 accounts (e.g. from "user@domain.onmicrosoft.com") to recipients mailboxes that doesn't hosted from Office365 (e.g. to "user@domain.com"), will be routed to the external/on-premises mail server.
That's it! Let me know if this guide has helped you by leaving your comment about your experience. Please like and share this guide to help others.
We're hiring
We're looking for part-time or full-time technical writers to join our team! It's about a remote position that qualified tech writers from anywhere in the world can apply. Click here for more details.
- FIX: Numeric keypad Not Working on Windows 10/11 - July 24, 2024
- How to Share Files or Printers in Hyper-V? - July 22, 2024
- How to invoke Hyper-V Screen resolution prompt? - July 17, 2024


![image_thumb[8][1] image_thumb[8][1]](https://www.wintips.org/wp-content/uploads/2023/04/image_thumb81_thumb.png)


December 24, 2023 @ 9:15 pm
Nice Thanks