FIX: Group Policy Client Service failed to logon in Windows 7 (Solved)
If you face the error "Group Policy Client service failed to logon. Access is denied" in Windows 7, continue below to fix the problem. The Windows 7 login problem "Group Policy Client service failed to logon", commonly appears after installing updates or after an improper shutdown.
Problem in details: After installing updates and restarting computer, user cannot login to Windows 7 with error "Group Policy Client service failed to logon. Access is denied."
In this tutorial you'll find several methods, to fix the error "Group Policy Client service failed to logon" in Windows 7.
How to fix: Group Policy Client Service failed to logon in Windows 7. *
* Note (Requirement): To fix this error you need to login to Windows by using another account that has administrator privileges'. If you don't a secondary account with admin privileges, proceed and enable the hidden administrator account, by following the instructions on this guide: How to Enable Administrator Offline using Registry.
- Method 1. Uninstall Latest Windows Updates.
- Method 2. Repair System Files with SFC/SCANNOW command.
- Method 3. Modify the Permissions on the NTUSER.DAT file.
- Method 4. Add "GPSvcGroup" Registry entries.
- Method 5. Create a New User and Transfer Files from Affected User.
Method 1. FIX Group Policy Client Service failed to logon by Uninstall Latest Updates.
The first method to fix the error "Group Policy Client Service failed to logon", is to uninstall the last installed update.
1. Log in to Windows with another account that has administrator privileges'.
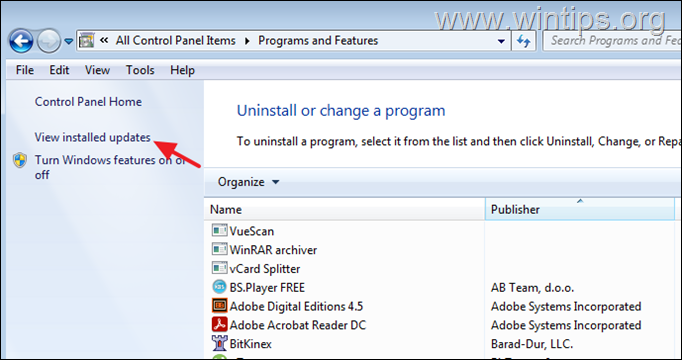
2. Navigate to Control Panel > Programs and features and open View Installed Updates.
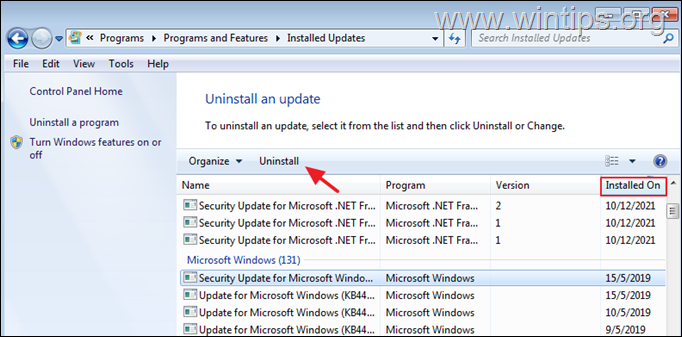
3. Sort the updates by the "Installed On" date, select the latest installed update and select Uninstall.
4. After removing the update, restart the computer and try to log on to the user that could not log on.
Method 2. Repair System Files with SFC /SCANNOW command.
Since the "Group Policy Client Service failed to connect" error can be caused after an improper shutdown or corrupt system files, try to repair the system files by using the SCANNOW command.
1. Log in to Windows with another account that has administrator privileges'.
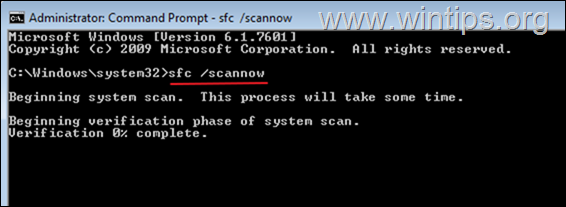
2. Open Command Prompt as Administrator and give this command:
- sfc /scannow
3. After command execution, close the command prompt window and restart your computer.
4. After restart, try to log on to the user that could not log on.
Method 3. Modify the Permissions on the NTUSER.DAT file.
1. Log in to Windows with another account that has administrator privileges'.
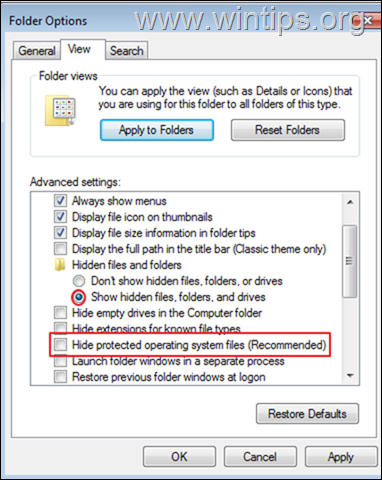
2. In Folder options perform the following actions and hit OK:
a. Enable the Show Hidden Files, folders, and drives option, and…
b. Uncheck the option Hide protected operating system files (Recommended).
2. Simultaneously press the Windows ![]() + R keys to open run command box.
+ R keys to open run command box.
3. In run command box, type: regedit and press Enter.
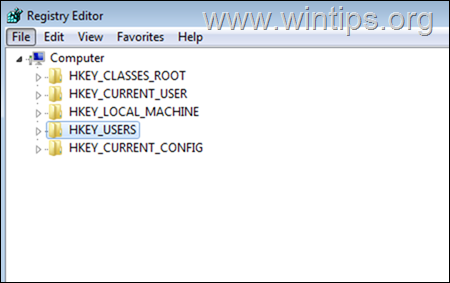
4. In Windows Registry, highlight the HKEY_USERS key.
5. From the File menu, select Load Hive
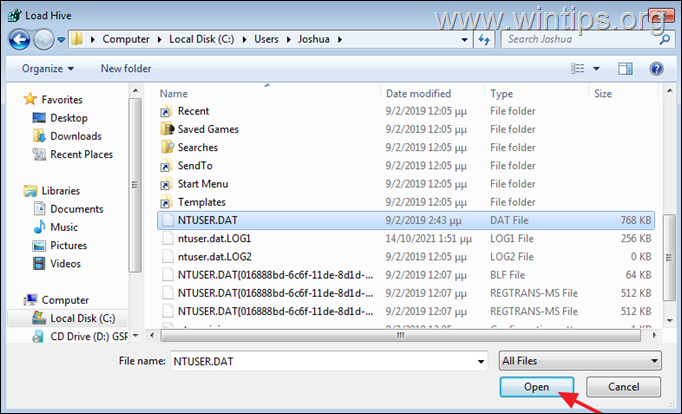
6. Navigate to the profile folder of the user who cannot log on because of the "Group Policy Client Service failed to logon" error, select the NTUSER.DAT file and click Open.
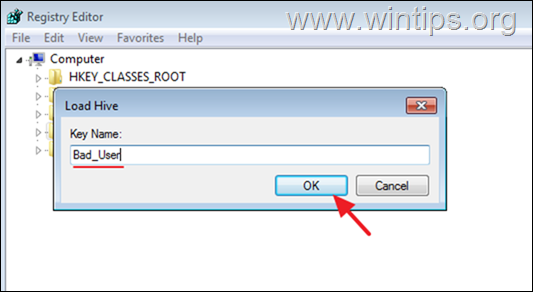
7. Type a name for the new key (e.g. "Bad_User") and press OK.
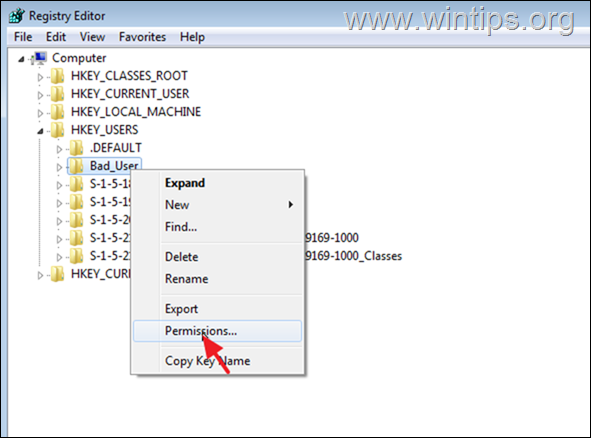
8. Now expand the HKEY_USERS key, right-click on the Bad_User subkey and select Permissions.
9. Here make sure that the following three accounts have full permissions:*
- System
- Administrators
- The Account name of the user that cannot login.
Notes:
1. If one of the three accounts is missing, press the Add button and add it manually.
2. In case that you see an Unknown Account in the list, remove it and add the Account name of the user that cannot login.
10. When done, click OK to apply the change.
11. Finally, from the File menu select Unload Hive and click Yes when prompted to unload the current key and its subkeys.
12. Close the Registry Editor and restart your PC.
13. After restart, you should login to the problematic account without problem.
Method 4. Add "GPSvcGroup" Registry entries.
1. Log in to Windows with another account that has administrator privileges'.
2. Simultaneously press the Windows ![]() + R keys to open run command box.
+ R keys to open run command box.
3. In run command box, type: regedit and press Enter.
4. Inside Windows Registry, navigate (from the left pane) to this key:
- HKEY_LOCAL_MACHINE\SOFTWARE\Microsoft\Windows NT\CurrentVersion\Svchost
5. Right-click at an empty space at the right pane and select New > Multi-String Value
6. Name the new value as GPSvcGroup
7. Now double-click at the newly created value, type GPSvc in the Value Data and click OK.
8. Now right- click at the Svchost key at the left pane and select New > Key
9. Name the new key as GPSvcGroup
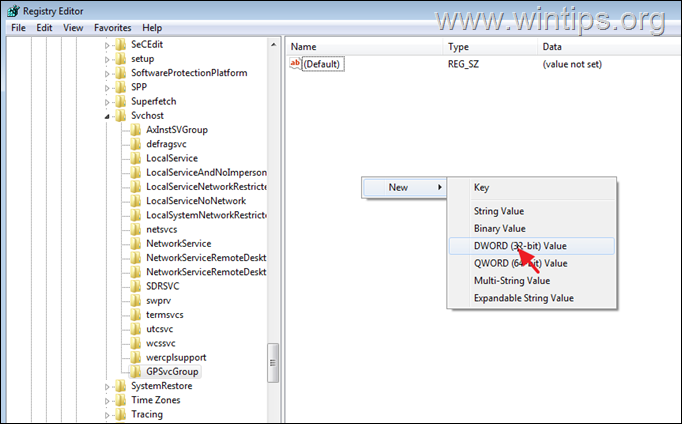
9a. Right-click at an empty space at the right pane and select New > DWORD (32-bit) value
9b. Name the new value AuthenticationCapabilities
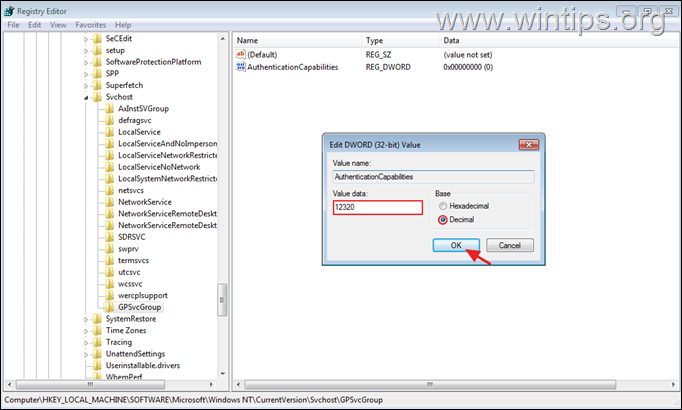
9c. Double-click at AuthenticationCapabilities, choose Decimal and type 12320 at the Value Data
9d. Right-click at an empty space at the right pane and select New > DWORD (32-bit) value.
9e. Name the new value as: ColnitializeSecurityParam
9f. Double-click at ColnitializeSecurityParam, type 1 at the Value Data box and click OK.
Method 5. Create a New User and Transfer Files from Affected User.
The final method to fix the boot up error ""Group Policy Client service failed to logon. Access is denied.", is to create a new user profile and then to transfer all the files from the affected user to the new one.
Step 1. Create a New User Account in Windows.
1. Log in to Windows with another account that has administrator privileges'.
2. Simultaneously press the Win + R keys to open the run command box and type
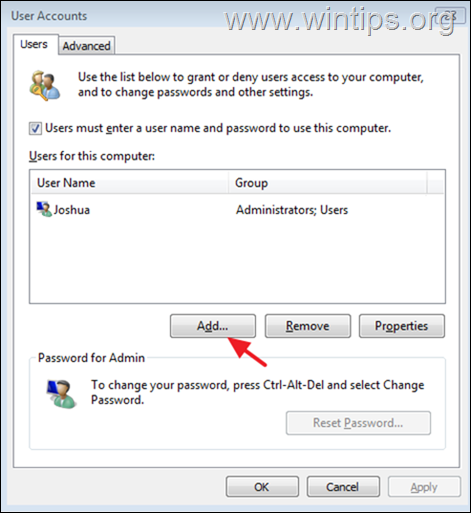
- control userpasswords2
3. Click Add to create a new user account.
4. Type a name for the new user and press Next & Next again at password prompt if you don't want to specify a password.
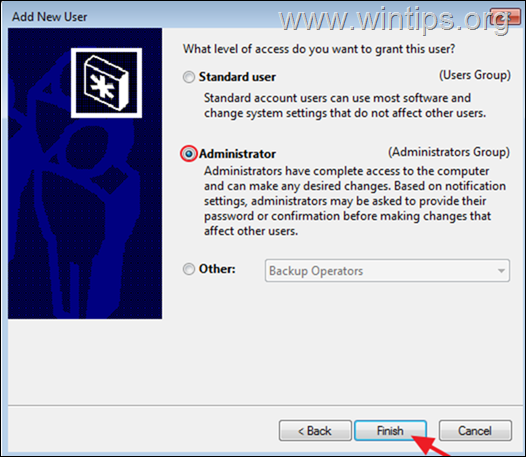
5. On the last screen, select the Administrator option and click Finish to create the new user.
Step 2. Transfer Files from the Affected User to the New User.
1. Sign-out from the Admin user and login to the new user.
2. Open file explorer and copy or move all the files from the affected user profile to the new one.
That's it! Which method worked for you?
Let me know if this guide has helped you by leaving your comment about your experience. Please like and share this guide to help others.
We're hiring
We're looking for part-time or full-time technical writers to join our team! It's about a remote position that qualified tech writers from anywhere in the world can apply. Click here for more details.
- How to Disable or Remove BitLocker from Windows RE. - April 24, 2024
- FIX: Error 0x8007025d in Windows 10 Update. - April 22, 2024
- How to Disable Device Encryption in Windows 11/10. - April 17, 2024


