FIX: SmartScreen can't be reached right now on Windows 10/11.
If you receive the message "SmartScreen can't be reached right now" when trying to install a program on Windows 10/11, continue reding below to fix the problem.
Microsoft considers security as an essential feature on their devices and SmartScreen is a built-in security component in Windows 10/11. It's a cloud-based anti-malware component that prevents devices from downloading malicious software or browsing potentially harmful websites.
Problem in details: When you try to install an application, SmartScreen may display an error message that says "Windows SmartScreen can't be reached right now".
The "SmartScreen cannot be reached right now" error could be caused by on of the following reasons:
- Bad Internet Connection.
- SmartScreen may be disabled.
- Use of a Proxy Server.
- Virus attack.
- Corrupted User profile.
How to FIX: Windows SmartScreen Can’t Be Reached on Windows 11/10.
If you are not experiencing problems accessing the Internet, proceed to install all available Windows Updates and see if that fixes the "Windows SmartScreen Can’t Be Reached" error. If not, use one of the following methods / steps to solve the problem.
- Enable SmartScreen in Security Options.
- Enable SmartScreen in Group Policy.
- Disable Proxy Server.
- Check for Viruses.
- Create a new User Profile.
Method 1. Enable Windows SmartScreen in Defender options.
This error usually occurs if Windows Smart Screen is turned off. So navigate to the Windows Defender settings and enable SmartScreen.
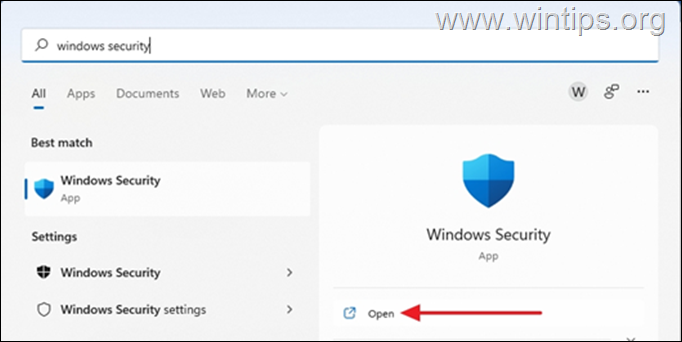
1. Type Windows security on the search bar, then select Open to launch the app.
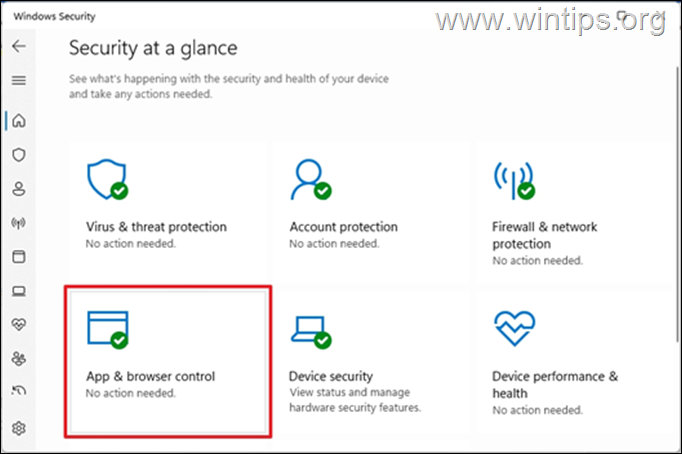
2. Select App and browser control in the security panel.
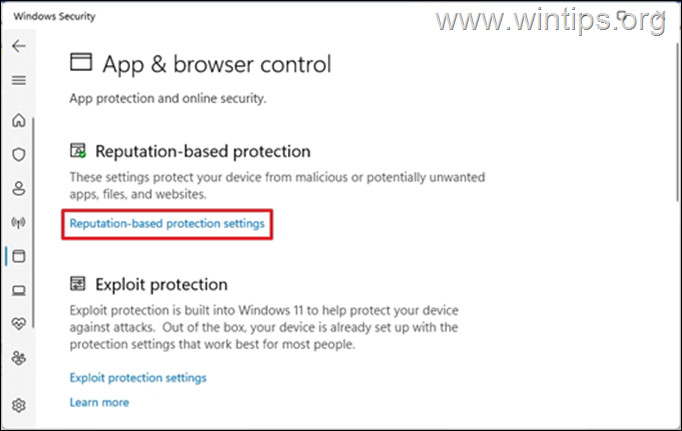
3. Select Reputation-based protection settings
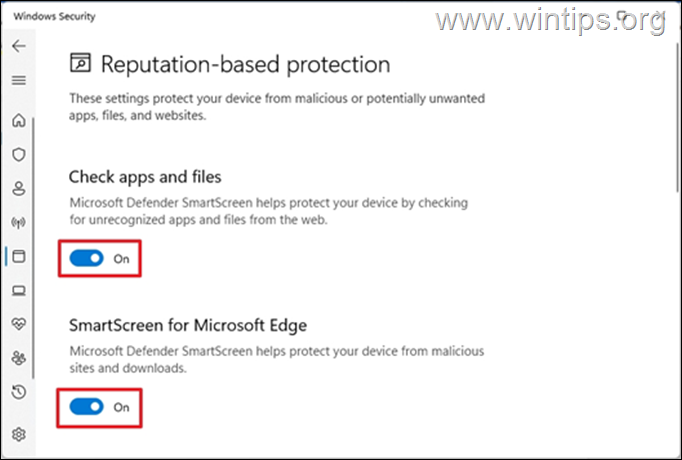
4. Toggle ON the options below to protect your device from malicious attacks.
- Check apps and files.
- SmartScreen for Microsoft Edge.
- Potentially unwanted app blocking.
- SmartScreen for Microsoft Store apps.
5. The "SmartScreen cannot be reached error" should be fixed once this is done.
Method 2. Enable SmartScreen in Group Policy.
If you own Windows 10 Pro or Windows Pro edition, proceed to turn on the Windows SmartScreen in Group Policy as instructed below. *
* Note: These steps are only applicable if you are using Windows 10/11 Pro edition. Group Policy is not available on Windows Home editions. If you're using a Home version of Windows 10/11 skip to next method.
1. Press Windows + R keys simultaneously on your keyboard to open a Run dialog box.
2. Type gpedit.msc and hit Enter to launch the Group Policy Editor.
3. Now, navigate to the following path in Group Policy Editor:
- Computer Configuration -> Administrative Templates -> Windows Components -> File Explorer
4. On the right pane, double-click at Configure Windows Defender SmartScreen.
5. Select Enabled, then click OK.
6. Close Group Policy editor, reboot the PC and check if the error has stopped.
Method 3. FIX SmartScreen Can’t Be Reached by Disabling Proxy Server.
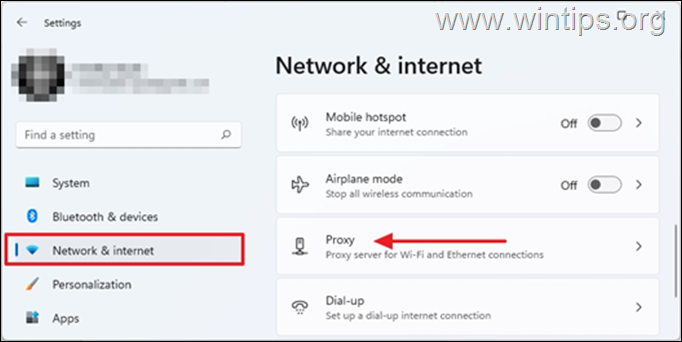
If you are using a proxy server on your device this can impact your network and lead to a problem with the Windows Smart Screen. To disable Proxy Server, follow the steps below.
1. Go to Start > Settings, select Network and Internet on the left and then click Proxy.
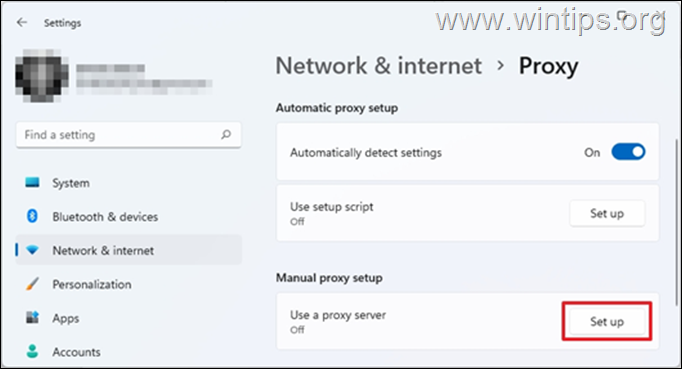
2. Under Manual proxy setup, click Setup.
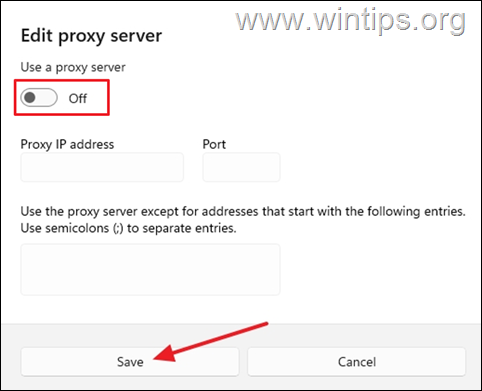
3. Toggle OFF the button Use a proxy server and hit Save.
4. Once completed, check if the issue is resolved.
Method 4. Scan your computer for viruses and malware.
If after trying the above methods the "Windows SmartScreen" error persists, make sure that your computer is 100% clean from harmful programs like rootkits, malware or viruses. To accomplish this task, follow the steps from this Quick Malware Scan and Removal Guide, and then check if the SmartScreen error is fixed.
Method 5. Create a new user profile.
If the SmartScreen problem persists, it's possible that the user profile has been corrupted. In that case, proceed and create a new user profile and see if that fixes the problem.
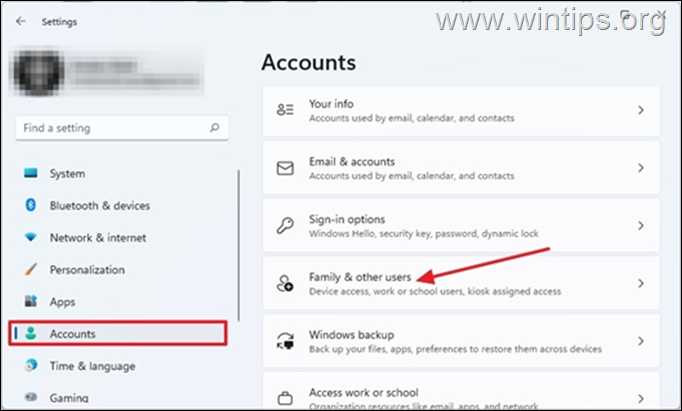
1. Go to Start > Settings.
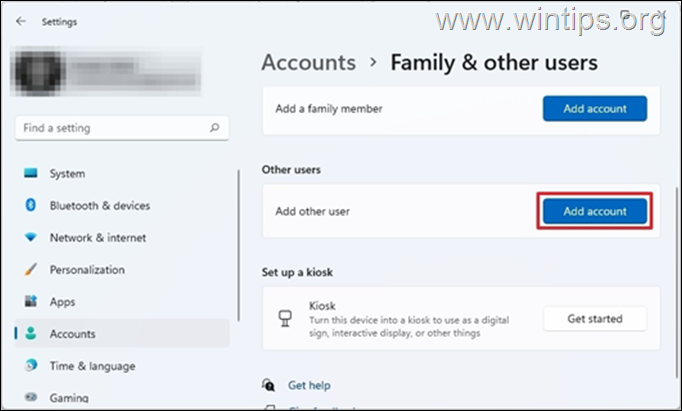
2. Select Accounts and then select Family and other users.
3. Under Other users select Add account
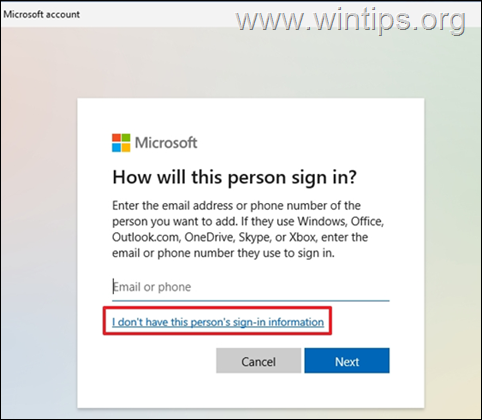
4. At the next screen, click I don’t have this person’s sign-in information
5. Now select Add a user without Microsoft account.
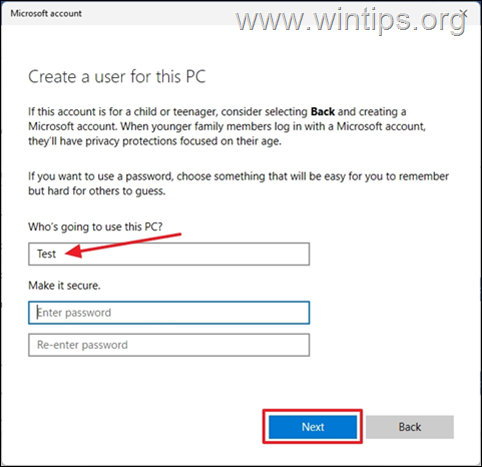
6. In Who’s going to use this PC section, enter a preferred username and password in the blank fields and click Next.
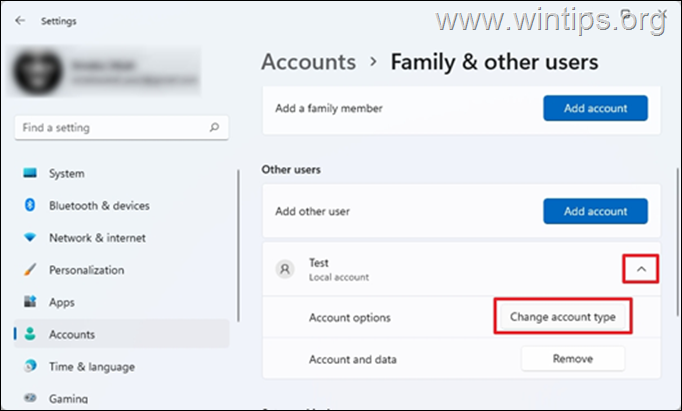
7. Now select Change account type from the drop-down menu on the newly created account.
8. Change the account type to Administrator, then press OK.
9. Close all open programs and reboot the computer.
10. At the Sign-in screen select the new account to login and then check if the SmartScreen error appears. If not, transfer your files and settings from the old account and you' done!
That's it! Which method worked for you?
Let me know if this guide has helped you by leaving your comment about your experience. Please like and share this guide to help others.
We're hiring
We're looking for part-time or full-time technical writers to join our team! It's about a remote position that qualified tech writers from anywhere in the world can apply. Click here for more details.
- FIX: Numeric keypad Not Working on Windows 10/11 - July 24, 2024
- How to Share Files or Printers in Hyper-V? - July 22, 2024
- How to invoke Hyper-V Screen resolution prompt? - July 17, 2024


