FIX: 'Getting Windows Ready, don't turn off your computer' stuck on Windows 10/11.
One of the most annoying issues with Windows 10/11 is when it freezes for a long time at the "Getting Windows Ready – Don't turn off your computer" screen.
The message "Getting Windows ready" appears during the installation of important updates, and in most cases after 4-5 minutes the message disappears, the computer restarts and you can continue your work. But in some cases the message stays for a long time and users do not know how long they have to wait until Windows is ready.
In this article, you will find detailed instructions to troubleshoot the "endless" issue of Getting Windows Ready in Windows 10/11. :)
How to FIX: Getting Windows Ready, Don't Turn off Your Computer in Windows 10/11,
- Wait longer.
- Force Shut down.
- Repair Startup.
- Uninstall Recent Updates.
- Restore PC to a Previous State.
- Reset Windows 10/11.
- Clean Install Windows 10/11.
Method 1. Wait for an Extended Period of Time.
If the computer has been stuck on the "Getting Windows Ready" screen for too long, don't despair and keep waiting until the process is complete. Personally I have had to wait from 1 to 4 hours (yes you read that right) for an old computer to come out of the "Getting Windows Ready" screen.
Some users even reported that their computer was stalled on the "Getting Windows Ready" page for about 8 hours before it successfully booted into Windows. It is therefore recommended that you leave your computer for a longer period of time, especially if there are a large number of updates that need to be installed. Also in such a case I suggest to replace your hard disk with an SSD.
Method 2. Hard Shut Down.
If you have been waiting too long or if you are in a hurry to continue working and the message on the screen still appears, then forcibly shutting down your computer can solve the problem. To do that:
1. Press and hold down the power button for at least 10 seconds to completely turn off your computer.
2. Disconnect all USB peripherals [e.g. USB flash drives, USB printers, etc. (except of course the mouse and keyboard).
3. Disconnect the power cord from the computer and also disconnect the battery if it is a laptop and if it is removable.
4. After 5 minutes connect the power cable. (Reattach the battery first if you own a laptop).
5. Turn on your computer and check if it starts normally without getting stuck in the "Getting Windows Ready" message.
Method 3. Repair Startup Problems.
If the above methods failed to resolve the issue, the next step is to try to resolve it using the options in the Windows Recovery Environment (WinRE).
Step 1. Force Windows to Boot in Windows Recovery Environment (WinRE).
1. Press and hold down the power button for at least 10 seconds to completely turn off your PC.
2. Turn On your PC, and when the manufacturer's logo appears (or when you see the spinning dots), hold down the power button for 10 seconds to turn off your computer again.
3. Repeat the above process 2 more times and then leave your PC to boot.
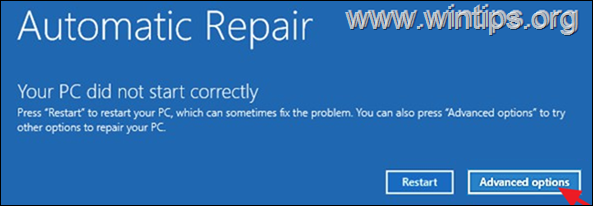
4. When the "Automatic Repair" screen appears, click Advanced Options, and continue to the next step. *
* Note: If your PC doesn't start in WinRE, create a Windows 10/11 USB installation media from another functional PC and then start the affected computer from the installation media.** Then click Next at the first screen and then click Repair your Computer > Troubleshoot.
** To Start your computer from the installation media, turn on the computer and depending on the PC manufacturer, press one of these keys repeatedly (F9, F8, ESC, Del) to access the boot options and select the USB installation media as the boot device.
Step 2: Run Startup Repair.
1. From the Windows Recovery Environment, select Troubleshoot > Advanced options.
2. Click the Startup Repair option and then select the target OS (e.g. Windows 10)
3. Let Windows to repair the startup components and then to restart.
4. Boot to Windows normally and proceed to install updates again.
Method 4: Uninstall Recent Update.
Because this problem usually occurs during the unsuccessful installation of an update, proceed to remove the latest update from the WinRE.
1. Boot into WINRE using the instructions on step-1 on method 3 above.
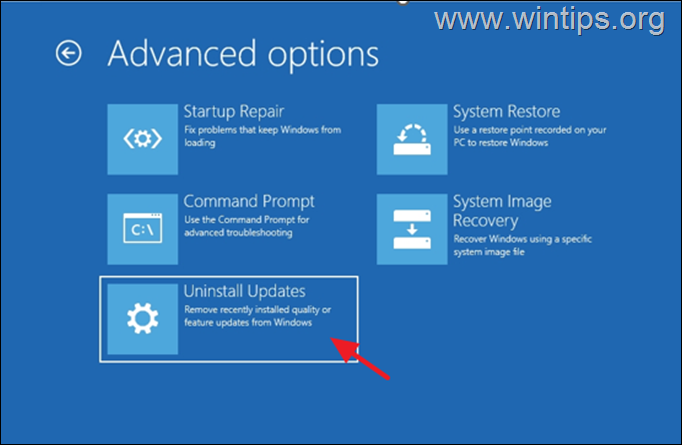
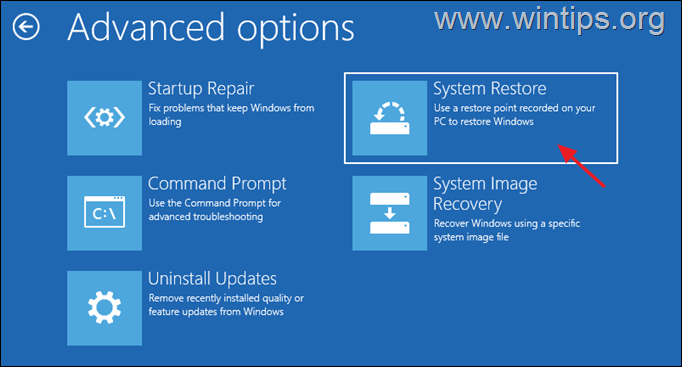
2. in Advanced options choose Uninstall Updates.
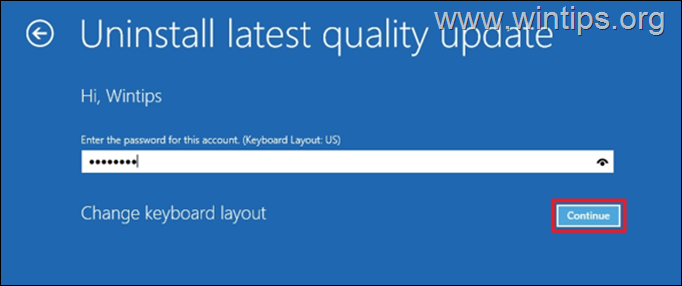
3. Choose an account with administrative privileges, type in the password, and click Continue.
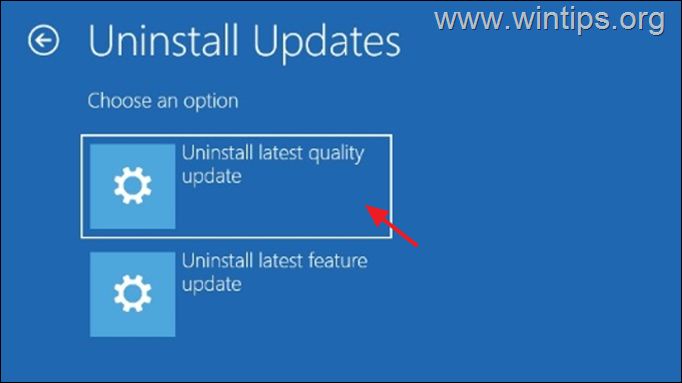
4. First choose Uninstall latest Quality update and follow the on-screen instructions to uninstall it. *
* Note. If the problem is not fixed after uninstalling the latest quality update, repeat the same steps but this time Uninstall latest feature update and see if that fixes the problem.
Method 5: Perform System Restore.
Your next option to prevent Windows to stuck at "Getting Windows Ready", is to restore your PC to a previous working state from the WinRE.
1. Boot into WINRE using the instructions on step-1 on method 3 above.
2. On WinRE Advanced options –> System Restore.
3. If prompted, select an account with administrative privileges, type a password for that account and click Continue.
4. At System Restore screen, click Next. *
* Note: If you receive the message that "no restore points have been created on your computer…" skip to next method.
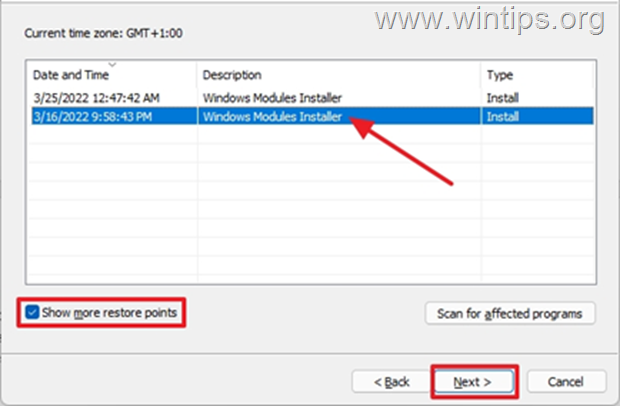
5. Select Show more restore points and select a date that you know your computer was working correctly, and then click Next.
6. Click Finish and Yes again to start to restore process.
7. Now wait until the restore process is completed. During the restore process, your computer will restart several times and when it's done, you should enter in Windows without problems.
Method 6. Reset Windows to Default State by keeping your files.
Another method to repair Windows 10, if your PC doesn't start normally, is to reinstall Windows by using the Reset this PC option in WinRE. *
* Important: The 'Reset this PC' option, keeps your files, BUT removes all your programs and settings. Use this option only if the above methods do not solve the problem.
1. Follow the instructions on step-1 above to enter in WinRE.
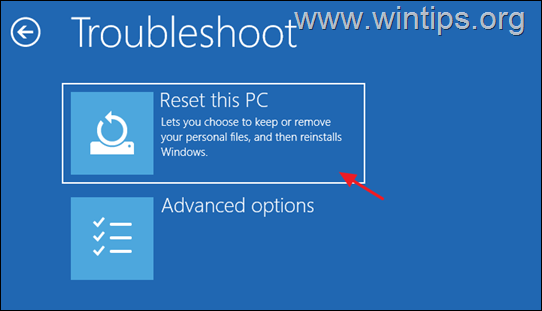
2. Click Reset this PC in Troubleshoot screen. *
* Note: Keep in mind that the Reset this PC option is not available if you started from a USB Windows installation Media. At this case, skip to next method.
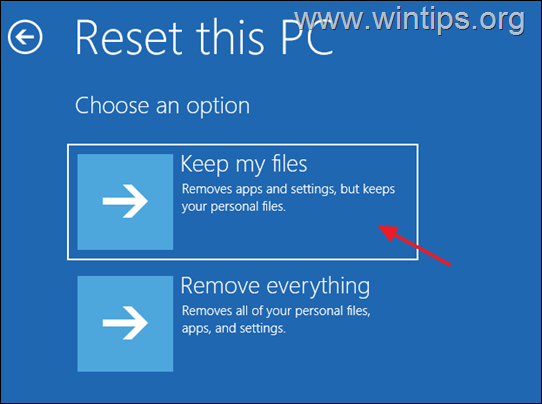
3. At the next screen choose Keep my files. *
* Please Note: All applications and settings will be removed if you continue and you will need to reinstall your programs when the process is complete.
4. If prompted, select an account with administrative privileges, type a password for that account and click Continue.
5. If you PC is connected to Internet, select Cloud download, otherwise choose Local reinstall. *
*Note: If your PC has a reliable internet connection, choose cloud download; otherwise, choose Local reinstall – which does not require an internet connection.
6. Finally, let the Reset this PC tool to reinstall Windows.
Method 7. Clean Install Windows 10 & Check Hardware.
If none of the above methods doesn't resolve your problem, then your final option is to backup your files and to perform a clean installation of Windows 10.
That's it! Which method worked for you?
Let me know if this guide has helped you by leaving your comment about your experience. Please like and share this guide to help others.
We're hiring
We're looking for part-time or full-time technical writers to join our team! It's about a remote position that qualified tech writers from anywhere in the world can apply. Click here for more details.
- FIX: Numeric keypad Not Working on Windows 10/11 - July 24, 2024
- How to Share Files or Printers in Hyper-V? - July 22, 2024
- How to invoke Hyper-V Screen resolution prompt? - July 17, 2024







November 5, 2023 @ 9:02 am
Thank you for the great advice!
This time I waited and it came back to normal.
I did a MS update and it updated my BIOS. Update too a while but went through fine.. but then it states my pin couldn’t be used anymore because of some security update or settings
So I updated the pin… I just entered the same one I had before.
Then it got stuck in “Getting Windows Ready – do not turn off computer” mode for a while!! Over an hour…
So with your advice, I waited and then it started “Working on updates” and rebooted at 30% and then went back to “Working on updates” screen and finally finished at 100% and came back on fine
Entered my pin (same I had before) and worked great!
Thank you for helping me be patient and just wait it out!
(My Last computer did the same thing … and I kept powering it on and off after 30 min or so… and it never came back to normal. Lesson learned!