How to Fix: Cannot Run Any Program, .EXE Extensions Changed by Virus (Solved)
A few days ago, one of my customers brought his Windows 7 computer to my service store, because he cannot open or run any Executable file (.exe), because Windows does not have a program associated with the executable files (.exe).
After investigating the problem I realized that all the executable files (.exe) were modified to an unknown extension, probably after a malware attack.
Due to the incorrectly modified .exe extension, the user is unable to run any executable (.exe) program(s), because Windows cannot recognize the type of the file with the following error:
"The file does not have a program associated with it for performing this action. Please install a program or, of one already installed, create an association in the Default Programs control panel".
This tutorial contains detailed instructions on how to fix invalid modified ".exe" extensions in order to resolve the "cannot run applications" issue on Windows 10, 8, 7 or Vista. (Virus Removal Guide)
How to fix: Modified .EXE extensions – Unable to Run or Open Programs (Virus Removal Guide)
Notice No1: If you cannot download any of the bellow suggested programs on the infected computer, then you can download them on another clean computer and transfer them (e.g. by using a USB flash disk) on the infected computer.
Notice No2: Add this page to your favorites (Ctrl + D) to easily find and follow the given instructions.
Step 1. Start your computer in Safe Mode with Network
Step 2. FIX Modified Extensions with RKILL.
Step 3. Uninstall Unknown Programs from Windows.
Step 4. Remove Adware with AdwCleaner.
Step 5. Remove Junk-ware files with JRT.
Step 6. Check & Restore HOSTS File's Integrity.
Step 7. Remove Malware Programs with MalwareBytes Anti-Malware Free.
Step 8. Remove Potentially Unwanted Applications with ESET Online Scanner.
Step 1: Start your computer in “Safe Mode with Networking”
Start your computer in Safe mode with network support. To do that:
Windows 7, Vista & XP users:
- Close all programs and reboot your computer.
- Press the "F8" key as your computer is booting up, before the appearance of the Windows logo.
- When the "Windows Advanced Options Menu" appears on your screen, use your keyboard arrows keys to highlight the “Safe Mode with Networking” option and then press "ENTER".
Windows 10, 8 & 8.1 users:
1. Press “Windows” ![]() + “R” keys to load the Run dialog box.
+ “R” keys to load the Run dialog box.
2. Type msconfig and press Enter.

3. At the Boot tab, check the Safe Boot & Network options.
4. Click OK and restart your computer.*
* Note: In order to boot Windows in “Normal Mode” again, just uncheck the “Safe Boot” checkbox by using the same procedure.
Step 2. FIX Modified Extensions with RKILL.
1. Download and Save RKill.com* to you desktop.
Notes:
1. RKill is a program that was developed at BleepingComputer.com that attempts to terminate known malware processes so that your normal security software can then run and clean your computer of infections.
2. RKill is offered under under different filenames because some malware will not allow processes to run unless they have a certain filename. Therefore when attempting to run RKill, if a malware terminates it please try a different filename.
2. Run RKill and let the program terminate any malicious processes that may be running and restore (fix) the .exe or any other extensions that have been incorrectly modified in registry.
3. When RKill is finished press OK and continue to the next step.
Step 3. Uninstall Unknown Programs from Windows.
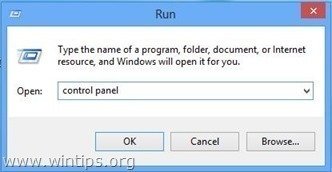
1. To do this, go to:
- Windows 7 & Vista: Start > Control Panel.
- Windows XP: Start > Settings > Control Panel
- Windows 10, 8 & 8.1:
2. Double click to open:
- Add or Remove Programs if you have Windows XP.
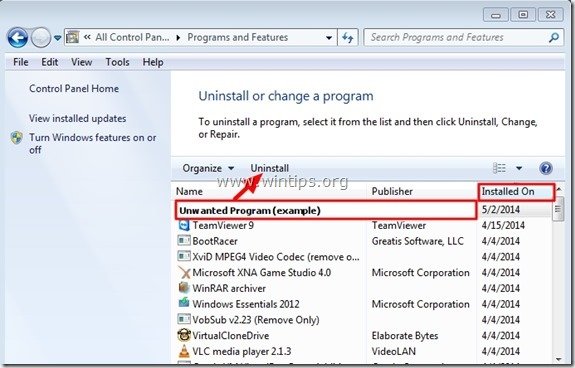
- Programs and Features (or “Uninstall a Program”) if you have Windows 10, 8, 7 or Vista.
3. When the program list is displayed on your screen:
1. Sort the programs displayed by Installation date (Click at Installed On).
2. Remove (Uninstall) any unknown program that was recently installed on your system. *
* Notes:
1. If you don't find any unwanted program on the list, then continue to the next step.
2. If you receive the “You do not have sufficient access to uninstall” error message, during uninstall process, then follow this uninstall guide to remove the program and then continue to the next steps.
Step 4: Remove Adware Programs with AdwCleaner.
1. Download and save AdwCleaner utility to your computer.
2. Close all open programs and run AdwCleaner.
3. After accepting the “License Agreement”, press the “Scan” button.
4. When the scan is completed, press “Clean” to remove all the unwanted malicious entries.
5. Press “OK” at “AdwCleaner – Information” and press “OK” again to restart your computer.
6. When your computer restarts, close "AdwCleaner" information (readme) window and continue to the next step.
Step 5. Remove Junk-ware files with JRT.
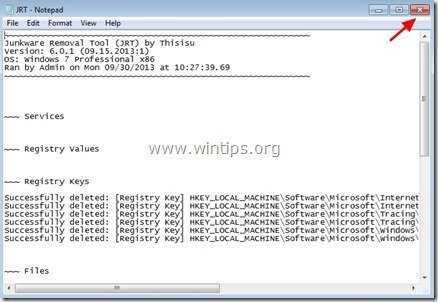
1. Download and run JRT – Junkware Removal Tool.
2. Press any key to start scanning your computer with “JRT – Junkware Removal Tool”.
3. Be patient until JRT scans and cleans your system.
4. Close JRT log file and and then reboot your computer.
Step 6. Check & Restore HOSTS File's Integrity.
The HOSTS file, is a plain text file that is used in an operating system (Windows, Mac, etc.) to map Internet Domain Names (host names) to numerical IP Addresses. If the Hosts file becomes corrupted or modified by a virus, then it causes Internet connectivity issues (e.g. can not access or download anything from Internet).
To Check and Restore HOSTS file's integrity:
1. Open Windows Explorer and navigate to this location on your disk:
- C:\Windows\System32\drivers\etc
2. Find and copy the hosts file to your desktop. To do that:
a. Right click at the hosts file and select Copy.
b. Then right click at an empty space on your desktop and select Paste.
3. Right click at the hosts file on your desktop and select Open.
4. From the list of programs select the Notepad and click OK.
5. If the hosts file is unmodified (has the default values) then you should see the screen below. *
* At this case, close the "host – Notepad" window and continue to Step-7.
[Screenshot of an unmodified (default) – hosts file]
6. If the hosts file has been modified by a virus, then you should see additional entries at the end of the host file. At this case you have to restore the hosts file to its default settings. To do that:
A. Mark all the text below and press Ctrl + C (Copy).
# Copyright (c) 1993-2006 Microsoft Corp.
#
# This is a sample HOSTS file used by Microsoft TCP/IP for Windows.
#
# This file contains the mappings of IP addresses to host names. Each
# entry should be kept on an individual line. The IP address should
# be placed in the first column followed by the corresponding host name.
# The IP address and the host name should be separated by at least one
# space.
#
# Additionally, comments (such as these) may be inserted on individual
# lines or following the machine name denoted by a '#' symbol.
#
# For example:
#
#      102.54.94.97     rhino.acme.com          # source server
#       38.25.63.10     x.acme.com              # x client host
# localhost name resolution is handle within DNS itself.
#       127.0.0.1       localhost
#       ::1             localhost
B. Go to the open "host – Notepad" window and erase anything on it. [press Ctrl + A and press Delete (Del)].
C. Then press Ctrl + V to paste the above – copied – text.
7. From the File menu, select Save and then close the "host – Notepad" window.
8. Finally, copy the hosts file from your desktop and paste it back to "C:\Windows\System32\drivers\etc" folder. *
9. Choose Copy and Replace when asked.
10. Restart your computer.
Step 7. Remove Malware infection with Malwarebytes Anti-Malware Free.
Malwarebytes Anti-Malware is one of the most reliable FREE anti malware programs today to clean your computer from all remaining malicious threats. If you want to stay constantly protected from malware threats, existing and future ones, we recommend that you install Malwarebytes Anti-Malware Premium. You can download Malwarebytes Anti-Malware Free from the link below:
Malwarebytes™ Protection
Removes Spyware, Adware & Malware.
Start Your Free Download Now!
Quick download & Installation instructions:
- After you click the above link, press at the “Start My Free 14-Trial” option to start your download.
- To install the FREE version of this amazing product, uncheck the “Enable free Trial of Malwarebytes Anti-Malware Premium” option at the last installation screen.
Scan & Clean your computer with Malwarebytes Anti-Malware.
1. Run "Malwarebytes Anti-Malware" and allow the program to update to its latest version and malicious database if needed.
2. When the update process is completed, press the “Scan Now” button to start scanning your system for malware and unwanted programs.
3. Now wait until Malwarebytes Anti-Malware finishes scanning your computer for malware.
4. When the scan has completed, press the “Quarantine All” (Remove Selected) button to remove all threats found.
5. Wait until Malwarebytes Anti-Malware removes all infections from your system and then restart your computer (if required from the program) to completely remove all active threats.
6. After the system restart, run Malwarebytes' Anti-Malware again to verify that no other threats remain in your system.
Advice: To ensure that your computer is clean and safe, perform a Malwarebytes' Anti-Malware full scan in Windows "Safe mode". Detailed instructions on how to do that you can find here.
Step 8. Remove Potentially Unwanted Applications with ESET Online Scanner.
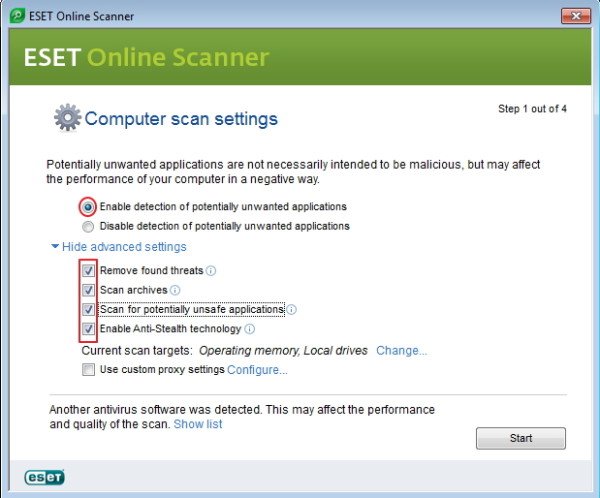
1. Download and run the ESET Online Scanner utility, a power Standalone Virus Removal tool, to clean your computer from threats.
2. At the Computer Scan Settings options select Enable detection of potentially unwanted applications.
3. Expand Advanced settings & check all available checkboxes. (Remove found threats, Scan Archives, Scan for potentially unsafe applications & Enable Anti-Stealth technology).
4. Press Start to scan and clean your computer}.
5. Be patient until the ESET Online scanner scans your system for viruses and remove them.
That's it! Let me know if this guide has helped you by leaving your comment about your experience. Please like and share this guide to help others.
We're hiring
We're looking for part-time or full-time technical writers to join our team! It's about a remote position that qualified tech writers from anywhere in the world can apply. Click here for more details.
- FIX: Numeric keypad Not Working on Windows 10/11 - July 24, 2024
- How to Share Files or Printers in Hyper-V? - July 22, 2024
- How to invoke Hyper-V Screen resolution prompt? - July 17, 2024


![malwarebytes-downlaod_thumb1_thumb2_[1]_thumb_thumb_thumb malwarebytes-downlaod_thumb1_thumb2_[1]_thumb_thumb_thumb](https://www.wintips.org/wp-content/uploads/2014/05/malwarebytes-downlaod_thumb1_thumb2_1_thumb_thumb_thumb_thumb.jpg)


