How to Allow Ping in Windows Firewall.
Ping command requests that help administrators test connectivity between machines on the network are blocked by default from Windows Firewall on Windows servers and Windows 10/11 clients for security reasons.
However, although disallowing the PING command requests makes the system more secure by showing it as unavailable to any virus threats, it sometimes needs to be allowed to troubleshoot network problems. Especially if you are an administrator, using the PING command is quite useful if you want to know if a computer can communicate with others.
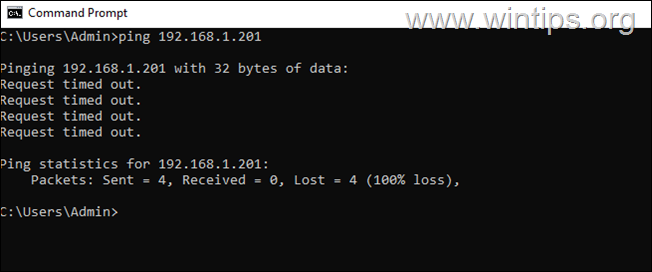
For example, if you ping a remote IP address on your network and it doesn't reply(Request timed out), proceed to enable the ping replies on the remote machine to test its connectivity.
In this guide you'll learn how to allow the Ping command requests in Windows Firewall.
How to Enable Ping Requests in Windows Firewall.
Method 1. Enable 'File and Printer Sharing (Echo Request – ICMPv4-In)' Rule.
The quickest way to allow ping requests is using the using the “Windows Defender Firewall with Advanced Security” app.
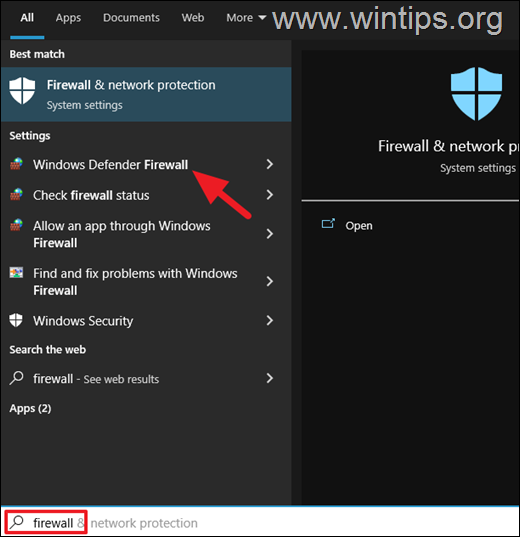
1. Type firewall in Search box and open the Windows Defender Firewall from the results.
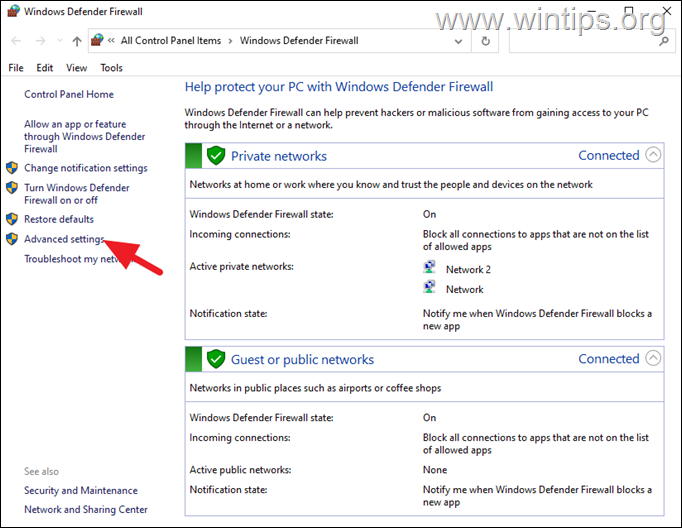
2. Click Advanced Settings on the left.
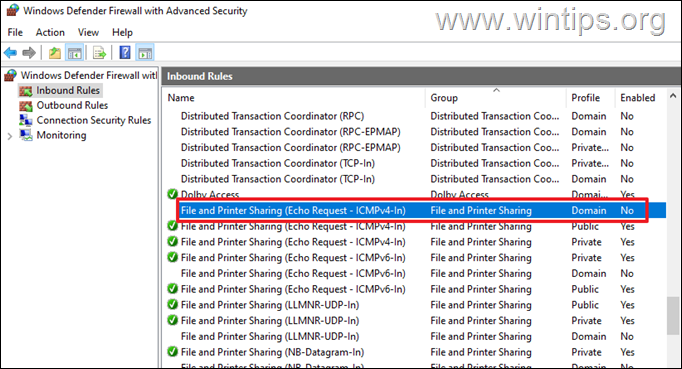
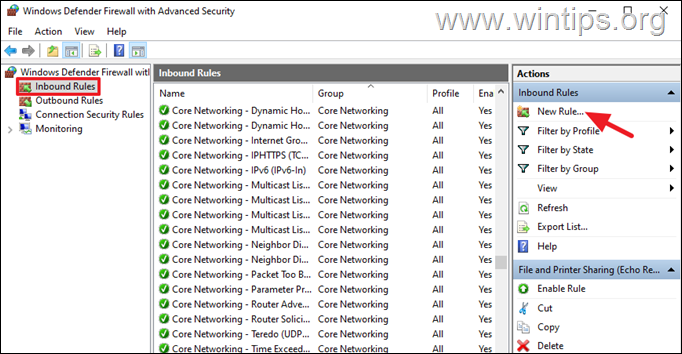
3. Select Inbound Rules at the left, and at the right…
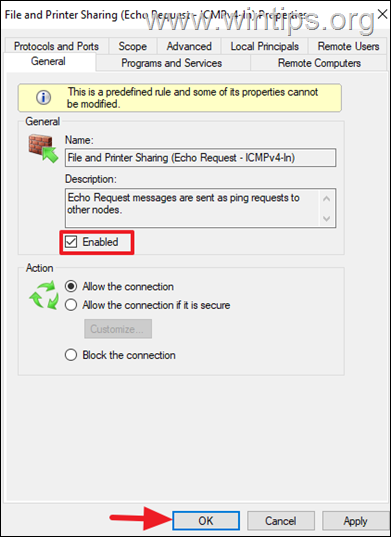
a. …scroll down and double-click to open any File and Printer Sharing (Echo Request – ICMPv4-In) rule which currently is disabled *
* Note: In the "Enabled" column it says "No".
b. Check the Enabled checkbox and click OK.
4. That's it! With the above easy steps you can allow the Ping command requests on Windows. *
* Suggestion: After troubleshooting network connectivity, it is recommended to disable Ping requests, at least in the Public profile.
Method 2. Allow Ping Command Request for All Programs or only from Specific IP Addresses.
To allow the Ping command requests in Windows Firewall, for all programs or only from specific IP's, proceed as follows:
1. See the steps 1 & 2 above to open the Windows Defender Firewall Advanced Settings.
2. Select Inbound Rules at the left, and at the right click New Rule.
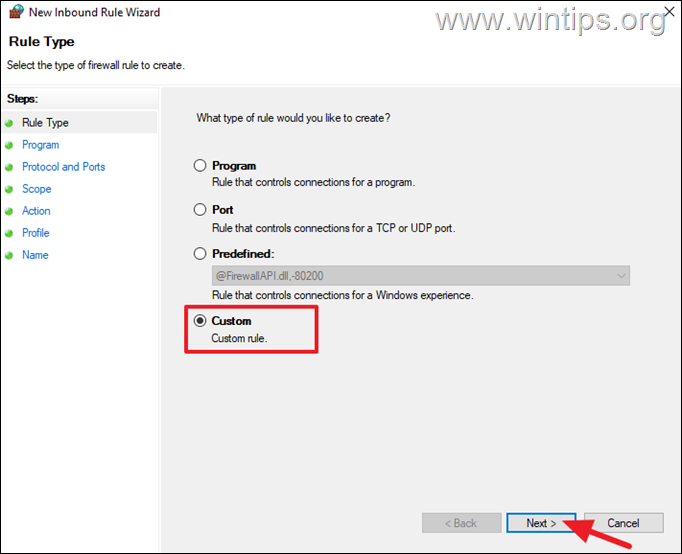
3. Choose Custom and click Next.
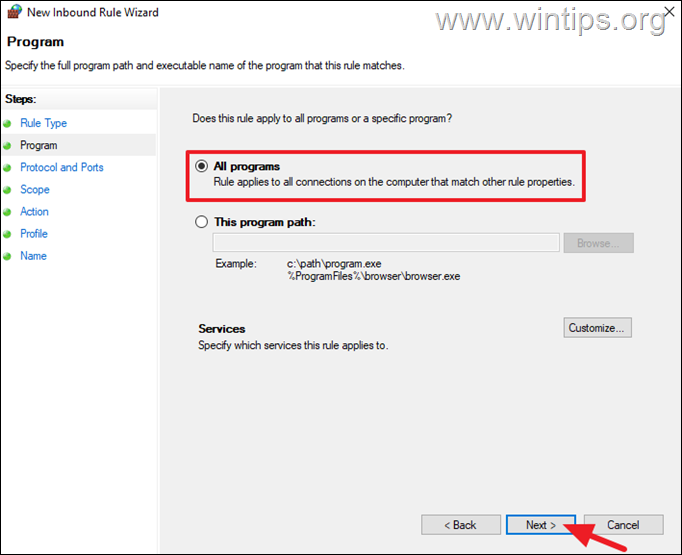
4. Select All Programs and click Next.
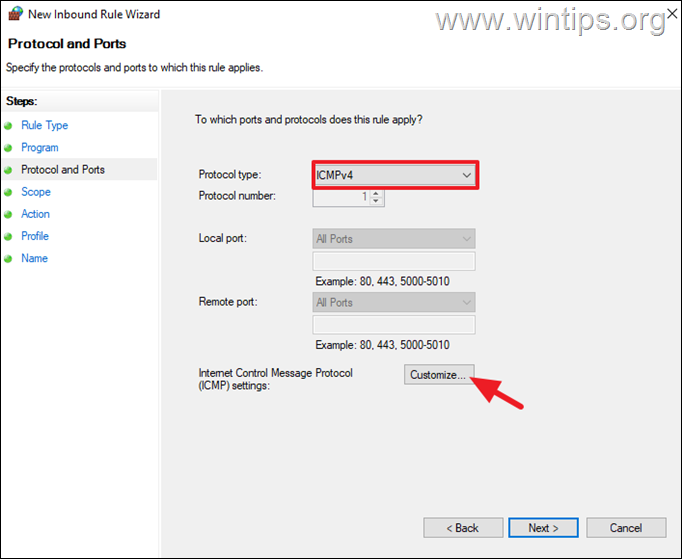
5a. In 'Protocol and Ports' settings, choose at Protocol Type ICMPv4 and then click Customize.
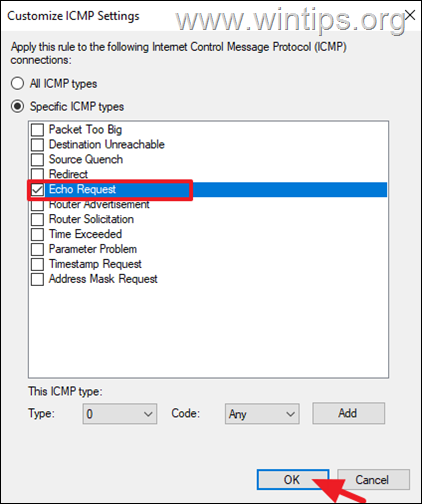
5b. At ICMP settings, check the Echo Request and then click OK.
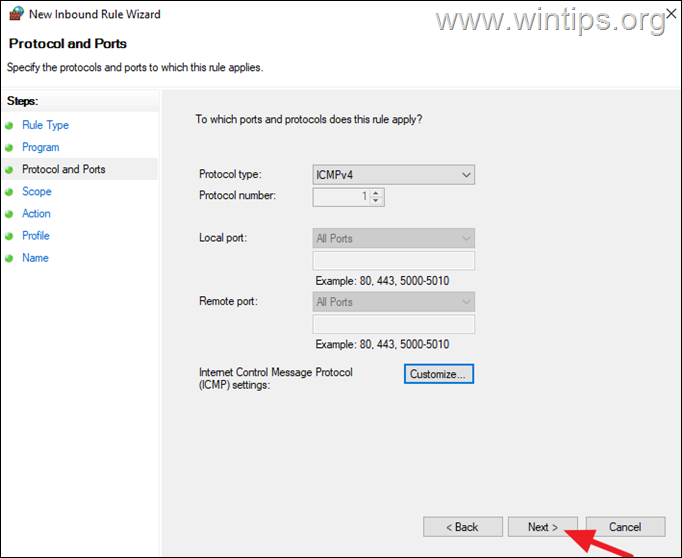
5c. Click Next.
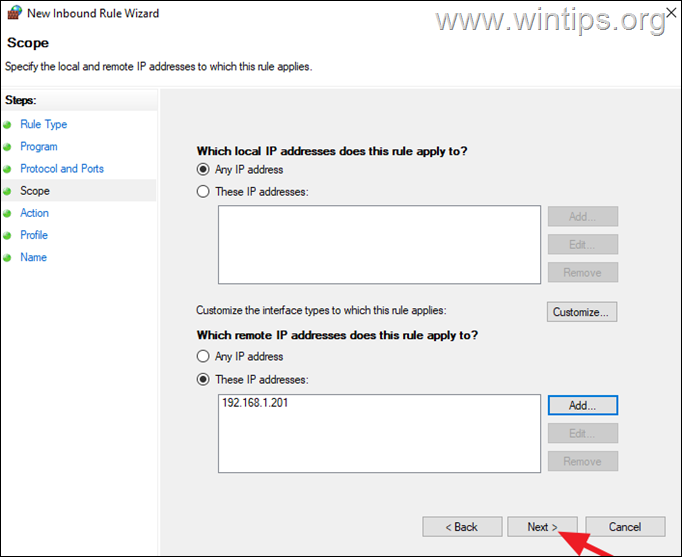
6. At Scope options, choose Any IP address for both local and remote IP's, if you want to allow the ping from all IP Addresses, or specify in "Which remote IP addresses" box, the remote IPs from which you allow only the ping requests.* When done, click Next.
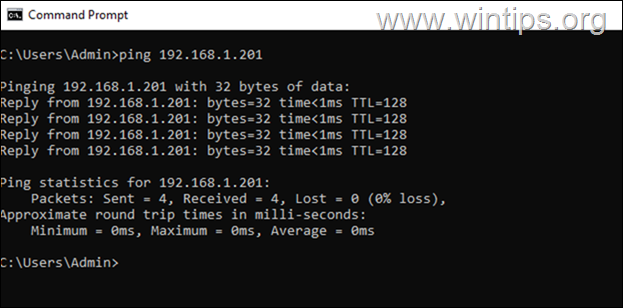
* Example: If you want to allow the ping request only from the IP Address "192.168.1.201", select These IP addresses and then add the IP "192.168.1.201".
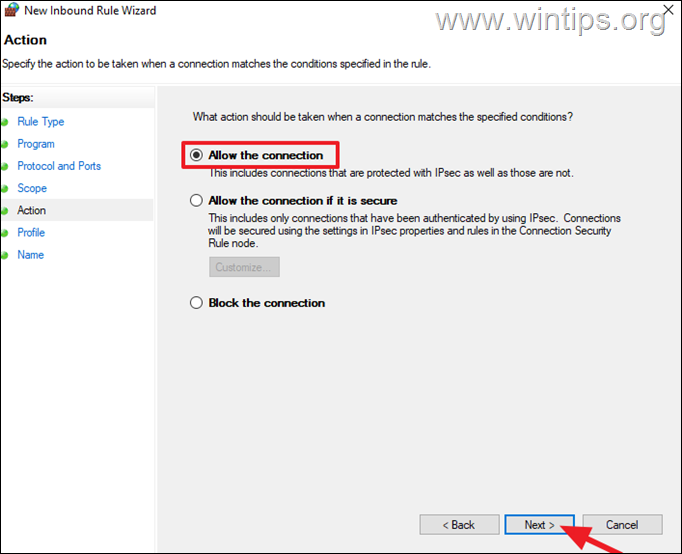
7. At Action screen, choose Allow the connection and click Next.
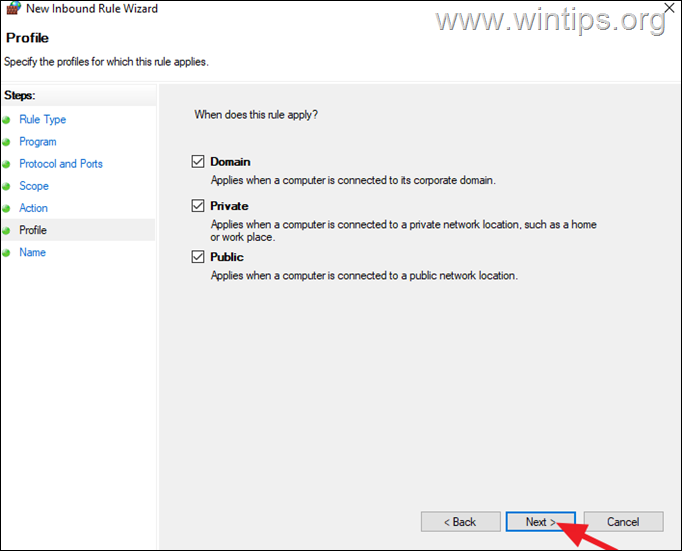
8. At Profile, leave checked all profiles and click Next.
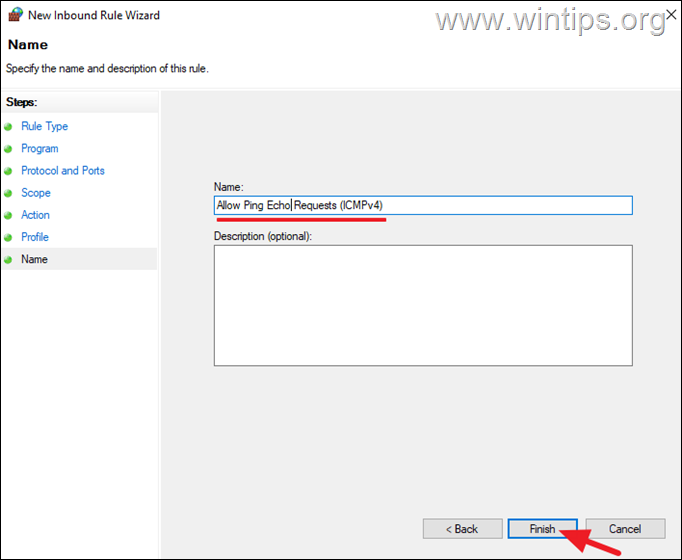
9. Finally give a recognizable name for the new rule and click Finish.
10. That's it. If you use the TCP/IP v6 Protocol, you can follow the above steps to create a second rule that will allow you to accept ICMPv6 ping requests. (In 'Protocol and Ports' settings, choose as Protocol Type: ICMPv6).
Method 3. Enable PING with Command Prompt.
Another way to allow ping in Windows Firewall is by using the Command Prompt. To do that:
1. Open command prompt as administrator. To do that:
1. Press the Windows + R keys to open the Run command box.
2. Type cmd or command prompt and press CTRL + SHIFT + ENTER.
2. In command prompt type the following command and press Enter to allow the ICMPv4 ping requests:
- netsh advfirewall firewall add rule name="ICMPv4 Allow Ping Requests" protocol=icmpv4:8,any dir=in action=allow
3. If you want to allow also the ICMPv6 ping requests, give this command:
- netsh advfirewall firewall add rule name="ICMPv6 Allow Ping Requests" protocol=icmpv6:8,any dir=in action=allow
4. You're done. After executing the above commands the Ping requests will be allowed in the Windows Firewall. *
* Note: To block again the Ping requests in the Windows Firewall, give these commands:
- netsh advfirewall firewall add rule name="ICMPv4 Allow Ping Requests" protocol=icmpv4:8,any dir=in action=block
- netsh advfirewall firewall add rule name="ICMPv6 Allow Ping Requests" protocol=icmpv6:8,any dir=in action=block
Method 4. Allow or Disallow the Ping requests in Group Policy.*
If you own Windows 10/11 Professional or a Windows Server version, you can enable the ping requests, through Group Policy, as instructed below.
1. In the Run command box, type gpedit.msc and click OK to open the Local Group Policy Editor.
2. Navigate to the following path:*
-
Local Computer Policy > Computer Configuration > Windows Settings > Security Settings > Windows Defender Firewall with Advanced Security
* Note: If you want to allow the PING requests on a Domain environment, create a New GPO, then edit its settings and go to:
-
Policies -> Windows Settings -> Security Settings -> Windows Defender Firewall with Advanced Security
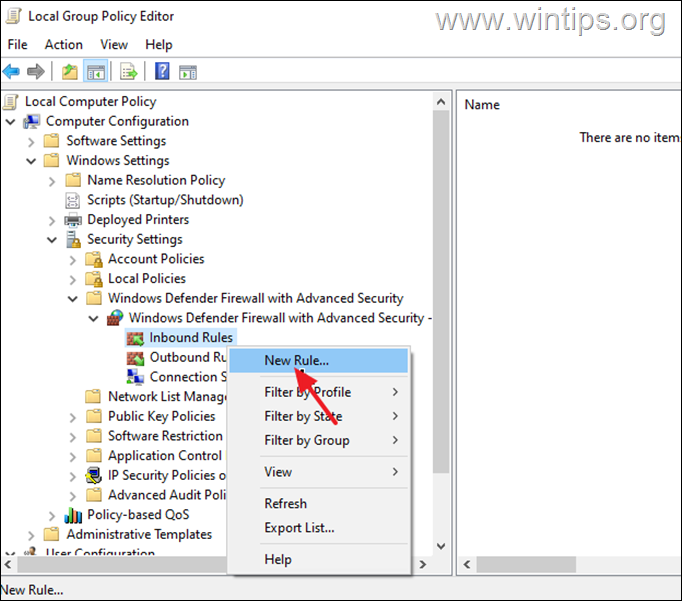
3. Right click at Inbound Rules and select New Rule.
4. At the next screen choose Custom and follow the steps 4-10 from Method-2 above to allow the Ping Requests.
That's it! Which method worked for you?
Let me know if this guide has helped you by leaving your comment about your experience. Please like and share this guide to help others.
We're hiring
We're looking for part-time or full-time technical writers to join our team! It's about a remote position that qualified tech writers from anywhere in the world can apply. Click here for more details.
- FIX: Numeric keypad Not Working on Windows 10/11 - July 24, 2024
- How to Share Files or Printers in Hyper-V? - July 22, 2024
- How to invoke Hyper-V Screen resolution prompt? - July 17, 2024

