How to Change Windows 11 Display Language.
The recently released Windows 11 is packed with over 110 languages. A fresh installation of Windows 11 offers you the option to set the default language. However, if you want to use another display language, or you purchased a PC that is configured with a different language than yours, you can easily change the display language in Windows 11, by using the instructions on this article.
Some Windows 11 PC – especially laptops, are pre-installed with languages such as Chinese, Japanese depending on the region where they are purchased. In other instances, multiple users who share one computer can decide to apply different languages to their user profile. *
* e.g.: if you are sharing a Windows 11 computer with "English" as display language, you can read this guide and select "French" as the display language in your user profile.
At any case, you can effortlessly change the Windows 11 display language to meet your needs.
How to Change the Display Language on Windows 11.
Before you change the Windows 11 display language, consider the following: If you have set up your computer with a Microsoft account, then any changes you make to the display language settings on that computer will be synchronized across all your devices that use the same Microsoft account. If you don't want that, proceed and prevent the language preferences synchronization, by following the below steps:
How to Stop Syncing Display language across devices. *
* Note: Keep in mind, that the display language will not be synchronized on other computers if you set up the computer with a local account. At such there is not need to display language settings synchronization.
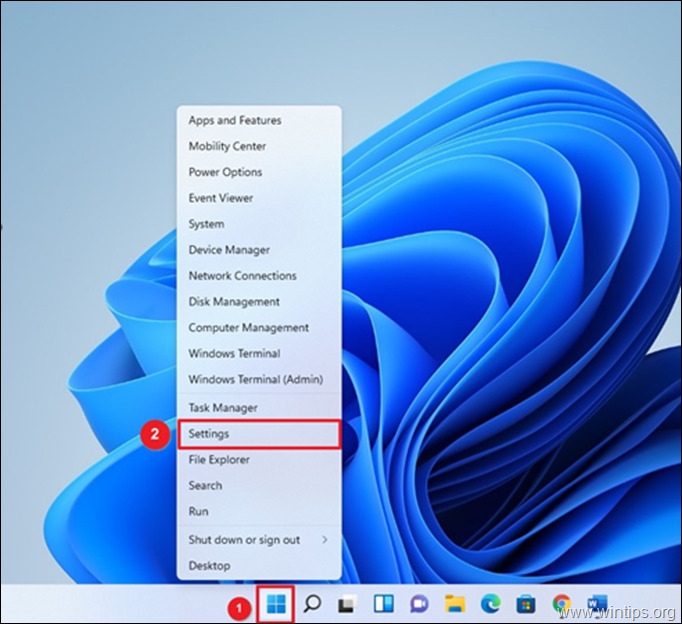
1. Right-click at Start ![]() menu and select Settings
menu and select Settings
2. Select Accounts on the left and then click Windows Backup on the right side.
3. Under Remember my preferences settings, uncheck the Language preferences option.
4. Once you complete the above steps, you can go ahead and change the language settings, without affecting the display language on other devices that use the same MS account.
How to Change Language on Windows 11.
1. Right-click at Start ![]() menu and select Settings.
menu and select Settings.
2. Select Time and Language on left & click Language & region on the right.
3. Under the Language section, select Add a language button from the "Preferred languages" setting.
4. Scroll down until you locate the language you want to install, select it and click Next. *
* Note: For quick access to the language, you can use the search bar. (e.g. type French in the search box to find quickly the "French" language)
5. At Install Language features options:
a. Review all the Optional language features and choose if you can install them.*
* Note: Not all Windows 11 languages supports input and display features such as: Display language, Text-to-speech, Speech recognition, and Handwriting.
b. Check Set as my Windows display language option.
c. Click the Install button.
6. When the language pack download is complete, the new language is added under “Preferred languages" and you will get a notification that “Windows needs to sign out in order to apply your new display language. Click Sign out to apply the change.
7. At next login, Windows 11 will be displayed in the language you just installed and the changes will apply also to all Windows 11 Settings and Apps.
In a situation where you are changing Windows 11 language because you are in a different country, you may also consider changing the Region. To do that:
- Navigate again to Time and Language -> Language & region
- Under the "Region" section, at Country or region use the drop-down menu to select your current location, and you're done.
Conclusion: Changing the Windows 11 language is relatively easy when you install your preferred language pack. The only inconvenience you might experience is to sign out and re-open your apps.
That's it! Let me know if this guide has helped you by leaving your comment about your experience. Please like and share this guide to help others.
We're hiring
We're looking for part-time or full-time technical writers to join our team! It's about a remote position that qualified tech writers from anywhere in the world can apply. Click here for more details.
- How to Disable or Remove BitLocker from Windows RE. - April 24, 2024
- FIX: Error 0x8007025d in Windows 10 Update. - April 22, 2024
- How to Disable Device Encryption in Windows 11/10. - April 17, 2024


