How to Switch Microsoft Account to Local Account in Windows 10.
If for any reason you no longer want to use your Microsoft account in Windows 10, this guide will help you to switch Microsoft Account to Local Account. In the latest Windows operating systems, Windows 8,10 & 11, it is possible to connect your computer with a Microsoft account to synchronize your device, files and services (e.g. Outlook, Teams, Skype, etc.) with other devices on which you use the same Microsoft account.
Although signing in with a Microsoft account in Windows 10 gives you the ability to easily access all Microsoft services, there are times when it might be better to use a local account instead. Local accounts are usually more secure, private, and independent of the Internet. If you want to use a local account instead of a Microsoft account, you're in the right place.
This tutorial contains step-by-step instructions on how to sign in to Windows 10 with a local account instead of a Microsoft account.
How to Switch Microsoft Account to Local Account in Windows 10.
Step 1. Switch to a Local Account in Windows 10 Settings.
1. Press Windows ![]() + I keys simultaneously to open Windows Settings.
+ I keys simultaneously to open Windows Settings.
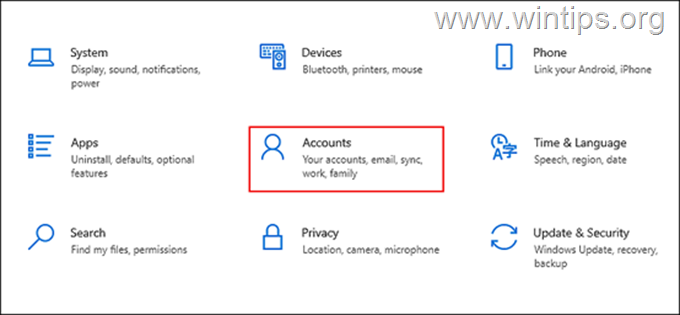
2. In the Settings window, open Accounts.
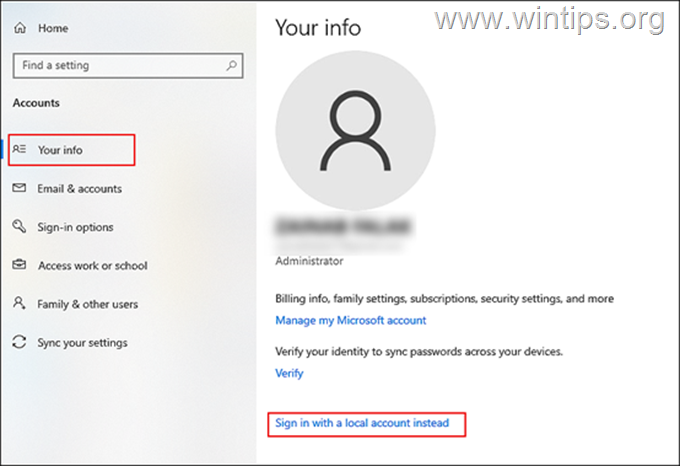
3. Select Your info from the left panel and click Sign in with a local account instead in the right pane.
4. In the next window, type your PIN or your Microsoft account password and hit Next.
5. At next screen, type the name of the local account and type a new password (twice). Type a password hint if you have trouble remembering passwords and click Next to proceed.
6. Then hit the Sign out and finish button.
7. Finally, sign back into Windows using the local account. Once this is done, your Windows 10 account will no longer be linked to your Microsoft account and you'll log in to Windows 10 with a local account.
Step 2. How to Completely Remove Microsoft Account from Windows 10
If you don't use the Microsoft Account on other apps (e.g. Outlook, Teams, etc.), or if you want to completely remove your Microsoft Account information and credentials from the computer, proceed as follows:
1. Press Windows ![]() + I keys simultaneously to open Windows Settings.
+ I keys simultaneously to open Windows Settings.
2. In the Settings window, open Accounts.
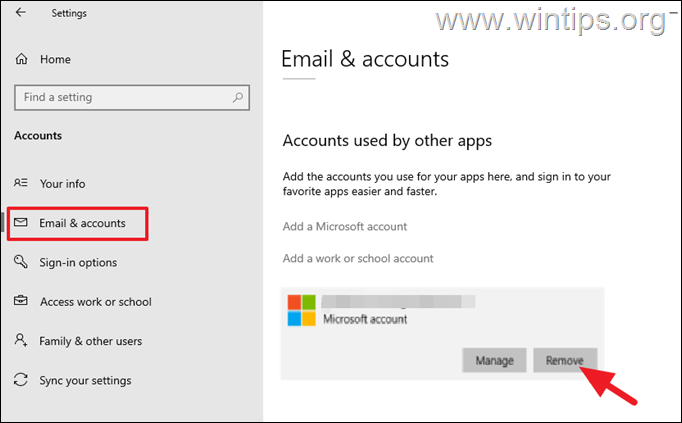
3. Now select Email & accounts at the left and under Accounts used by other apps in the right pane, select the Microsoft account that you want to delete.
4. Click Remove and Yes to remove the account from your PC.
5. Finally, restart your PC to save the changes.
That's it! Let me know if this guide has helped you by leaving your comment about your experience. Please like and share this guide to help others.
We're hiring
We're looking for part-time or full-time technical writers to join our team! It's about a remote position that qualified tech writers from anywhere in the world can apply. Click here for more details.
- How to Disable or Remove BitLocker from Windows RE. - April 24, 2024
- FIX: Error 0x8007025d in Windows 10 Update. - April 22, 2024
- How to Disable Device Encryption in Windows 11/10. - April 17, 2024

