How to change TEMP folder and allocate free space on your system disk
If you are running out of space in your system disk, then an easy solution to allocate free space, is to clear (delete) temporary files that were created from Windows services or programs installed on your computer. The cleaning procedure of these files is a safety operation and you don’t lose any critical files that are needed from your system to operate normally.
Windows uses (minimum) two temporary folders to store all temporary files created by computer usage: The system temporary folder: “C:\Windows\Temp” (that stores all System temporary files) and the user temporary folder that stores temporary files from each user. The user temporary folder is created inside each user’s profile and the full path depends from the operating system installed on the computer:
For Windows 8,7, VIsta OS the user temporary folder path is: %USERPROFILE%\AppData\Local\Temp
&
For Windows XP the user temporary folder path is: %USERPROFILE%\Local Settings\Temp
Moving the Temporary folder to another location helps you easily find and delete all your temporary files (from inside Temporary folder) and maximize your system disk's free space. This procedure works better in the case of the existence of a second hard drive on your system.
In this article I’ll show you the way to move the temporary store folders to another disk location.
Step 1: Create a new folder for Temp files:
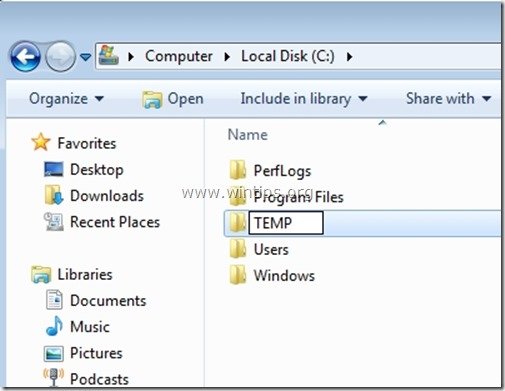
1. Open Windows explorer and create a new folder at the location that you prefer your temporary files to be stored.
(e.g. “C:\TEMP” or “D:\TEMP” if you have a secondary hard disk).
Step 2: Open Environment Variables settings.
To do this:
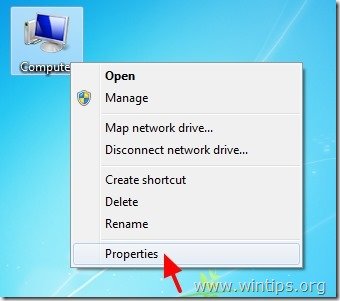
1. Right click on the Computer icon and select Properties.
2. Click in Advanced system settings on the left pane.
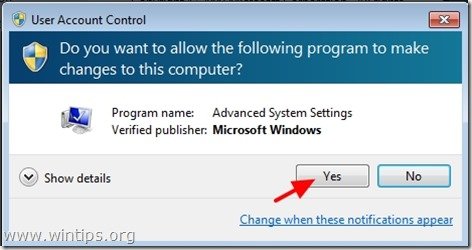
3. Ask “Yes” on the “UAC Warning” message.
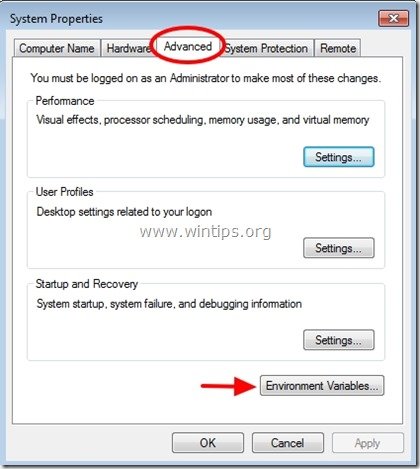
4. Inside Advanced settings click on “Environment Variables”
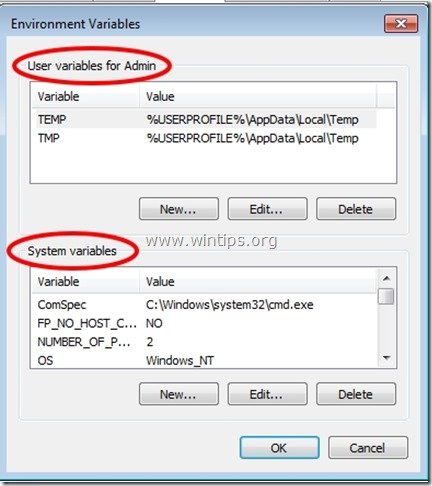
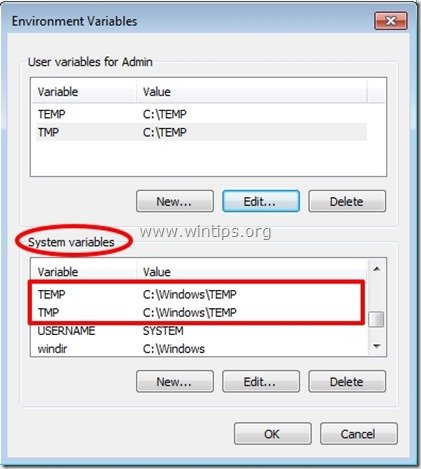
5. Inside Environment Variables you see two sections:
a. User variables for the current user (e.g. Admin)
b. System variables
From here you’ll be able to change the default location for temporary files.
Step 3. Change Environment Variables values.
A. To change current user's temp files store location:
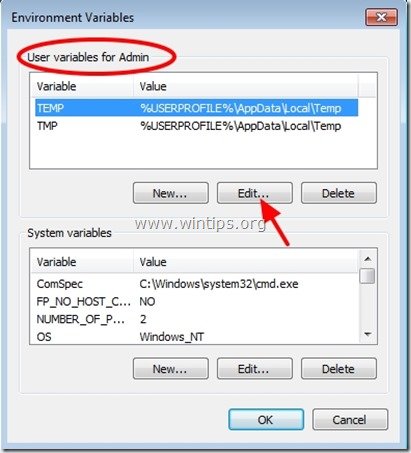
1. Go inside “User variables” section select the “TEMP” variable and press “Edit”.
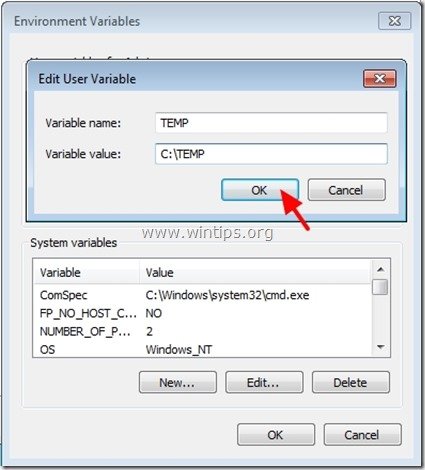
2. In “Variable Value” box delete the default TEMP location (%USERPROFILE%\AppData\Local\Temp) and then type the new TEMP folder location (e.g. C:\TEMP). Press “OK” when finished.
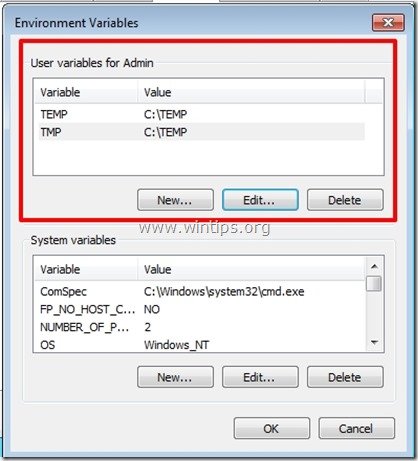
3. Repeat the same procedure for the “TMP” variable.
After you have finished, the “User variables” section should be like this:
5. Press “OK” twice and restart your computer for changes to take effect if you don’t want to change System’s Temp store location.
B. To change System’s temp files store location:
1. Go inside “System variables” section and scroll down until you find “TEMP” & “TMP” variables.
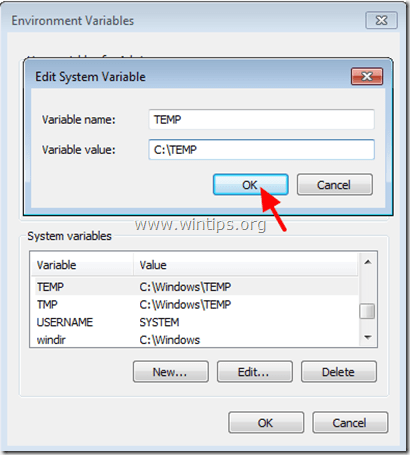
2. Select the “TEMP” variable and press “Edit”.
3. In “Variable Value” box delete the default TEMP location (%SystemRoot%\TEMP) and then type the new SYSTEM TEMP folder location. (e.g. C:\TEMP). Press “OK” when finished.
4. Repeat the same procedure for the “TMP” variable.
After you have finished, the “User variables” section should be like this:
5. Press “OK” twice and restart your computer for changes to take effect.
From now on, you can easily find and safely delete all the contents inside your new TEMP folder and allocate disk space.
We're hiring
We're looking for part-time or full-time technical writers to join our team! It's about a remote position that qualified tech writers from anywhere in the world can apply. Click here for more details.
- How to Disable or Remove BitLocker from Windows RE. - April 24, 2024
- FIX: Error 0x8007025d in Windows 10 Update. - April 22, 2024
- How to Disable Device Encryption in Windows 11/10. - April 17, 2024





February 22, 2018 @ 3:48 pm
Very good information. Can I delete everything in the user\app data\local\temp folder without causing any issues?
February 22, 2018 @ 6:34 pm
@Yes you can
August 22, 2013 @ 5:25 am
Thank you for such a complete step by step explanation. It made it so easy for me and was gratifying when it worked so smoothly.