How to Clear System Cache in Windows 10/11.
In this tutorial we will show you how to clear the system cache and the Windows temporary files in Windows 10/11 OS.
Just like any other operating system, Windows keeps a cache of temporary files to help your system run more efficiently. Over time, this cache can become bloated and cause problems. The good news is that it is easy to clean the system cache in Windows
If you are experiencing problems with your Windows 10 PC, one of the first things you should try is clearing the system cache. This can help resolve a number of issues, including application crashes, freezing, and slow performance.
How to Clean the Windows 10/11 System Cache.
To clear the Windows system cache, follow the steps below (the first three steps applies to Windows 7, 8 also):
- Delete System Cache with Disk Cleanup tool.
- Clear Windows Temp Files.
- Clear File Explorer History.
- Clear Windows Update Cache.
- Clear Microsoft Store Cache.
- Clear System Cache with Storage Sense.
Step 1. Clear System Cache with Disk Cleanup Tool.
The first way you can clear the system cache is by using the Disk Cleanup tool. This is a built-in Windows utility that helps you free up space on your hard drive. To use it, follow these steps:
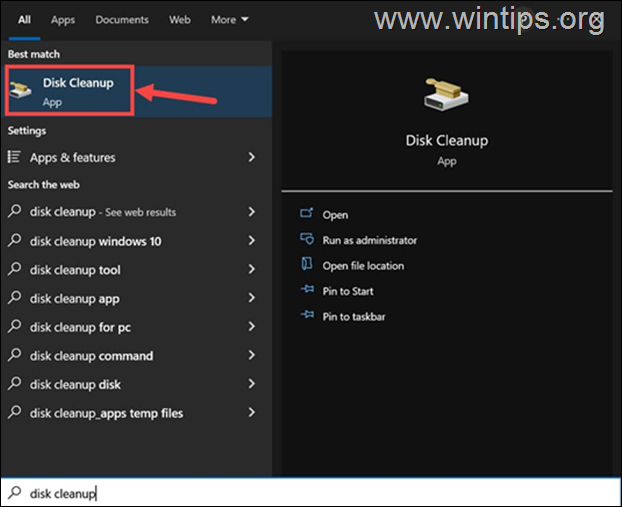
1. Click on the Search icon ![]() next to the Start button and type Disk Cleanup. Then open the Disk Cleanup app.
next to the Start button and type Disk Cleanup. Then open the Disk Cleanup app.
2. If more than one drives are installed on your PC, ensure that the Windows (C:) drive is selected and click OK.
3. Next, click on the Clean up system files button.
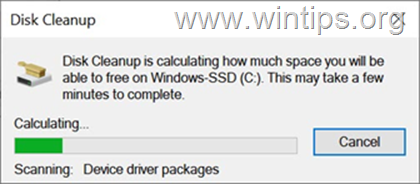
4. Let the Disk Cleanup tool scan for files that can be safely deleted.
5. On the next window, select which useless files you want remove and and click OK.
* Note: I suggest to delete the following:
- Windows Update Cleanup
- Windows Upgrade log files.
- Downloaded Program Files.
- Temporary Internet files.
- Previous Windows Installations.
- Recycle bin
(Attention: by checking this all the contents of the recycle bin will be deleted) - Temporary Files.
- Temporary Windows Installation files.
6. Click the Delete Files button to confirm your decision.
7. Wait until the cleaning tool finishes deleting the selected files and continue to next step.
Step 2. Delete Windows Temporary Files.
The next step to clear the system cache is by deleting the temporary Windows files. These are files that are no longer needed and can be safely deleted. To do this, follow these steps:
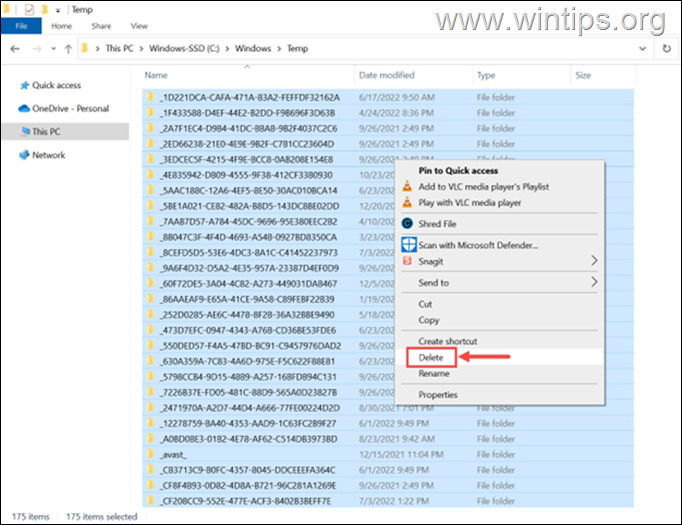
1. Open File Explorer and navigate to the following location:
- C:\Windows\Temp
2. Open the Temp folder, press CTRL + A to select all of the folders and files, then right-click and select Delete from the context menu.
Step 3. Clear File Explorer History
The next step to clear the system cache is by deleting the File Explorer history. This is a list of all the files and folders that you have accessed recently.
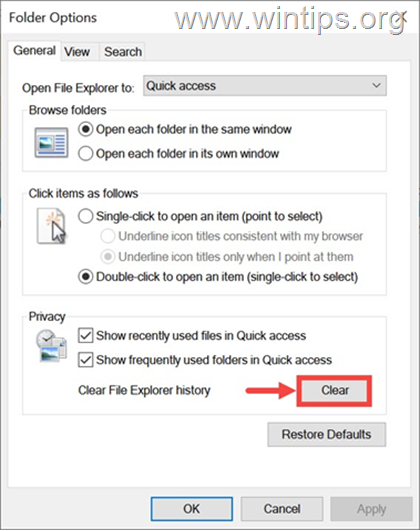
1. In File Explorer select the View tab and then click Options > Change folder and search options.
2. Under the General tab, click on the Clear button to clear File Explorer history.
Step 4. Delete Windows Update Cache.
The Windows Update cache contains all the temporary update files that are used when installing updates, but after the updates are installed they remain on the system but are useless.
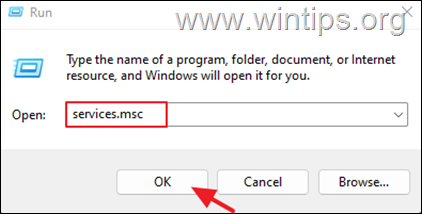
1. Simultaneously press the Windows ![]() + R keys to open run command box.
+ R keys to open run command box.
2. In run command box, type: services.msc and press Enter.
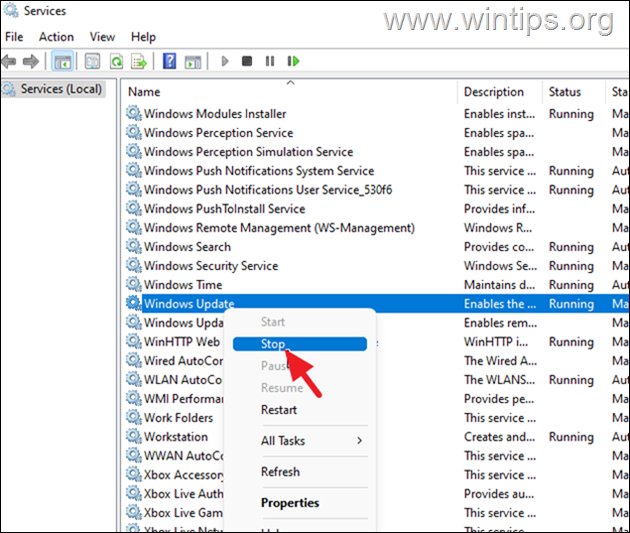
3. Scroll down to locate the Windows Update service and then right-click on it and select Stop.
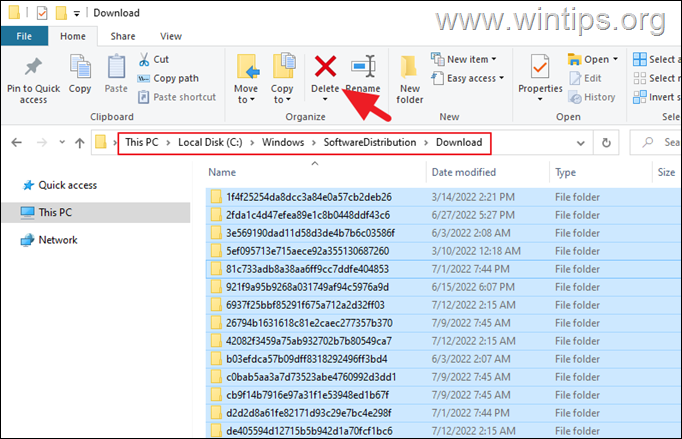
4. Without closing the Services window, open File Explorer and navigate o the following location:
-
C:\Windows\SoftwareDistribution\Download
5. Select all the files on the Download folder and Delete them. *
* Note: If you have previously run the Disk Cleanup tool (step-1) with the "Windows Update Cleanup" option selected, this folder will be – normally – empty now.
5. When done, go back to Services window, right-click at Windows Update service and choose Start.
Step 5. Clear Microsoft Store Cache.
If you are facing issues with the Microsoft Store, one of the first things you can try is to clear its cache. This can help resolve a number of problems, including slow performance and application crashes. To clear the Windows Store cache:
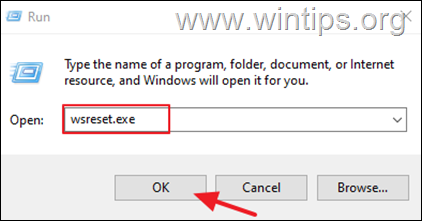
1. Press the Windows + R keys to open the Run dialog.
2. At Open box, paste the below command and press Enter:
- wsreset.exe
3. It will open a black window…don't close it and wait for it to close automatically.
4. After the reset is complete, the Windows Store will open automatically. Close it and proceed to the next step.
Step 6. Delete Windows Cache with Storage Sense.
Windows also has a built-in utility called Storage Sense that can help you clear the system cache. This is a great way to free up space on your hard drive and improve performance.
1. From the Start menu open the Settings and click System.
2. On the next screen, select on the Storage option on the left pane, and at the right:
a. Set the switch to On to enable the Storage Sense
b. Click Configure Storage Sense or run it now.
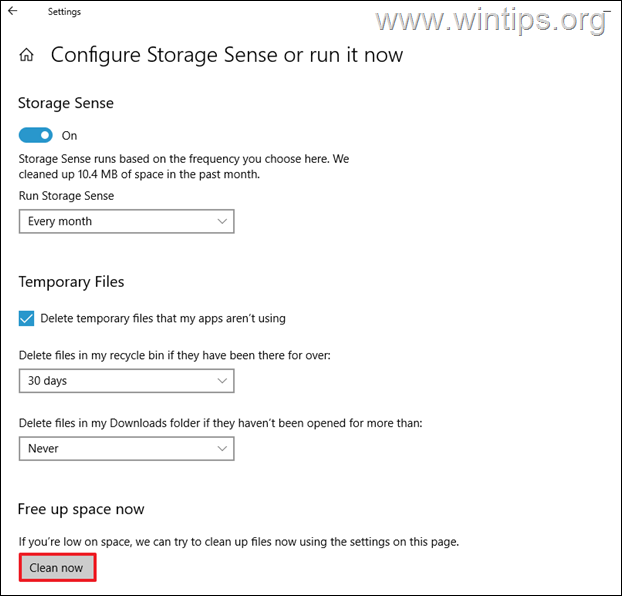
3. At the next screen specify how often you want the Storage Sense to automatically delete the useless files* from your PC and how often to empty the contents of the recycle bin or the Downloads folder. When done, click the Clean now button if you want to run the tool now.
* Note: By default, Storage Sense deletes unnecessary temporary files and the contents of the recycle bin after the time specified here.
Final Words
Clearing the system cache can help resolve a number of issues on your Windows system. In this blog post, we have shown you all the steps needed to clear the system cache in Windows. Try them out and see if they help improve your system's performance.
That's it! Let me know if this guide has helped you by leaving your comment about your experience. Please like and share this guide to help others.
We're hiring
We're looking for part-time or full-time technical writers to join our team! It's about a remote position that qualified tech writers from anywhere in the world can apply. Click here for more details.
- FIX: Numeric keypad Not Working on Windows 10/11 - July 24, 2024
- How to Share Files or Printers in Hyper-V? - July 22, 2024
- How to invoke Hyper-V Screen resolution prompt? - July 17, 2024










October 12, 2022 @ 8:36 pm
BIG THANKS VERY PR0DUKTIVE W0RK T0DAY ! \NICE AWES0ME KEEP_IT_UP! ✨🎉✨🎉✨🎉🎉🎎🎭🎎🎭🎎🎭🎗🎗🎗🎗🎗🎗🎗🎑🎑🎑🎑✨🎆🎆