How to Create a Distribution List in Office 365.
This guide, contains step by step instructions on how to create a distribution list in Office 365. A distribution list, is a group of people that have a global email address, so if you want to send an email to that group, you haven't to type each individual recipient's name.
Distribution lists (or "Distribution Groups") are commonly used by large organizations or companies that have many employees in each department (group), and want to have a unique email address for each of these departments for easy communication. For example, if one company have many people on the sales department, then it can use a distribution list with a global email address (e.g. "sales@company.com"), to communicate with all the people of the sales department.
- Related article: How to Setup a Distribution List for Email Alias in Office365.
How to Create a Distribution Group (List) in Microsoft 365.
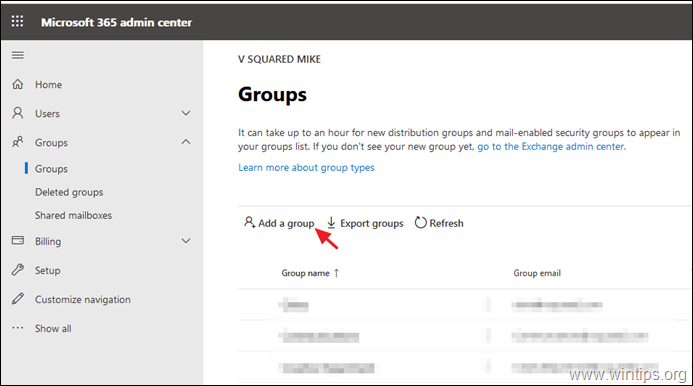
1. Login to Office 365 Admin center and go to Groups > Add a group.
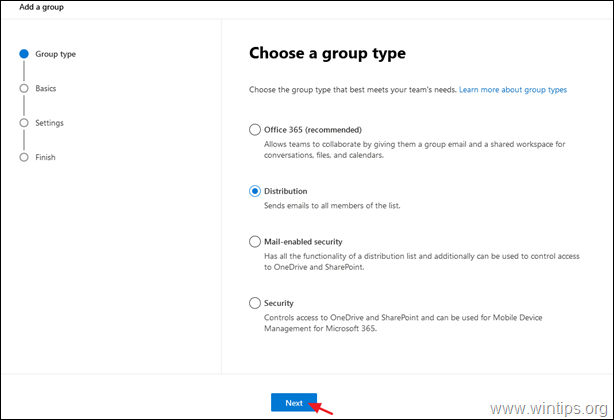
2. At Choose a group type options, choose Distribution.
3. As a name, type a recognizable name (e.g. "Sales"), and click Next.
4. At Group email address:
a. Type the global email address for the distribution list (e.g. "sales").
b. If you want to receive mail from people outside your organization, select the Allow people outside of my organization to send email to this distribution list.
c. When done, click Next.
5. Click Create Group.
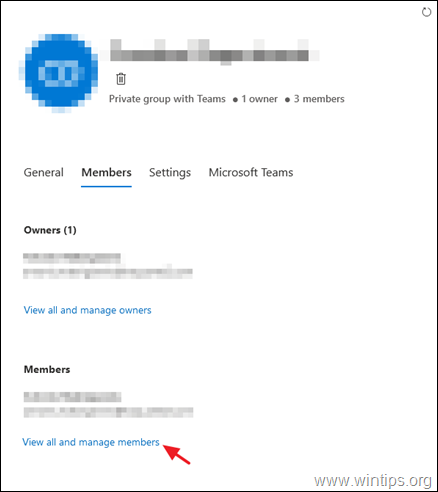
6. Now, open the new group and at the Members tab, click View all and Manage Members.
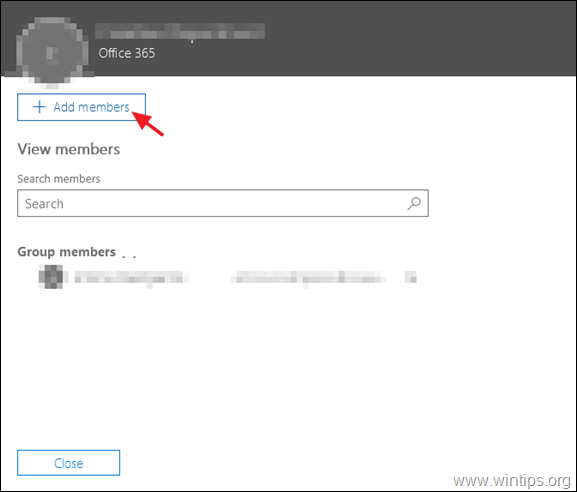
7. Click Add members.
8. Now select the user(s) who will receive and respond to the emails in the new email alias address and click Save.
That's it! Let me know if this guide has helped you by leaving your comment about your experience. Please like and share this guide to help others.
We're hiring
We're looking for part-time or full-time technical writers to join our team! It's about a remote position that qualified tech writers from anywhere in the world can apply. Click here for more details.
- FIX: Numeric keypad Not Working on Windows 10/11 - July 24, 2024
- How to Share Files or Printers in Hyper-V? - July 22, 2024
- How to invoke Hyper-V Screen resolution prompt? - July 17, 2024


