How to enable $Admin Shares in Windows 7, 8 or 10.
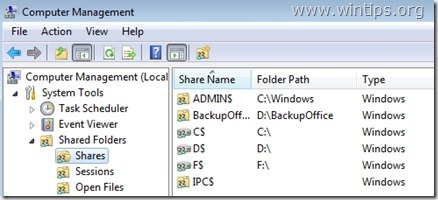
As “Administrative shares” are defined all the default network shares that can be accessed remotely only from network administrators. The Admin shares are hidden and they are disabled by default in a Windows 7 based computers in order to prevent unauthorized users to access or modify them through a network environment.
In this tutorial, we explain how to SECURELY enable Admin$ shares for your disk volumes (C$, D$, etc.) on a Windows 7, 8 or 10 based computer, so they will be accessible (from another computer on your network) only by specific users.
How to enable Administrative shares on Windows 7, 8, 8.1 or 10 OS.
To enable the default (hidden) shares (C$, D$, etc.) on Windows 10, 8 or 10 OS:
Step 1: Ensure that both computers belong to the same Workgroup.
To check if both computers belong to the same workgroup, do the following:
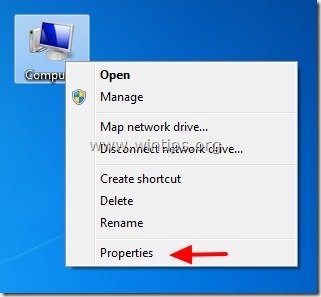
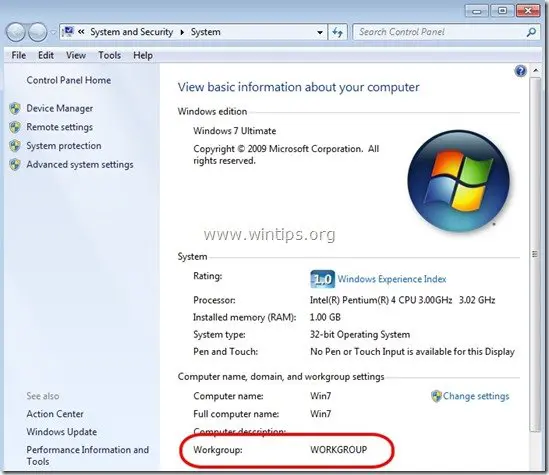
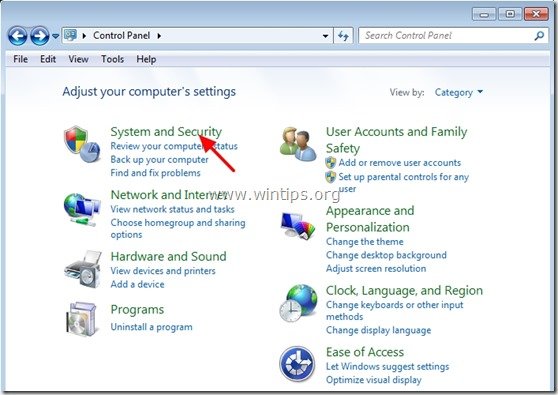
1. Right-click on “Computer-Name” icon on your desktop and choose “Properties” or (additionally) navigate to Windows Control Panel, choose “System and Security” and select “System”,
2. Look at “WORKGROUP” name at the right and ensure that it is the same name on both computers (e.g. WORKGROUP)
Step 2: Specify which user(s) can access the Admin Shares (Disk Volumes).
The Administrative shares can be (and must be) accessed from Administrator users only. So if you want a user from your network to be able to access Admin($) shares, you must give to this user local Administrative rights on the computer that you want to enable Admin shares. To do that:
1. Go to your Windows control panel (“Start” > “Control Panel”).
2. Open “Add or remove user accounts”
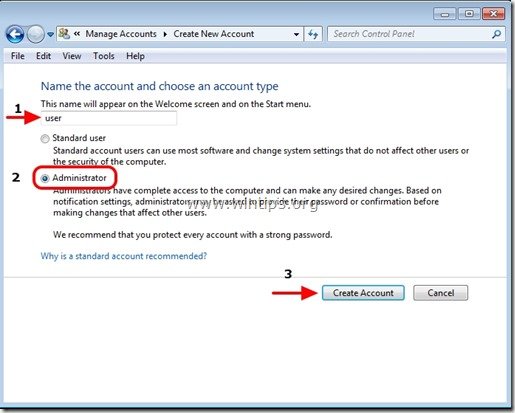
3. Now create a new account on your computer with Administrative privileges. Additionally, if you have already setup an account, ensure that he has Administrator privileges (choose the Account you want, select “Change the account type” option and set him as “Administrator”).
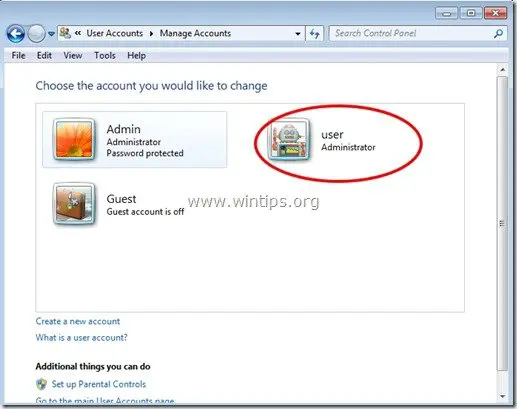
4. Give a username for your new account (e.g. user), set it up as an Administrator user and press “Create Account” button.
5. At this point the “Manage Accounts” options window should look like this:
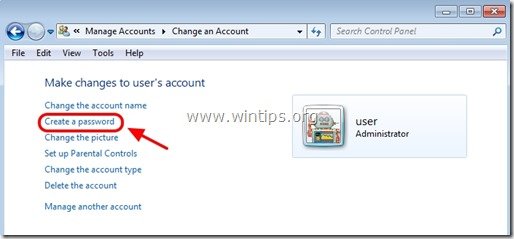
6. After you create your account your must specify a password. So click on the new account (e.g. user) and press “Create a password”.
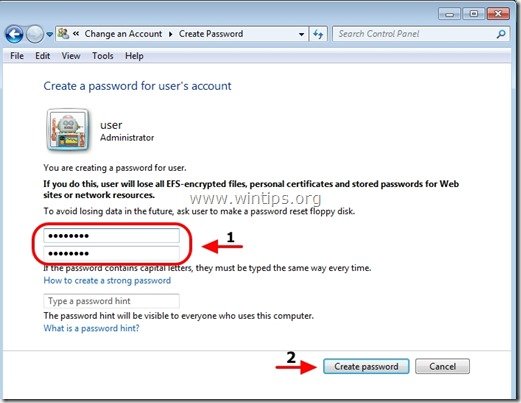
7. Type a strong password (2 times) and press “Create password” button.
Step 3: Enable “File and print sharing” through Windows Firewall.
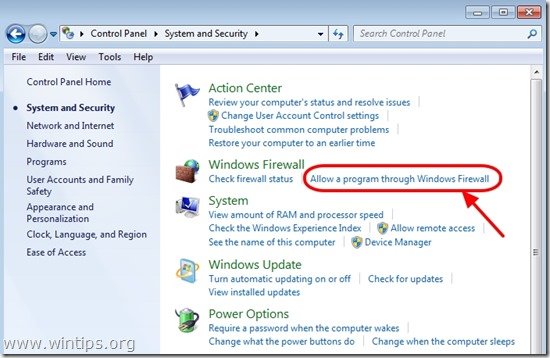
1. Navigate to Windows control panel and click on “System and Security”.
2. On “Windows Firewall” section, press the “Allow a program through Windows Firewall” option.
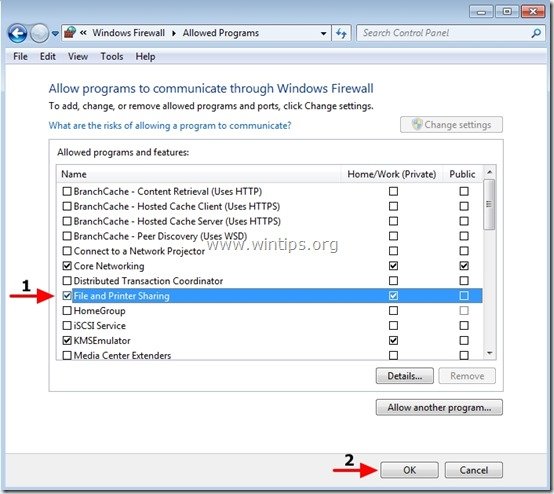
3. In”Allowed programs and features” list, check to enable the “File and Printer Sharing” feature and press “OK”. (In Windows 10 uncheck and re-check)
4. Restart your computer (Optionally).
Step 4. Check if you can access the admin shares from another computer.
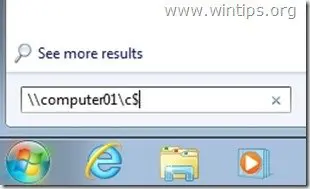
1. From another computer press the “Start” buton and in the search box type the following command:
“\\<ComputerName>\<DiskVolumeName>$” (without the quotes) and hit “Enter”.
Note: As “<ComputerName>” put the name of the computer with the Admin Shares enabled on it (e.g. “Computer01”) and as “<DiskVolumeName>” put the name of the volume that you want to access, (e.g. “C$” = Disk Volume C:\ , “D$” = Disk Volume D:\, etc.)
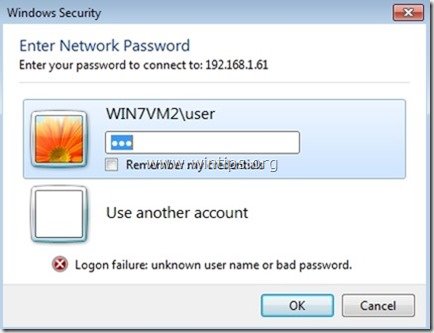
2. Now type the username & the password to access the remote computer’s admin shares (as specified in Step 1) & hit “Enter”.
3. If you follow the above steps as described, then you can access the remote computer’s admin shares without any problems.
Step 5: Modify registry settings on the computer with the Admin Shares Enabled(Optional)
Note: Perform this step ONLY if you face problems/errors when you try to access Admin Shares (e.g.logon failure).
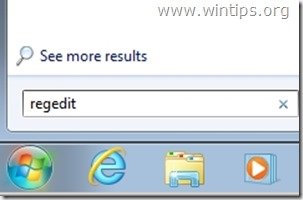
1. Go to the remote computer (with the Admin Shares enabled on it) and open Registry Editor. To do that, press “Start” button and in the search box type “regedit” and hit “Enter”.
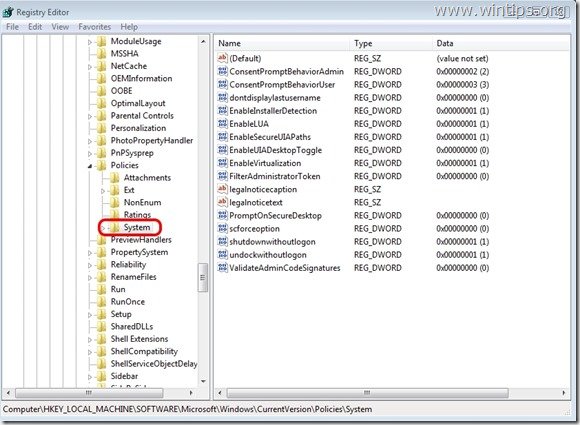
2. In registry editor navigate to the following path:
“HKEY_LOCAL_MACHINE\SOFTWARE\Microsoft\Windows\CurrentVersion\Policies\System”
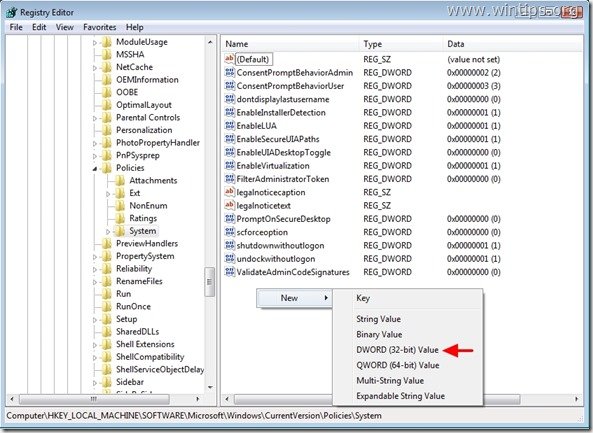
3. Right-click on the right pane and choose “New” > “DWORD (32-bit) Value”.
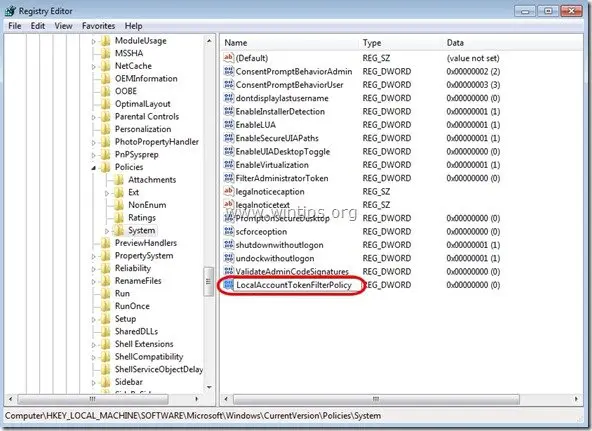
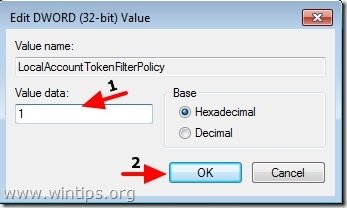
4. Type the “LocalAccountTokenFilterPolicy” for value name and press “Enter”.
5. Double click on “LocalAccountTokenFilterPolicy” value to modify the “Value Data” from “0” to “1” and press “OK”
6. Exit Registry Editor and try again to access administrative shares on the remote computer.
We're hiring
We're looking for part-time or full-time technical writers to join our team! It's about a remote position that qualified tech writers from anywhere in the world can apply. Click here for more details.
- How to Disable or Remove BitLocker from Windows RE. - April 24, 2024
- FIX: Error 0x8007025d in Windows 10 Update. - April 22, 2024
- How to Disable Device Encryption in Windows 11/10. - April 17, 2024





April 29, 2023 @ 7:55 pm
Was trying to access the admin shares on my old Windows 10 PC from my new Windows 11 PC. Step 5 – doing the registry edit on my old Windows 10 PC – was what worked. Thanks!
March 6, 2021 @ 11:00 pm
Five years after the original post and it is still helping people. Setting up veeam backup from one computer to another computer using only local accounts on each machine you have to use an admin$ share. Thanks for this.
April 23, 2019 @ 10:18 am
Thank you for this amazing tutorial! You saved my life man, I struggled with configuring PSexec for a couple of days and I randomly stumbled upon your site. Have a nice day!
July 19, 2017 @ 9:02 am
Gosh I don't know why Microsoft makes these configurations so annoying tedious for users. Thanks for the registry key setting. Also had to restart the system in order for that setting value to take effect.
October 5, 2016 @ 1:17 pm
i want to easy method
January 22, 2015 @ 7:00 pm
Brilliant , thanks for the great explanation.. really Good
October 1, 2014 @ 7:49 pm
Y have to reboot to apply this settings
December 5, 2014 @ 11:25 pm
B/c the system only takes a lot of its cues from the registry at the time the OS loads up. To get a different interpretation, the OS needs to reload the registry.
September 9, 2014 @ 10:39 pm
Only "Step 5: Modify registry settings on the computer with the Admin Shares Enabled(Optional)" is actually required for 99% of users. Unless your in a corporate shop on a domains, almost all users of Windows 7 are running there local machine with Administrator accounts. By default Microsoft restricted access to the admin share. The regkey is what unlocks the functionality.
April 14, 2015 @ 11:43 pm
Yeah, exactly. This is true for Windows 7, Windows 8, Windows 8.1 as well as current build 10041 of Windows 10. You MUST modify the registry, as given in instructions above.
March 5, 2016 @ 6:38 pm
Actually, I have just realized that the legacy "Administrator" account needs to be enabled if one wishes to skip step 5 and not make the registry edit in order to enable remote access of the admin shares in a local work group environment.
I am running a freshly installed Windows 10 TH2 right now, and after I enabled the old legacy Administrator account I was able to access the admin shares remotely, without having to make the registry change.
Note! It does NOT help to create a NEW administrator account. If your username is Bob and you are part of the admin group, and you create a new admin user Alice, you will still not be able to use that account to access the admin shares remotely. In that case, you MUST make the registry change as described in step five above. Otherwise you will have to enable the legacy Administrator account.
Use one of these methods, depending on your preference.
Method 1: Enabling Administrator
======================
1. Make sure local and remote PC are joined in the same work group. Reboot booth PCs after making any changes.
2. Enable file and printer sharing in Windows Firewall settings.
3. Run lusrmgr.msc and enable "Administrator" account.
4. Set a password for Administrator.
5. Ready! You can now remotely access any admin share on the local PC.
Note! You don't need to sign out, and then sign in as Administrator. You can remain signed in as Bob. Just remember to NOT use Bob's credentials for remote share access. Instead, you will use Administrator's credentials you just created.
Method 2: Setting LocalAccountTokenFilterPolicy
1. Make sure local and remote PC are joined in the same work group. Reboot booth PCs after making any changes.
2. Enable file and printer sharing in Windows Firewall settings.
3. Run regedit.exe and navigate to HKLM\SOFTWARE\Microsoft\Windows\CurrentVersion\Policies\System.
4. Create a DWORD named LocalAccountTokenFilterPolicy and set its data value to 1.
5. Ready! You can now remotely access any admin share on the local PC.
This method does NOT require you to enable the Administrator account, nor to create any new user account with administrator permission. It will work perfectly with Bob's user account, as long as he is a member of the admin group. This would normally be your regular user account that you created during Windows setup.
November 11, 2016 @ 3:56 pm
Thanks!
Method 1 made my day :)