How to Enable Hyper-V On Windows 10/11 Home.
If you want to enable Hyper-V on Windows 10/11 Home edition, continue reading below.
Hyper-V is Microsoft's hypervisor platform and, like the VΜware or VirtualBox hypervisors, allows you to run multiple operating systems on a singe Windows PC.
With the Hyper-V virtualization platform, you can create virtual machines that run on their own hardware without affecting the host. Compared to other hypervisors, Hyper-V offers comparable features and functionality which is why it is currently used by many system administrators to do their testing.
Hyper-V was originally built into Windows Server 2008 and later versions, but now it's also available in Windows 10/11 Pro, Enterprise, and Education editions. But, don't worry… if you're a Windows 10/11 Home owner, in this article I'll show you how you can install the Hyper-V platform even on your own system.
Hyper-V Requirements
A Virtual Machine (usually called "VM"), is a virtual computer with its own hardware (CPU, RAM, DISK, etc.), that is "borrowed" from the physical computer (usually called "HOST"). Thus, to install Hyper-V, the host machine must meet the following hardware requirements.
A. RAM: 8GB at least. (If you want to get better performance, RAM should be increased to at least 16GB or better to 32GB).
B. CPU: You must have a 64-bit Processor that supports Second Level Translation Address (SLAT). (Most Intel and AMD processors support the SLAT hardware mechanism, especially on computers pre-installed with Windows 8 or a later versions).
* Info: The "Second Level Address Translation" (SLAT), is a hardware mechanism which is supported when the Virtualization Technology is supported. If you own an Intel processor, go to your processor's specification page and look if the "Intel® Virtualization Technology (Intel® VT-x)" located under "Advanced Technology". Alternatively see if the "Virtualization Technology" feature is enabled in BIOS.
C. in order to run Hyper-V, the following items must be enabled in BIOS : *
- Virtualization Technology
- Hardware Enforced Data Execution Prevention (DEP)
* Notes:
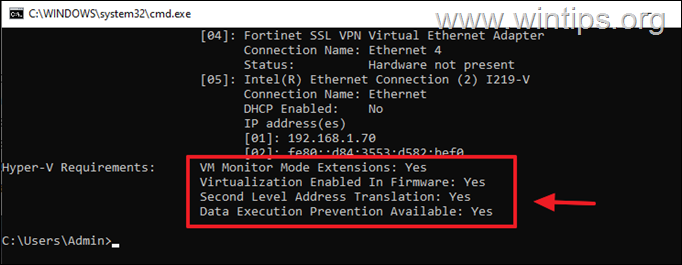
1. To find out if the above items are already enabled on your system:
1. Open Command Prompt and type systeminfo.exe
2. Scroll at the end of the report to find out if the Hyper-V requirements are met. If not, proceed to enable them in Bios by using the instructions below.
2. To Enable Virtualization Technology & Data Execution Prevention (DEP) in BIOS:
1. Restart the computer and repeatedly press one of these keys: F2, F10, F8, F12 or Del* when the computer manufacturer's logo appears on the screen to enter the BIOS/UEFI settings (* The key may vary from manufacturer to manufacturer).
2. To Enable Virtualization in BIOS:
a. If you own an Intel CPU:
- Click the Advanced* tab and set the Virtualization (aka "Intel® Virtualization Technology (VT-x)" to Enable.
* Note: In some BIOS the "Virtualization" setting is located in Performance, or in System Configuration sections.
b. If you own an AMD CPU:
- Click the M.I.T. tab –> Advanced Frequency Settings –> Advanced Core settings and the set the SVM Mode (aka "Secure Virtual Machine") to Enable.
3. To Enable Data Execution Prevention (DEP) in BIOS:
Depending on your computer manufacturer, the option to enable the hardware DEP varies and can be located at Advanced or in Performance section and may be labeled as "Data Execution Prevention," "XD," "Execute Disable," or "NX".
How to Enable Hyper-V on Windows 11/10 Home.
Once all the requirements above are met, follow these instructions to activate the Hyper-V feature on your Windows 10/11 home PC.
1. Open Notepad and paste the code below: *
pushd "%~dp0"
dir /b %SystemRoot%\servicing\Packages\*Hyper-V*.mum >hyper-v.txt
for /f %%i in ('findstr /i . hyper-v.txt 2^>nul') do dism /online /norestart /add-package:"%SystemRoot%\servicing\Packages\%%i"
del hyper-v.txt
Dism /online /enable-feature /featurename:Microsoft-Hyper-V -All /LimitAccess /ALL
pause
* Note: The above script adds the Hyper-V feature on Windows 10/11 home. The code has been created by the Microsoft Virtualization team on Github.
2. Save the file as Hyper-V Enabler.bat and close notepad.
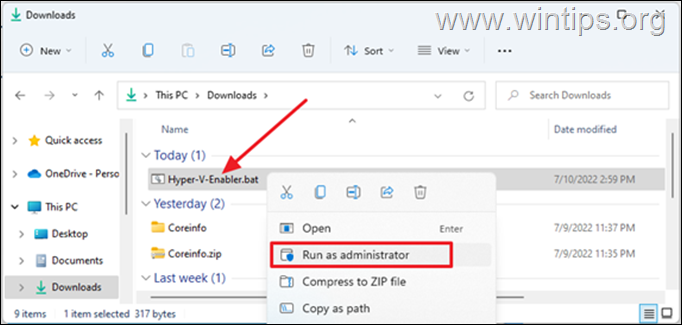
3. Right-click on Hyper-V Enabler.bat and select Run as administrator. This will open the command prompt, and trigger the installation process to begin.
4. Once the installation completed, you will get a prompt asking if you want to restart the computer now, press Y to proceed.
5. During rebooting Windows will install updates and will take a few minutes to complete.
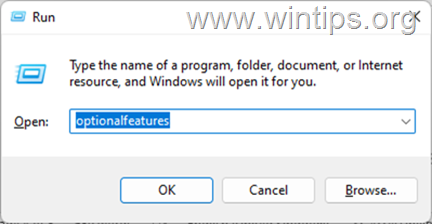
6. After signing to Windows, press the Windows key + R keys to open the Run dialog box.
7. Type optionalfeatures and hit Enter.
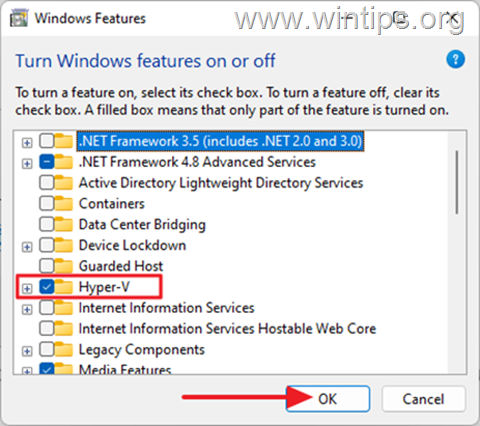
8. Check the Hyper-V option and press OK to enable the feature.
9. Wait for Windows to install Hyper-V, and when prompted, restart your computer.
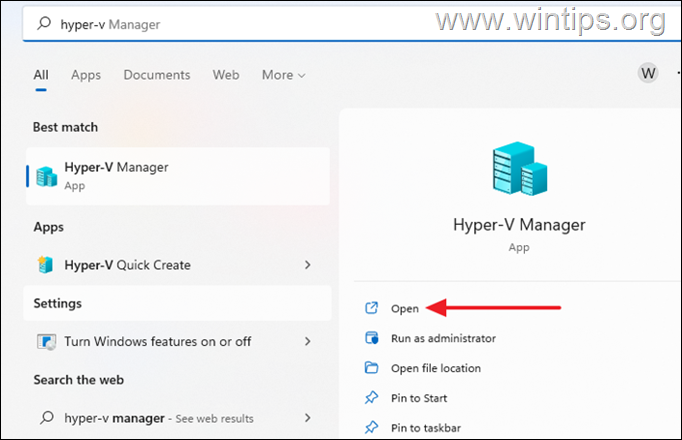
10. Search for 'hyper-v" to Open it and start creating virtual machines.
Final words: These are all the steps required to enable Hyper V on Windows 10 Home & Windows 11 Home Editions. If something doesn't work as instructed, make sure your computer meets the requirements to run Hyper-V.
You can always disable Hyper-V if you no longer need it, either by unchecking the Hyper-V check box on Windows Features, or by executing the below command in PowerShell (Admin):
- DISM /Online /Disable-Feature /FeatureName:Microsoft-Hyper-V
That's it! Which method worked for you?
Let me know if this guide has helped you by leaving your comment about your experience. Please like and share this guide to help others.
We're hiring
We're looking for part-time or full-time technical writers to join our team! It's about a remote position that qualified tech writers from anywhere in the world can apply. Click here for more details.
- FIX: Numeric keypad Not Working on Windows 10/11 - July 24, 2024
- How to Share Files or Printers in Hyper-V? - July 22, 2024
- How to invoke Hyper-V Screen resolution prompt? - July 17, 2024




December 14, 2023 @ 8:25 pm
Thanks – worked like a charm.