How to FIX Laptop Overheating issues.
Laptop overheating can cause serious hardware problems and can completely damage your laptop if you do nothing to address the issue. The overheating problem usually occurs on a laptop that has been in use for a long time and is usually due to dust collected on the CPU fan and its vents.
As you may know, the CPU is the "brain" of your computer that is responsible for running Windows and applications on your computer. The most important thing to keep the CPU healthy is to keep the CPU cool. Overheating of the CPU can cause serious problems on your laptop, and to prevent this damage, modern CPUs have a protection feature that automatically shuts down the laptop if the CPU gets too hot.
In this guide you will find detailed instructions on how to prevent and solve laptop overheating problems.
How to Protect your Laptop from Overheating.
- Since many laptops take in air from the bottom to dissipate heat, avoid placing your laptop on your lap or on cloths (such as sheets, blankets, etc.), and always prefer to place it on a hard flat surface, such as your office.
- Keep clear the space near the laptop's air vents.
- Use a Laptop Cooling Pad or a Laptop Vacuum Cooler.
- Even if your laptop does not overheat, it's a good practice to clean its vents and fan, twice a year to prevent dust buildup.
How to Check if the CPU overheats.
Step 1. Check CPU Temperature when Processor is IDLE.
The first step to troubleshoot the laptop overheating issue is to measure the CPU temperature, when the CPU is idle and when is under stress. To do that:
1. Download and install the following two utilities n your PC:
-
- Core Temp. (To monitor the CPU Temperature)
- CPUID CPU-Z (To stress the CPU)
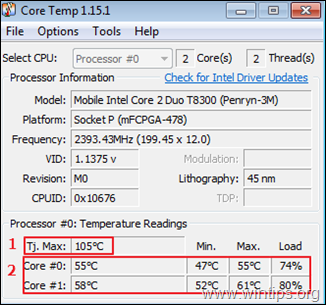
3. Run the Core Temp program and notice the following information:
-
- The Tj. Max (Junction Temperature), which is the maximum temperature allowed at the processor die.
- The current temperature of all the CPU Cores.
4. Now, according the temperatures you see on Core Temp program, perform the corresponding action: *
- If the average temperature of all the CPU cores is about the 50-60% of the maximum allowed CPU temperature (Tj. Max), proceed to step-2 to find out the CPU temperature under stress.
- If the average temperature of all the CPU cores is about the 80-90% of the maximum allowed CPU temperature (Tj. Max) and it grows, then stop here and skip to step-3 to clean you laptop from dust.
* Note: At this point I have to say that there is no ideal (normal) temperature for a processor, because it differs from model to model and from manufacturer to manufacturer. Generally speaking, the CPU temperature in IDLE mode can range between 40-65°C and under pressure between 65-85°C. To check if your processor temperatures (at IDLE and at LOAD state), are normal, search on the WEB for other users that owns the same processor as you.
e.g.: As you see in the above screenshot, for an Intel® Core™2 Duo Processor T8300 CPU, where the maximum allowed temperature is 105°C, the average temperature (when the processor is idle), is about 56-57°C. This CPU temperature seems normal when the processor is idle, but its better to stress it to ensure.
Step 2. Check CPU Temperature when Processor is UNDER LOAD
To find out the max (average) CPU temperature, when the CPU is stressed 100%:
1. Without closing the Core Temp utility, run CPUID CPU-Z
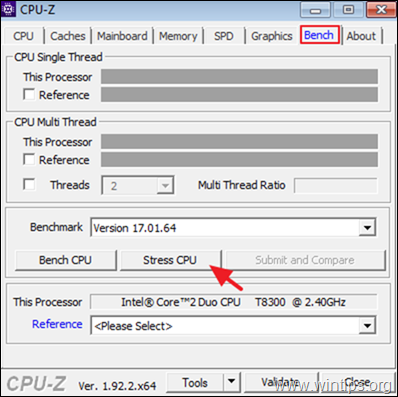
2. In CPU-Z, select the Bench (Benchmark) tab and click Stress CPU.
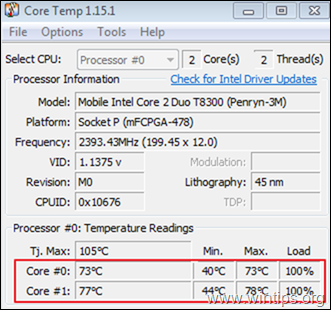
3. Now, open Core Temp and check again the average temperature of all CPU cores under 100% load. Now according the results, perform the corresponding action:
- If under 100% load, the average temperature of all the CPU cores is about the 70-80% of the maximum allowed CPU temperature (Tj. Max), leave the stress test to run for another 15-20 minutes to ensure that the CPU temperature does not grow more. If the temperature down not grow, then the CPU temp is normal but, optionally, proceed to step-3 to clean the laptop's vents from dust.
- If under 100% load, the average temperature of all the CPU cores is about the 90-95% of the maximum allowed CPU temperature (Tj. Max) and grows up, then stop the CPU-Z stress test immediately (before it reaches 'Tj. Max' temp), and continue to step-3 to clean the laptop's vents from dust.
e.g.: In this example, (where the maximum allowed CPU temperature is 105°C), the max temperature when the processor is stressed, is about 77-78°C. This is a good temperature for that CPU when stressed, but for precautions reasons its a good practice to clean the CPU vents.
How to Lower the CPU Temperature on your Laptop.
Step 3. Clean the Dust from Air Vents.
The most important cause of laptop overheating is the DUST. So, the first step to fix the overheating issue is to clean the DUST from the air vents. This can be done easily, by using a can of compressed air to clean the vents.
Requirements: Compressed air and (optionally) a vacuum cleaner.
To clean laptop's vents:
1. Shutdown your laptop and disconnect the power cable.
2. Close the lid and place the laptop upside-down.
3. Remove the Battery.
4. If you own a canister vacuum cleaner (that does not use water), remove the floor pedal and put the hose on the air vents and suck the dust.
5. When done, spray the air ducts with the compressed air.
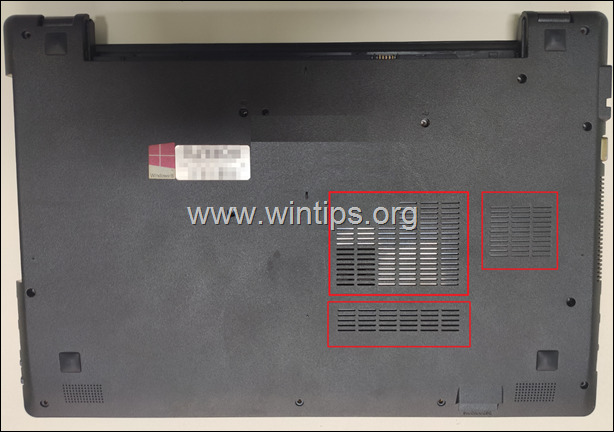
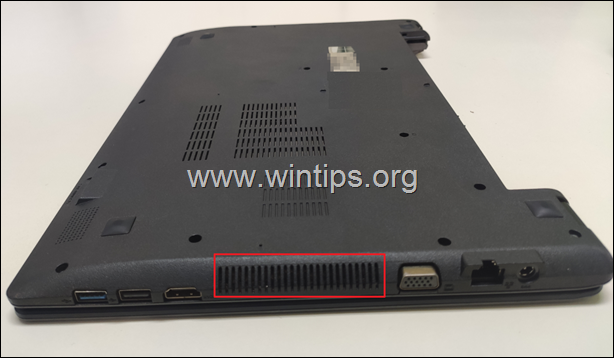
* Note: Most laptops has vents on the bottom and in the left side or in backside. So, locate and clean all of them from dust.
6. After cleaning the dust from vents, power on your laptop and perform the steps 1 & 2 again to check if the CPU temperature is significantly reduced and it is within the allowable limits, when the CPU is stressed. If not, proceed below.
Step 4. Clean the Internal CPU Cooling Unit and Change the Thermal Paste.
If your laptop still overheats after cleaning the dust from the air ducts, then you need to open the laptop cover in order to clean the dust from the CPU cooler and to change the thermal paste* of the heatsink. Since this is specialized work, I suggest it be performed by a computer service shop to avoid damage.
* Note: The Thermal Paste is used to increase the thermal conductivity between the processor and heatsink by filling in microscopic holes between the heatsink and processor.
Requirements: Screwdrivers suitable for screws on the back of your laptop, a small Brush, a dry lint-free Cloth, high purity isopropyl Alcohol & Thermal Paste.
To fix the internal cooling (if you have technical skills), here are the steps you need to follow:
1. Shutdown your laptop and disconnect the power cable.
2. Close the lid and place the laptop upside-down.
3. Remove the Battery.
4. Remove the Back Cover. *
* Note: The way to remove the back cover, varies from laptop to laptop. So, read your laptop's manufacturer service manual or, even better, check if there is a video with instructions on YouTube on how to disassemble your laptop.
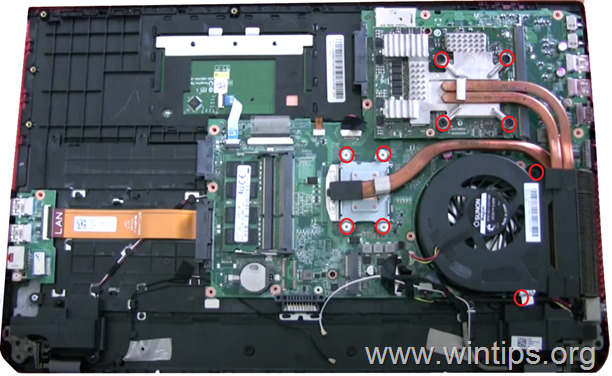
5. After opening the back cover, locate the cooling fan, and remove it from its place. To do that:
-
- Remove the cooler's power cable.
- Locate and remove all screws that secure the cooling fan and the heat sink.
6. When the CPU cooling system is out of its place:
a. Use a small brush to clean carefully the fan's wings from dust and then spray with the compressed air the wings to flow the dust out.
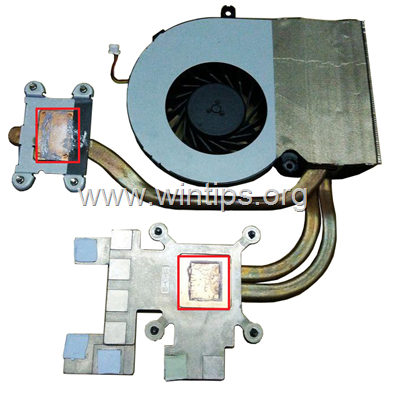
b. Use a dry lint-free cloth (e.g. microfiber), and carefully remove the old thermal paste from both the processor lid and the heatsink. *
* Notes:
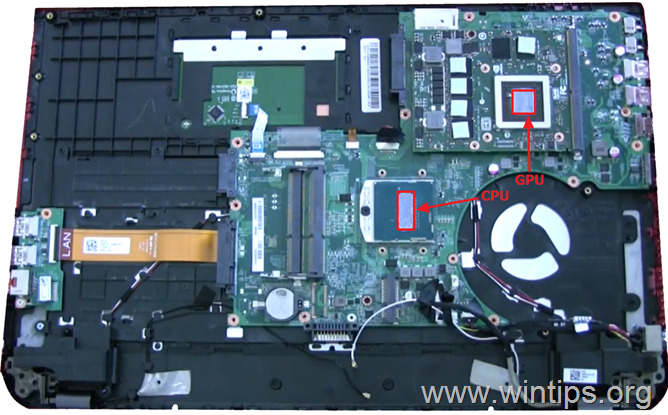
1. If the heat sink also cools the GPU chip, then you must also remove the thermal paste from the GPU chip.
2. To make the thermal paste removal easier, apply 2-3 drops of rubbing alcohol or high purity isopropyl alcohol onto the cloth.
CAUTION: Take care not to scratch the surface of the processor and heatsink when removing the old thermal paste.
c. Once you have removed the old thermal paste, apply a small quantity of the new thermal paste (about the size of a grain of rice), on the center of the processor lid. *
* Notes:
1. If the heat sink also cools the GPU chip, then you must also apply the thermal paste on the GPU chip.
2. Before applying the new thermal paste, take a look at the instructions of the manufacturer of the thermal paste, to see how to apply it. For example, if you use the Arctic Silver 5 thermal paste (which is one of the best thermal pastes I have used), navigate to this link to find out how to apply the thermal compound.
7. After applying the new thermal paste:
-
- Put the CPU cooling unit back in its place.
- Secure the CPU cooling unit with its screws.
- Connect the cooler's power cable.
8. When done, place back the back cover, the battery and the power adapter.
9. Power on the laptop and check the CPU temperature.
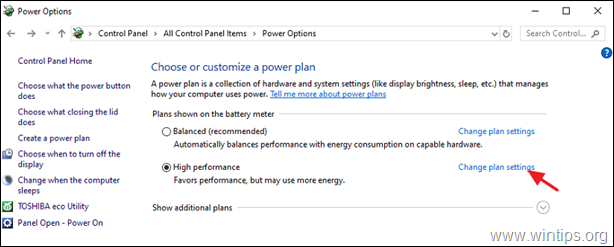
Additional help: If after performing all these steps you laptop still overheat, decrease the Processor's performance and then check if the CPU temperature is dropped. To do that:
1. Navigate to Control Panel and open Power Options.
2. Click Change plan settings.
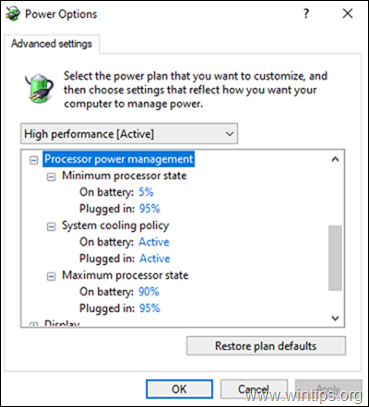
3. Click Change advanced power settings.
4. Under Processor power management:
- Set the Minimum processor state when Plugged in to 90 or to 95%
- Set the System cooling policy to Active
- Set the Maximum processor state when Plugged in to 90 or to 95%
5. When done, click OK to save the changes and check the CPU temperature under stress.
* TIP: If your laptop has a backlit keyboard, then turn it off.
That's it! Let me know if this guide has helped you by leaving your comment about your experience. Please like and share this guide to help others.
We're hiring
We're looking for part-time or full-time technical writers to join our team! It's about a remote position that qualified tech writers from anywhere in the world can apply. Click here for more details.
- How to Disable or Remove BitLocker from Windows RE. - April 24, 2024
- FIX: Error 0x8007025d in Windows 10 Update. - April 22, 2024
- How to Disable Device Encryption in Windows 11/10. - April 17, 2024

