How to Install Windows 11 from USB on TPM v1.2 devices.
This tutorial contains instructions on how to clean install Windows 11 from USB on devices with TPM version 1.2 and with an unsupported CPU.
If your computer supports TPM v1.2* and you can't install Windows 11 from USB because you get the error message "This computer cannot run Windows 11. This computer does not meet the minimum system requirements to install this version of Windows," continue reading below to fix the problem.
* Note: If your computer does not support any TPM version (TPM v1.2 or TPM v2.0), read the instructions on this article: How to Update Windows 10 to Windows 11 without TPM 2.0 or TPM 1.2.
How to Bypass TPM V2.0 requirement to Install Windows 11 from USB on Devices with TPM V1.2.
Requirements:
- A Windows 11 USB installation media: To create the installation media use the instructions on this article: How to Download Windows 11 ISO or USB.
- The computer must support at least TPM v1.2. If your computer does not support TPM 1.2 either, then you can install Windows 11 only after you create a Windows 11 installation media using the instructions in method-3 of this article.
To install Windows 11 on a computer without TPM 2.0 but with TPM 1.2
1. Boot your computer from the Windows 11 USB installation media.
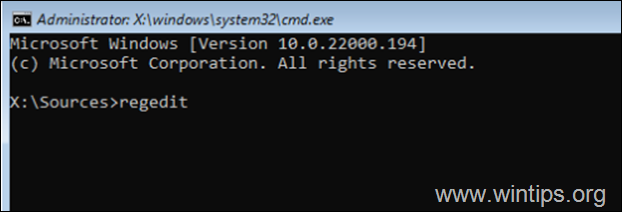
2. At the first Windows Setup screen press SHIFT + F10 to open command prompt.
3. At command prompt, type regedit
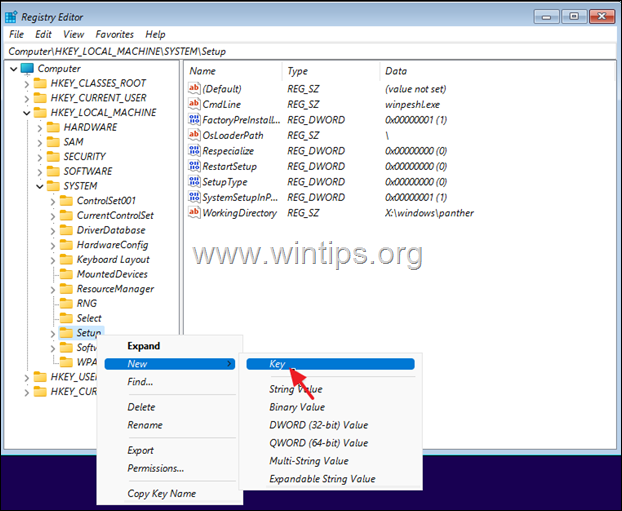
4. In Registry Editor navigate to this key:
- HKEY_LOCAL_MACHINE\SYSTEM\Setup
5. Right-click on the Setup key and choose New -> Key.
6. Name the new key LabConfig and press Enter.
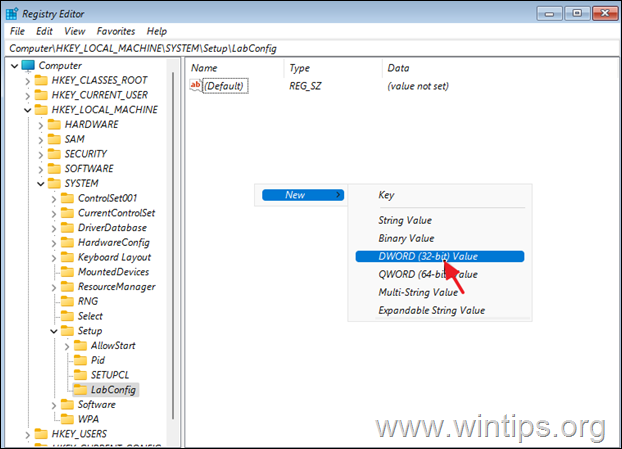
7. Select the LabConfig key on the left.
8a. Right-click at an empty space on the right pane and choose New > DWORD (32-bit Value)
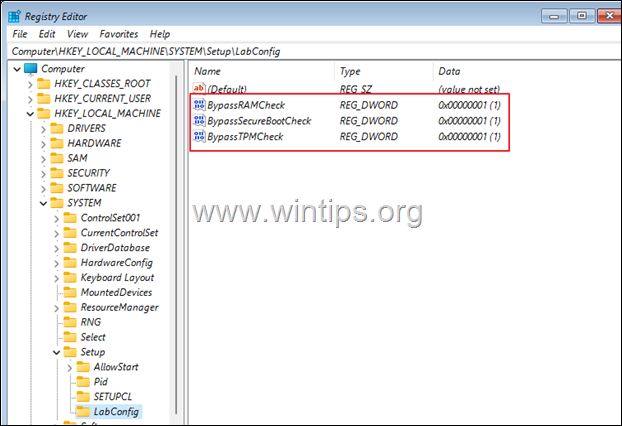
8b. Name the new value BypassTPMCheck and press Enter.
8c. Repeat steps 8a & 8b and create two more values with names:
- BypassRAMCheck
- BypassSecureBootCheck
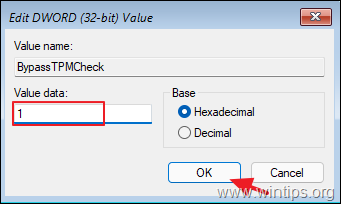
9. Now, open one by one the three newly created values and type 1 at the value data box.
10. After all modifications, you should have the image on your screen:
11. Close the Registry Editor and the command prompt windows.
12. At the Windows setup screen, choose your Language, Time – Currency and your keyboard input method and click Next.
13. Finally, click Install now to start the installation of Windows 11. *
* Note: If you want to view instructions for the next steps of the installation, visit this article.
That's it! Let me know if this guide has helped you by leaving your comment about your experience. Please like and share this guide to help others.
We're hiring
We're looking for part-time or full-time technical writers to join our team! It's about a remote position that qualified tech writers from anywhere in the world can apply. Click here for more details.
- FIX: Numeric keypad Not Working on Windows 10/11 - July 24, 2024
- How to Share Files or Printers in Hyper-V? - July 22, 2024
- How to invoke Hyper-V Screen resolution prompt? - July 17, 2024



![image_thumb[52]_thumb image_thumb[52]_thumb](https://www.wintips.org/wp-content/uploads/2021/10/image_thumb52_thumb_thumb-1.png)


