How to Recover Files from a Damaged or Inaccessible disk by using TestDisk.
When your hard drive with all your important data is damaged, then all your data becomes unavailable and you cannot access them anymore. For all of us that have been in a such a situation, it was a nightmare and we realized that the simple job of always keeping a recent copy of our critical files to another media is the most important lesson that we must always have in our minds and the most important action to always perform. In this article you can find instructions on how to recover files from a damaged disk.
It is possible to retrieve data stored on a damaged disk?
First of all you should know that when your disk is damaged (so you cannot access your data) this means two things:
1. Hardware problems: A hardware disk damage means that the disk’s hardware components are malfunctioning. To trace your hard disk’s hardware problems a common method is to listen carefully on your hard disk for any noises that come from your hard drive when your Operating System (or you) tries to access it. If you don’t hear any noise at all or if you hear a repeated clunking, it means that there is probably a physical damage on your hard disk. At this case, the best choice you have, is to go to a data recovery professional in order to retrieve your data, but before you do that, you can try the steps described in this article, to find out if you have a chance to recover your files yourself.
2. Software problems: A software problem means that your Operating System detects the damaged drive {(Hard drive (HDD), USB Disk, Pen drive, etc.) but you cannot access the data on it. A software malfunction can happen for several reasons: e.g. power corruption, forced removal of your storage device (e.g. external USB hard disk, USB pen drive, etc.) without prior using the safely remove option, or because your hard disk's health is decreased during working time. If you ‘re in such a situation, keep reading this article to find out how to recover your files.
How to recover data from an inaccessible hard disk or other storage device (HDD, USB Disk, SD card or Pen drive).
Before you continue to the steps below, first make sure that your disk can be recognized from your computer. To confirm that, log on to your OS and look at “Disk Management” to see if your disk is listed there. To do that:
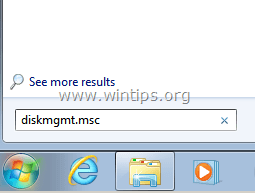
– Simultaneously press Windows key + R to open run command box.
– Inside the Search (run) command box, type: diskmgmt.msc and press Enter.
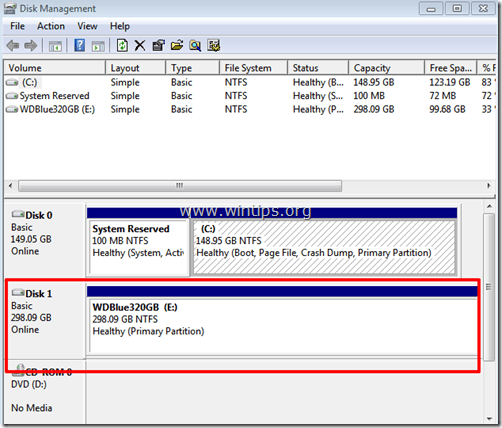
– In Disk Management window see if the damaged disk is listed (See screenshot example).
If your disk is recognized* in Disk Management, but you still cannot access your files because of:
– Previous Forced Removal of the storage device (without using “Safely Remove” option), then follow the steps in this article to recover the files to another destination and then try to restore the corrupted partition table by using the instructions in this article: How to fix: You Need to Format this Disk Before You Can Use It
– Other (unknown) reason(s) then continue to the steps below to recover your missing files (Data).
* Note: If your disk isn’t recognized in Disk Management and you are sure that you have connected it properly with your computer, then you have to attend on a data recovery professional for data retrieval.
How to Restore Lost Data (files) using TestDisk.
In order to restore files from a damaged disk you have to download the TestDisk utility.
TestDisk utility is a powerful FREE data recovery software! It was primarily designed to help recover lost partitions and/or make non-booting disks bootable again when these symptoms are caused by faulty software, certain types of viruses or human error (such as accidentally deleting a Partition Table).
Attention: Keep in mind that you follow this guide at your own risk and you have to be very careful with the steps on it, to avoid losing your data.
Step 1. Download Testdisk utility to your computer.
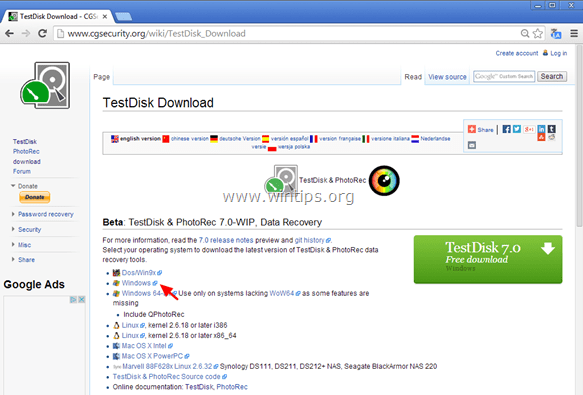
1. Navigate to http://www.cgsecurity.org/wiki/TestDisk and download Testdisk utility.
2. Click to download the TestDisk version according your OS. (e.g. Windows).
3. When download operation is completed, navigate to your download location folder and right-click on “testdisk-7.0-WIP.win.zip” compressed file and select “Extract All” to un-compress its contents.
.
Step 2. Use Testdisk utility to recover files.
In this step, you can learn how to use TestDisk, for file recovery (restore files from the damaged hard drive).
1. First of all, connect the damaged hard disk drive (HDD) on your computer.
2. Now explore “testdisk-7.0-WIP.win” folder contents and double-click to run the “testdisk_win.exe” application.
2a. Click “Yes” at UAC warning message.
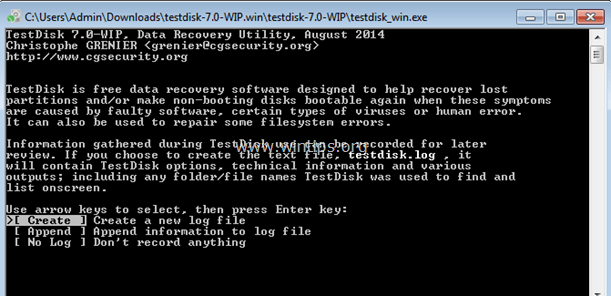
3. At the TestDisk utility first screen, press “Enter” at the highlighted “Create” option.
4. Wait until TestDisk scans your computer for connected disks.

5. Using the keyboard arrow keys CAREFULLY select the damaged hard disk drive and press “Enter” to ‘Proceed’ to disk analysis.
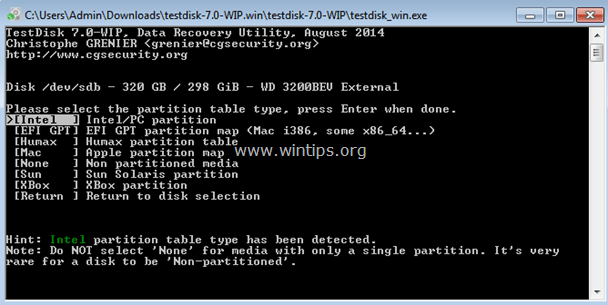
6. At the next screen select (using the keyboard arrows keys) the partition table type (e.g. Intel) and press “Enter”.*
* Notice: At this point, TestDisk utility (usually) recognizes the correct partition table type and highlights it automatically. For Windows OS the partition table type is “Intel”.
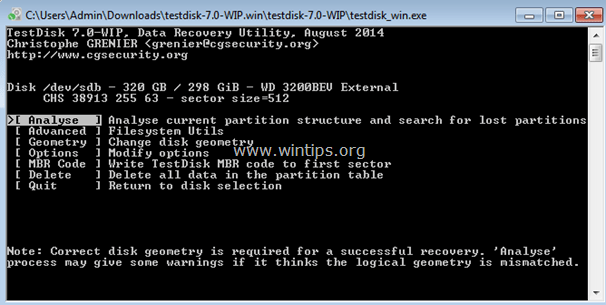
7. At the next screen press “Enter” at the “Analyze” option and let TestDisk utility to analyze your HDD and find the lost partition table structure.
8. After disk analysis, TestDisk should display the current partition structure. Press “Enter” again and let TestDisk to “Quick Search” your disk for lost partitions.
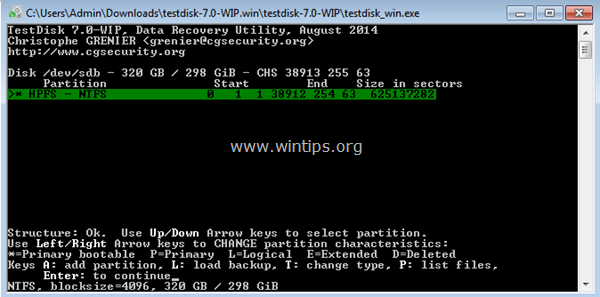
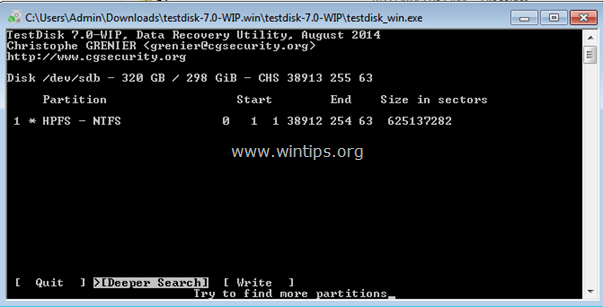
9. If TestDisk can locate the lost partition(s), during ‘Quick Search’ operation, then you will see a similar screen like below. Press the “P” key letter on keyboard to ensure that the partition found contains your files.
10. At this point two different things (cases) can happen:
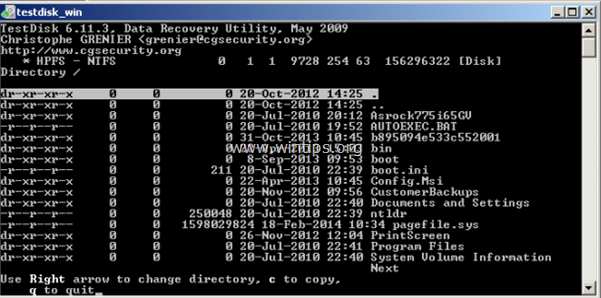
Case 1. If you can see a list of your lost files on your screen like the screenshot below, continue to Step 3.
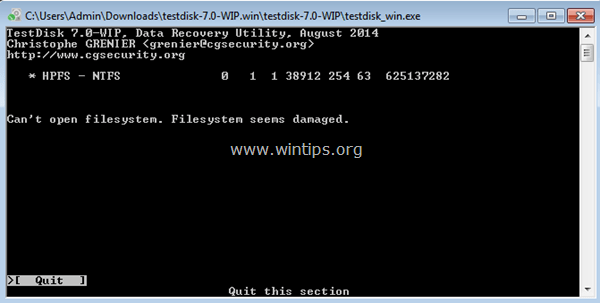
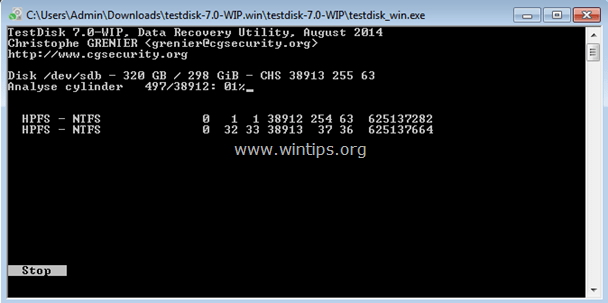
Case 2. If the TestDisk cannot open (recognize) the filesystem or the filesystem is damaged then you have to perform a deeper search using TestDisk utility to find lost partitions. To do that:
a. Press “q” to quit this section and return to the previous one.
b. At the previous section screen, press “Enter”.
c. Press “Enter” one more time to perform a “Deeper Search”.
d. Now be patient until TestDisk analyzes your disk. (This operation may take some time).
e. When the Deeper Search operation is completed, press “P” again to see if your files are listed. If you files are listed, then continue to the next step.
Step 3: Copy your files from the damaged disk to a different storage device.
1. After successful recognition (listing) of your files as described before, press the "a" key on your keyboard to select all files found and then press the "C" key to copy all files. (Suggested option).
OR
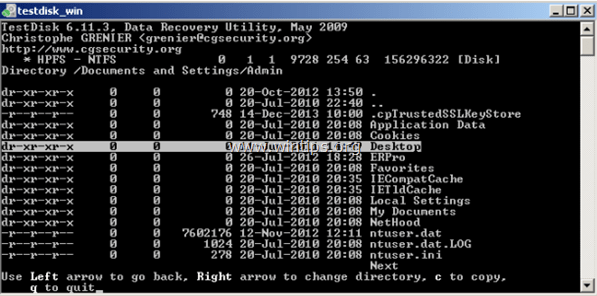
Use your keyboard ‘UP’ & ‘DOWN’ arrow keys to find the folder that you want to recover its contents and then press the "c" key, to copy the current file/folder. *
* Note: If you want to explore the contents of a folder, then after navigating to the folder and then press the Right arrow or Enter Key.
2. Then press the C key to copy all selected files.
Available options:
- Press h key to hide the deleted files/folders.
- Press : to select the current file/folder.
- Press a to select all files/folders.
- Press c key to copy the current file/folder.
- Press C key to copy all the selected files/folders.
- Press q to quit
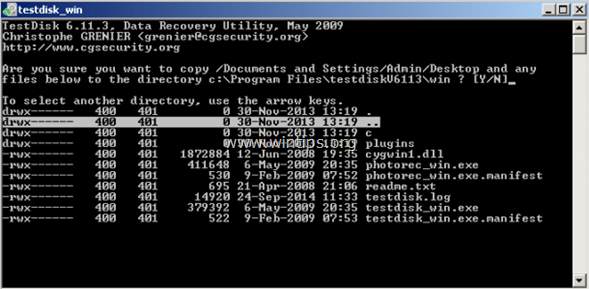
2. Now you have to select (specify) a new destination folder to copy your files. At this point:
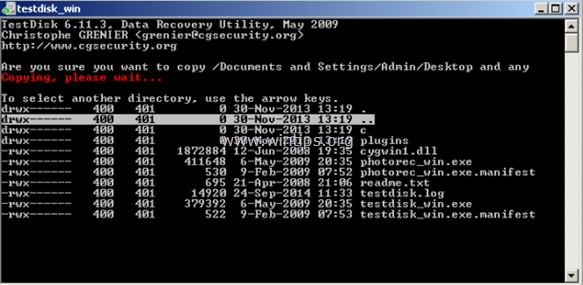
– Press “Y” to start copying the selected folder(s) and its contents to the default destination*
* The default destination (for the copy process) is the folder where “TestDisk” is running from. (the location where you extracted “testdisk-7.0-WIP.win.zip” file in step 1).
OR
– Press "N" and use your keyboard Arrow keys to select a different destination to store the selected files/folders, and then press the "C" key to start the copy process.
3. Now be patient until "TestDisk" copies all the chosen files from your damaged disk to the new destination.
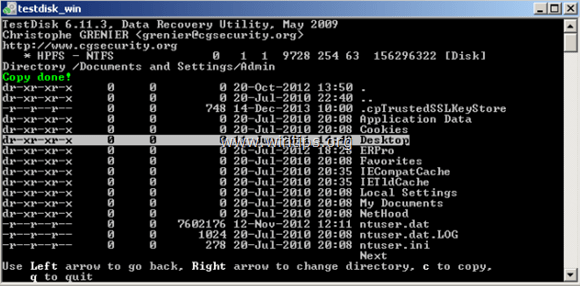
4. When the copy operation is done, you should see a “Copy Done!” message.
Next, if you want to recover a different folder (or file) from your damaged disk, then repeat the same steps to do so, OR press the “Q” key several times to quit the “TestDisk” utility.
5. Finally, navigate to the destination location to find your missing files.
You ‘re done! If you follow the above procedure correctly and with a little luck, you should successfully recover all your files from the damaged storage device! ![]()
We're hiring
We're looking for part-time or full-time technical writers to join our team! It's about a remote position that qualified tech writers from anywhere in the world can apply. Click here for more details.
- FIX: Numeric keypad Not Working on Windows 10/11 - July 24, 2024
- How to Share Files or Printers in Hyper-V? - July 22, 2024
- How to invoke Hyper-V Screen resolution prompt? - July 17, 2024









January 18, 2024 @ 4:29 am
Great utility! Is there a way to use TestDisk to remove the files from the corrupted disk? I'm copying groups of folders/files at a time to another drive. I'd like to delete the files/folders as I go.
October 24, 2023 @ 6:37 pm
Is it possible to copy the files to be recovered within the partition itself but with the file system restored? It happens that in Linux the partition appears but it tells me "unknown format" when it was originally NTFS.
It broke in a partition resizing process, the power went out in the middle of the process and it was damaged.
October 25, 2023 @ 9:24 am
No, it is not possible and it is not safe to copy the recovered files to the same disk.
January 28, 2022 @ 7:09 am
Just to point out, testdisk exists for Linux too, over the years I've had 3 or 4 drives where they really went to lunch, start getting plenty of read errors. testdisk to the rescue! If you have a few bad sectors, fsck (linux scandisk/chkdsk equivalent) works a treat, it uses a spare copy of whatever filesystem info to rewrite the bad sector, the drive either finds the sector isn't bad once it's written to it, or finds it still is bad and maps it to a spare. No more bad sector and you're good.
But if you start getting disk-failure quantity bad sectors, fsck just makes things worse, current drive I'm recovering fsck put ore and more stuff in lost+found, then deleted the root directory "/", so Linux will not mount it. Testdisk doesn't care though, the stuff is stuck in lost+found but on this filesystem Linux won't even mount, it's only had 1 error and like 20000 successful files recovered so far (4TB disk so it'll take a while.)
May 6, 2019 @ 1:58 am
Nice guide, thanks.
October 25, 2018 @ 1:18 am
Test disk does not find my drive letter E:, what can I do?
October 25, 2018 @ 9:52 am
@Leonard: If Testdisk is unable to identify your drive, the damage on the disk is serious and you will not be able to retrieve files. However you can try with another program to recover your files. For that task see this article: How to Recover Data from RAW Hard disk, USB Disk, SD Card
July 14, 2018 @ 2:01 pm
Hi, my external disk was found, but after "proceed" was message – partition: read error, after "quick search" – no partition found or selected for recovery, after "deep search" – nothing. Is it possible to do something?
July 16, 2018 @ 10:30 am
@etako: Unfortunately No. The disk is completely damaged.
July 10, 2018 @ 2:26 am
It didn't work with my pasword-encrypted Buffalo HD-PNTU3. My files are recognized in the disk but nothing fixed up after rebooting PC. Is it because of the password?
July 10, 2018 @ 9:03 am
@Arruouelle: Of course it is because of the password-encryption.
November 14, 2017 @ 10:49 am
After i copy the folder i want to recover it says i dont have permision to open that folder.. I dont know what else should i do..
November 14, 2017 @ 5:31 pm
@Daniel Zajac: You have copied the folder or not with TestDisk?
February 13, 2017 @ 11:05 am
Hi, I could locate some directories but not the recent folder that I created in the last few days, which is the folder that i want the most… It was in an external hard drive and automatically detected "none" as non-partitioned. (Pressing the Down Arrow key would have no use since I can see all the directories within half a screen). Any idea how to recover the folder i saved yesterday? Thanks!
February 13, 2017 @ 3:32 pm
@Pucca: in which location you have created the folder? the only method to see all the listed files is by using arrow keys. Can you use the arrow keys in another program?
October 25, 2016 @ 5:38 pm
This worked! Thank you so much!!!
October 18, 2016 @ 4:50 pm
My Win 7 Home Prem. 64-bit laptop HDD became unbootable.
I removed the HDD and mounted to a USB docking station, connected to a Win 7 Home prem. desktop PC (where the drive showed up as F:\), tried to read file structure and got the "must be formatted" message. Tried the technique at https://www.wintips.org/how-to-recover-files-from-damaged-inaccessible-disk/. Disk management result:
(F:) Layout:Simple Type: Basic File System: RAW Status: Healthy (Primary Partition) Capacity (and Free Space): 687.55 GB %Free: 100% Fault. . .: No Overhead…: 0%.
Unsure what RAW meant, I proceeded to use testdisk. At step 6, "{None ] Non partitioned media" was pre-selected. This was the first departure from the scenario in the article.
I changed the selection to "Intel" and ran steps 7 and 8. At step 8 (quick search) the program began testing the "cylinder(s) as shown in the image for Step 10 (not 9) Case 2, part d. One error message was generated early on (the first 5% or so) which disappeared after the scan completed. At 100% I got this from disktest:
Drive F: -738 GB / 687 GiB – CHS 89753 255 63
Partition Start End Size in Sectors
!(no entries in these fields)! and the following choices at the bottom:
Keys A: add partition. L: load backup. Enter: to continue
I'm not sure how to go forward from here without losing files. Deep Scan? Something else?
October 18, 2016 @ 5:05 pm
@Paul Lundstrom: I think that your disk is hardware damaged. Try to recover your files by using one of the other programs mentioned on this post: https://www.wintips.org/how-to-recover-data-from-raw-disk-hdd-usb-sd/
May 8, 2016 @ 10:12 am
I managed to recover a few files that came on the screen. The rest of the files the files did not come on the screen.
October 4, 2016 @ 5:25 pm
@Charles Sikwila: Use the Down arrow key, to see all the files.
March 20, 2016 @ 12:31 pm
hello this all work when i go into deep search. i can see all my files i need to copy but when i go to copy them to a new folder in my desktop it fails to cop the files.. what is my next step
March 31, 2016 @ 12:31 pm
@stinky pinky: (Sorry for my late answer) Try to recover the files from your disk with "EaseUS Data Recovery" by using these instructions: https://www.wintips.org/how-to-recover-deleted-missed-files-even-after-disk-format/
September 6, 2015 @ 5:10 pm
its working fine … thanks … :)